
Recommendations for making different types of bulk snowflakes.
Contents
- How to make a 3D snowflake 3D for the New Year from paper?
- 3D snowflakes from paper with your own hands: step by step instruction
- Types of bulk snowflakes - origami: photos
- 3D snowflakes from strips of paper:
- schemes Beautiful volumetric snowflakes - balls: diagrams, photo
- Large bulk snowflakes from paper:
- templates Video: Volumetric snowflakehands
Before the New Year there are some couple of weeks, which means that it's time to think about how you will decorate your house. If you think that Christmas trees and festive garlands will be enough, you are deeply mistaken. Forest beauty can become a decoration of the living room, but in all other rooms the festive mood will not be felt.
If you want to recreate the New Year's atmosphere in every corner of your house, then do not be lazy and decorate everything around New Year's attributes. Best for this fit three-dimensional snowflakes from paper. And although this decor at first glance seems very simple, it is he who can turn your house into a fairy-tale snowy kingdom.
So find in your busy work schedule a little free time, stock up on white paper and scissors and start creating a New Year's fairy tale for yourself and your family.
How to make a 3D snowflake 3D for the New Year from paper?
 3D Snowflake 3D
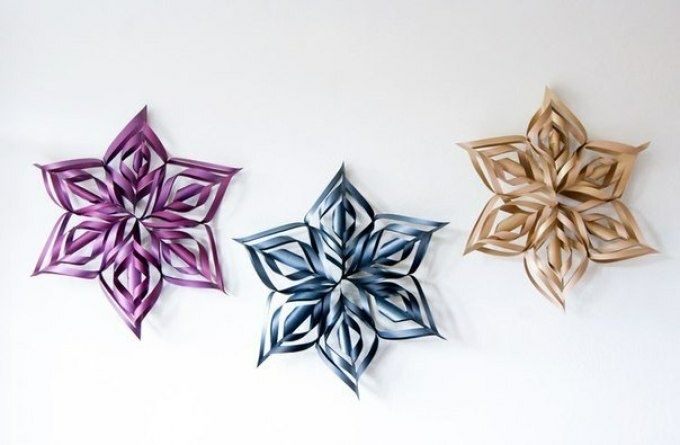
 If you want to really surprise your household, then decorate the house with 3D 3D snowflakes. Such a craft, depending on the size, can be placed on a tree, window, wall or even furniture. Very beautiful will look like a garland made of such man-made decor.
Try to make different sizes of snowflakes and fix them on the thread so that they are all at different levels. If you are not too lazy and make a few of these garlands, you can make an imitation of snow in some room.
Materials for making 3D 3D snowflakes:
- White paper( you can use any other color if you wish)
- Stationery stapler
- Paper scissors
- Ruler and simple pencil
- Any glue
Recommendations for manufacturing:
 Drawing No. 1
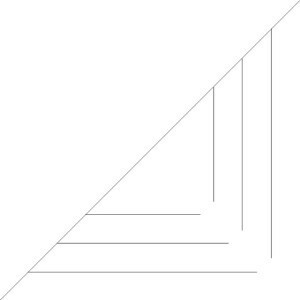
 - First of all,the manufacture of a stencil, with which you can later make individual blanks of the future decoration. To do this, take a thick sheet of paper( you can even cardboard) and draw six straight lines at right angles on it. Make sure that they are placed on the sheet parallel to each other and do not intersect anywhere. Draw them at a distance of 1 centimeter from each other.
 Drawing No. 2
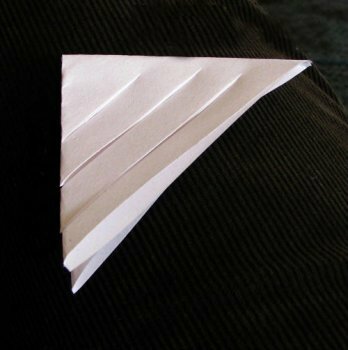
 - After this, take six sheets of the same size( square shape), fold each of them individually diagonally and cut them into three sections using a pre-made stencil. If you did everything right, then you should have six isosceles triangles with parallel cuts on your table.
 Drawing No. 3
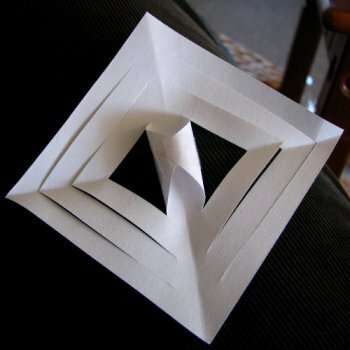
 - Take one of the blanks and carefully unfold it. On the table in front of you should lie a square consisting of several smaller squares. The corners of the smallest square( it is in the center of the workpiece) should be carefully tucked to the center and fastened with glue.
 Drawing No. 4
 - After this, the sheet must be turned to the next side and in the same way fixed the free corners of the next square. Continue these actions should be until the time you do not get a semblance of multilayer icicles. So you need to glue all the remaining five parts.
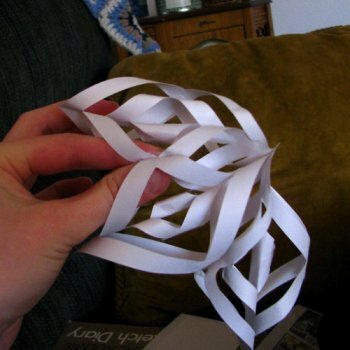 Figure # 5
 - Next, we take ready icicles and carefully with a stapler we fasten them together. We do this in two stages. First we fix three icicles in one. Then, with the same stapler, we fix the two halves formed between each other. Do everything as neat as possible, but do not feel sorry for the brackets, if you do not fix them properly, the finished product will simply fall apart.
Volumetric snowflakes from paper with their own hands: step by step instruction
 Step-by-step instruction
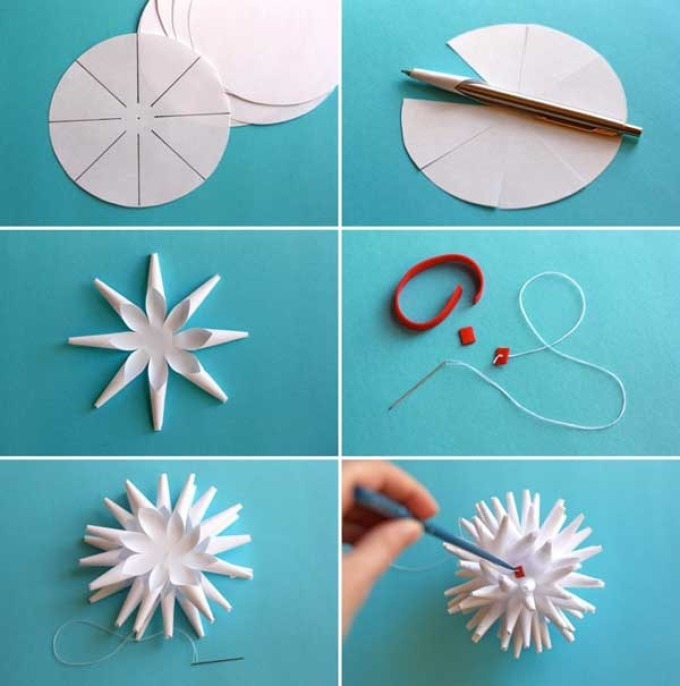
 Volumetric snowflakes always look very nice, but unfortunately, it takes a lot of time to make them. In view of this, if you want to decorate your house for the New Year with such a festive entourage, then try to make a simpler version of the three-dimensional decoration. It will have a slightly different forum, but most importantly, you will spend your minimum of time on it.
Materials:
- Sheets of paper
- Thread and needle
- Compasses
- Pencil and ruler
- Fabric of red or yellow
Fabrication rules:
- Take a sheet of paper and draw on it four identical circle diameters. For the production of small snowflakes, a diameter of 5 centimeters will suffice, and for the creation of larger products this figure can increase even up to 10 centimeters.
- Draw the circles carefully with scissors, and then use a ruler and a pencil to separate each circle individually into eight equal parts. On these lines the workpiece will have to be cut with scissors from the edge to the center.
- Then the ends of the formed petals should be carefully bent to the center and fixed with glue. If you can not get the correct shape of the petal, try to help yourself with a simple pencil.
- So make three more such paper flowers, and then start fixing all the blanks with each other. This can be done with the help of glue or take a thread with a needle and just sew all the parts of the snowflake.
- In order for such a snowflake to look finished, be sure to cut out a small circle from the fabric and attach it in the center of the product. If there is a desire, you can decorate it a little with sequins and small buds.
Kinds of bulk snowflakes - origami: photo
 3D snowflake
 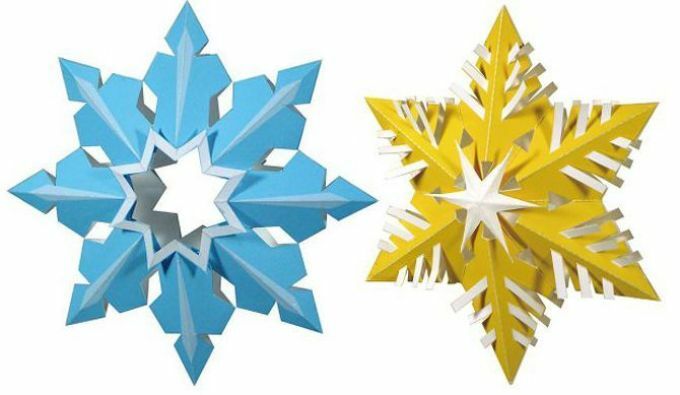 Two-colored origami
 - Many of us origami is associated with something very complicated and incomprehensible. But in fact, this technique simply requires a little more concentration than any other man-made process. Therefore, if you show very little patience, you can certainly make bulk snowflakes in this way. But in this case there are several methods for creating New Year's adornments.
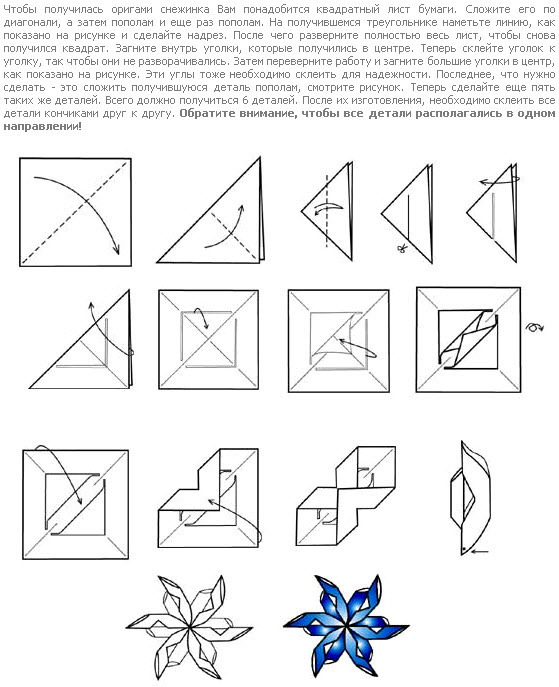 Snowflake-origami
 - The first form is usual origami, which involves folding paper sheets in a certain order, after which it turns out a three-dimensional product with a 3D effect. In this case, you do not have to glue and fix anything. All that you will be required to create an ornament, just put it right.
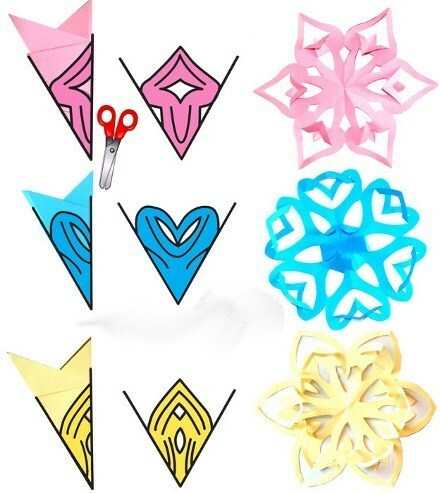 Snowflake-karigami
 The second and more complex kind of this technique is the so-called karigami. In this case, the process involves both correct folding of the sheet and the most accurate cutting of the pattern. If you make such a snowflake-origami for the first time, then it will be better if you first draw a future pattern and then start to cut it.
You can do this as a standard scissors, or manicure. The last option for beginners is preferable as they will enable correctly cut the most intricate pattern. After the carving you will only have to bend some parts and a three-dimensional snowflake-carigami will be ready.
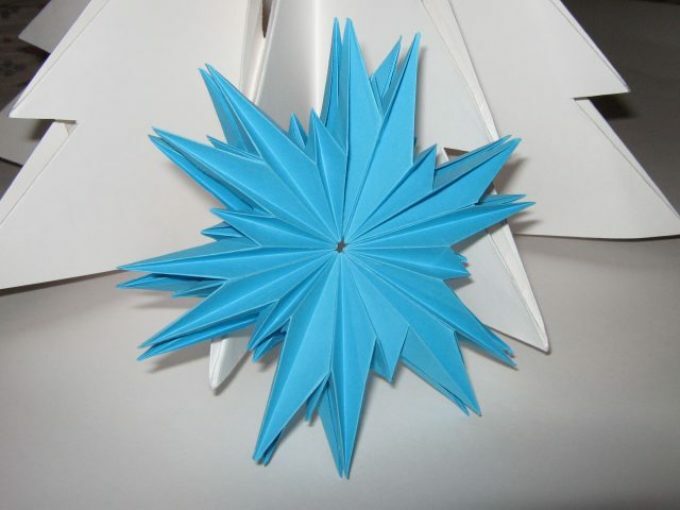
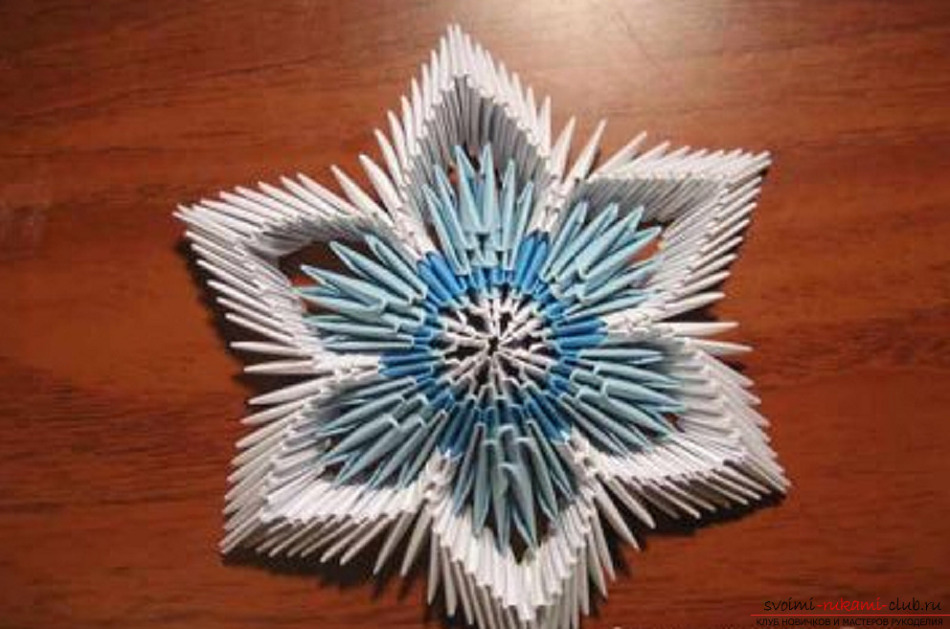 Modular snowflake
 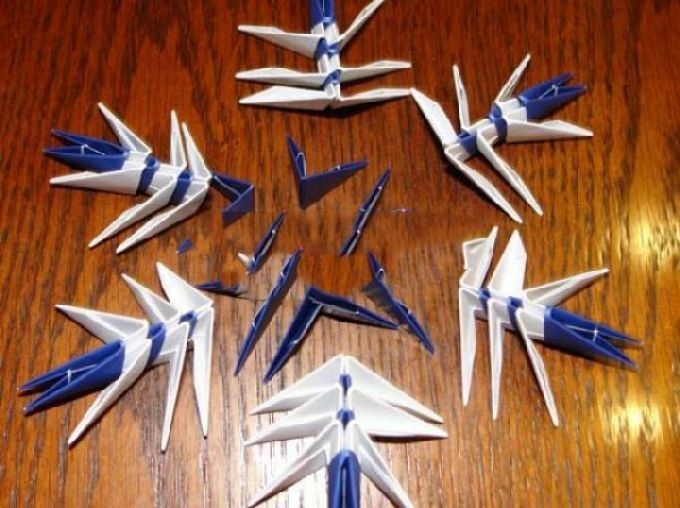 Elements of the modular snowflake
 - The last way to create snowflakes is the most difficult, but finished jewelry turns out to be truly fabulous. This kind is also called modular origami. In this case, you first have to make quite a few different small parts, and then in the correct order to connect them. The downside of this method of origami is that if during the connection you allow the most minimal error, then it is quite bad to spoil the visual perception of the decoration.
Bulk snowflakes from strips of paper:
 schemes A volumetric snowflake in the form of a star
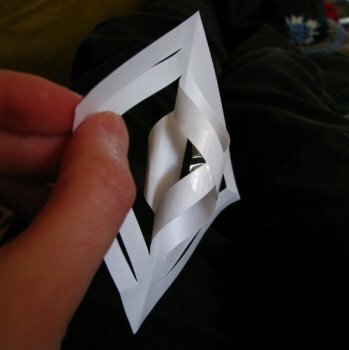
 If you want to get the most volume snowflake, then make it from paper strips. In this case, you can independently regulate how much this or that part of the product will perform, but most importantly, you do not have to keep track of how you bend or draw lines all the time.
To create this decoration you will need scissors, glue and thin strips of paper of any color. If you want to make the most airborne snowflake, then use for its production of strips with a width of 3 to 5 millimeters. In case you plan to decorate the house with large volume snowflakes, then cut strips with a width of 8 millimeters.
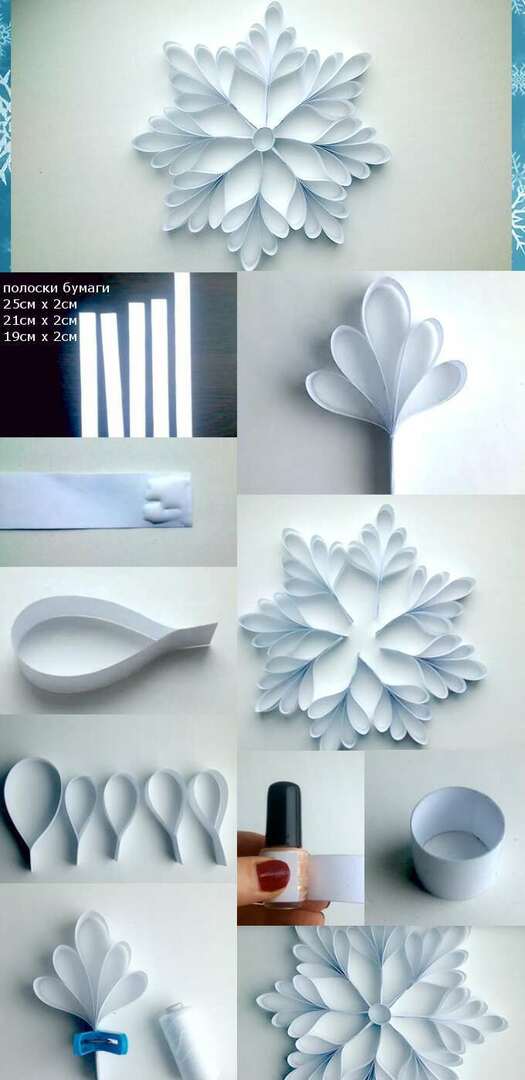 Scheme №1
 Volumetric snowflakes from strips:
- So, first of all we take a sheet of paper and cut off from it five strips of the same width. The length of these blanks will be different. In order to make one part of the snowflake you will need 1 strip of 25 cm long, 2 of a length of 21 cm and two of 19 cm.
- In the next step, we grease the ends of the workpieces with glue and carefully fasten them. We let the petals dry out a little, and then we begin to form a three-dimensional leaf. Be sure to check whether all the parts are fixed to each other and if necessary, then additionally fix them with a thread or an ordinary clothespin.
- Thus, we make at least eight paper leaves. If you want the finished product to be more voluminous, then make 10 or 12 leaves. Allow the workpieces to dry thoroughly and begin to assemble the product.
- Cut a strip of 1 cm wide from the thick paper and glue it into a circle. To this circle, it is necessary to carefully attach all previously made blanks. If you see that the design is not very strong, then try first to glue the leaves together and then fix them on the core.
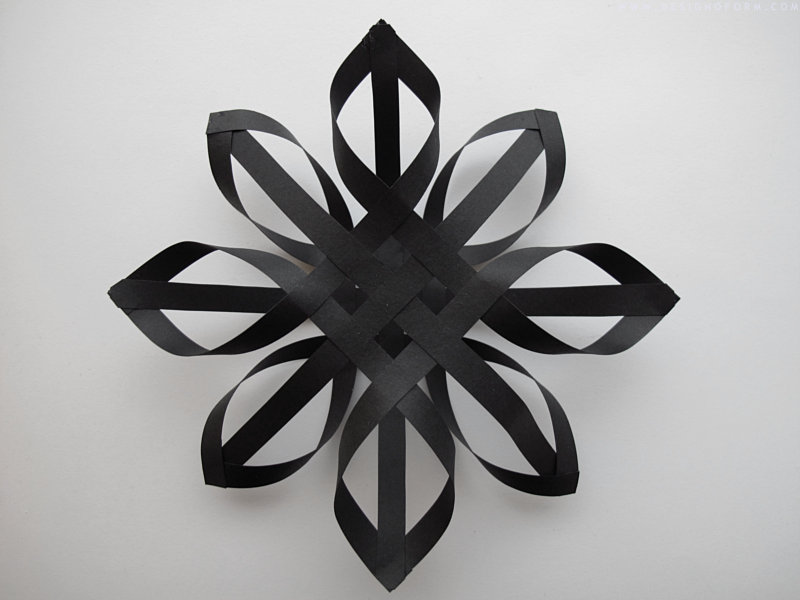
The next way to create a 3D snowflake is considered to be quite complicated, but still if you decide to make a decoration with this method, the result will be satisfied( Scheme # 2).To create an average decoration size you will need 6 strips 25 cm long, glue and paper clips.
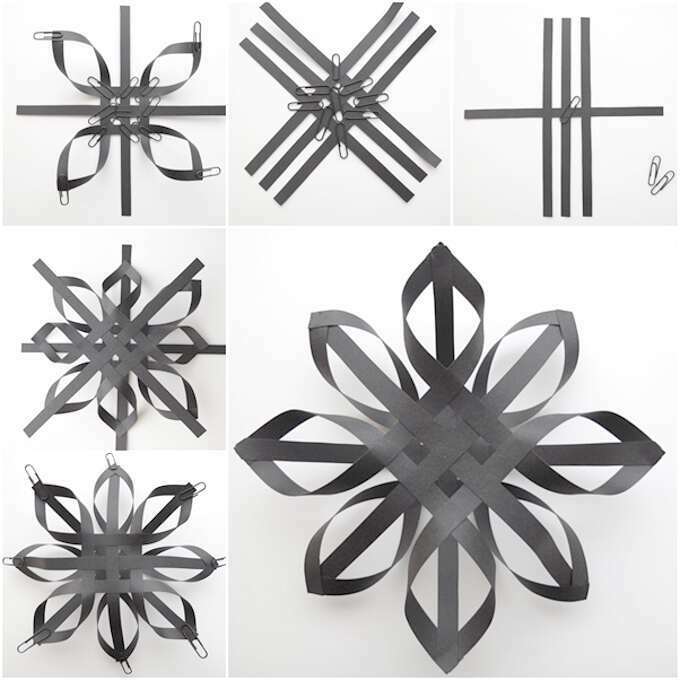 Scheme №2
 So:
- At the first stage we begin to interlace the strips among themselves so that a square forms in the center. We fix each strip with glue or a paper clip.
- In the second stage we begin to connect closely located strips to each other. To do this, their ends are first glued with glue, and then carefully fastened together. After these actions you should have a kind of leaf.
- We thus form the three remaining pieces of the workpiece and proceed to create another such part of the snowflake. After it is ready, you will only have to put them together so that visually your product resembles a flower. After the glue dries, the clips can be removed, and the snowflake can be hung on the Christmas tree or fastened to the window.
Beautiful volumetric snowflakes - balls: charts, photos
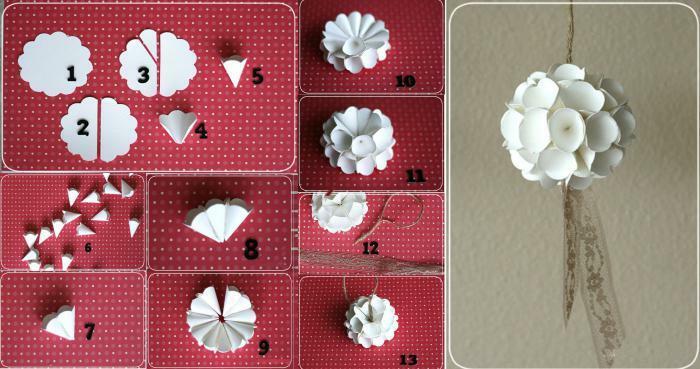 Photo №1
 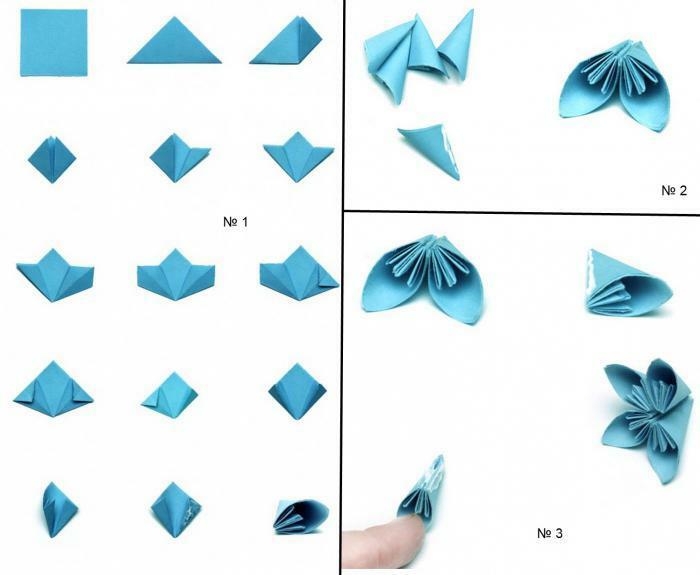 Фото №2
 A little bit below we will tell you how to make a Christmas snowball-ball made of colored paper. In case you want it to look more like a snowflake, then before you start gluing all parts of the product together cut an interesting drawing on them. This will help make the decoration easier, airy and festive.
Recommendations for manufacturing :
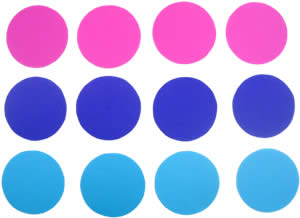 Figure # 1
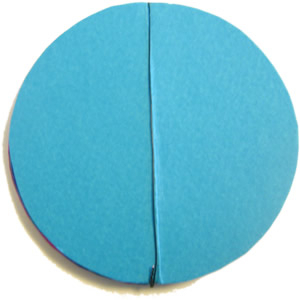
 - Take a paper of any color and draw 12 circles on it. In order for your Christmas decoration to be perfect, they should all have the same diameter.
 Drawing No. 2
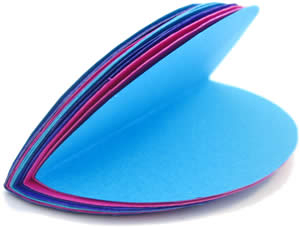
 - Bend all blanks in half and fold them into one neat little pile. If you use multi-colored paper to create a snowflake-ball, then do not forget that colors must necessarily alternate.
- Put this blank for a while under anything heavy and leave it there for 10-15 minutes. During this time, the line of inflection of the circles becomes very noticeable, and you can correctly fix them among themselves.
 Drawing No. 3
 - To do this, carefully straighten the workpiece, and then use a stapler to connect all twelve pieces together. Make sure the staples are on the fold line.
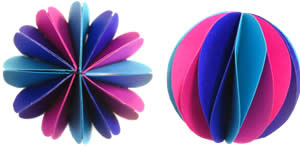 Figure # 4
 - When you are done with this process, you can proceed to create the form. Spread the circles and start using glue to glue them together. Connect them in such a way that each individual half of the circle on one side of the horse, and on the opposite side of the bottom was attached to the adjacent part of the product.
Large bulk snowflakes from paper:
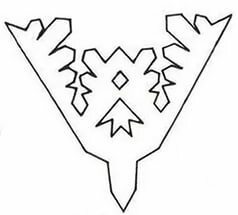 templates Template №1
 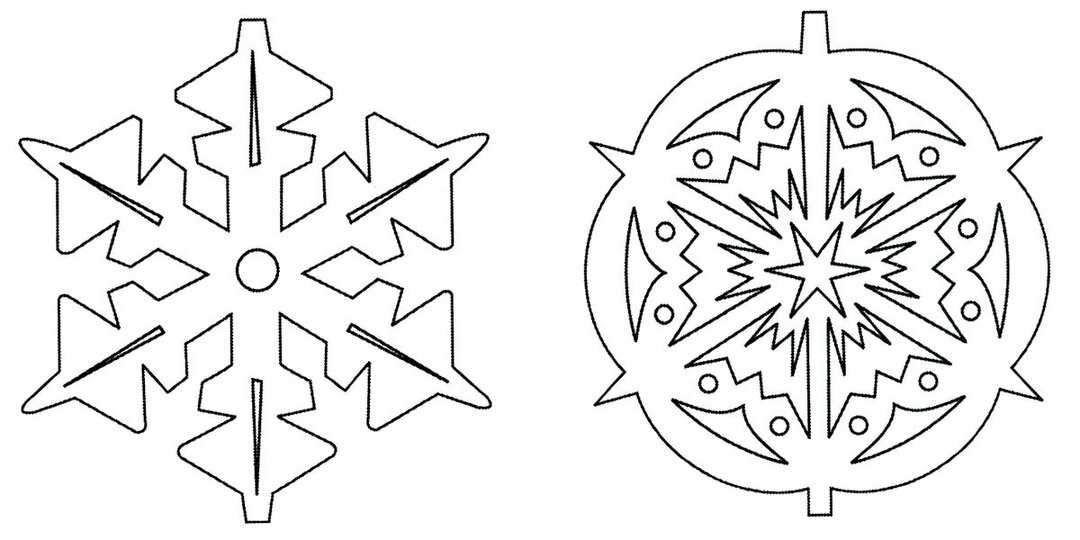 Template № 2
 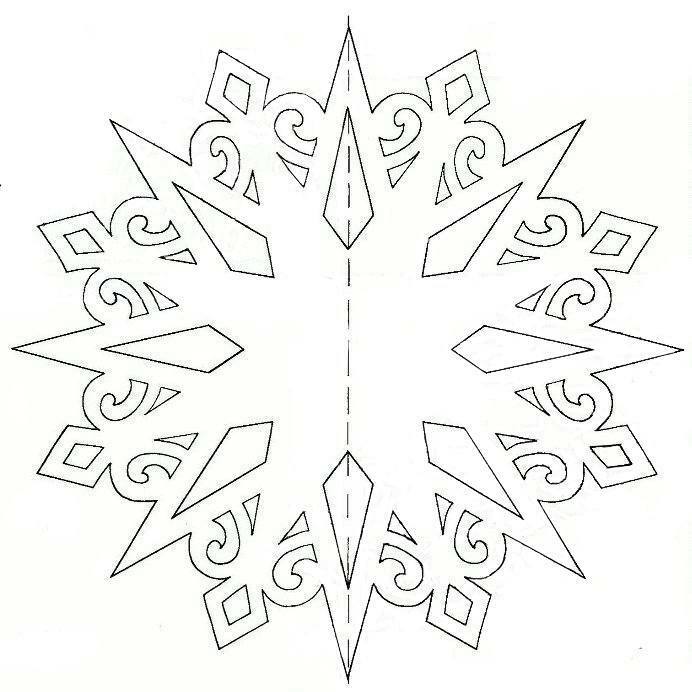 Template № 3
 Today we have already introduced you the most common ways of creating voluminous New Year snowflakes. And as you already probably understand, if desired, even a child can make from ordinary paper this beautiful Christmas decoration.
But finally we still decided to introduce you to one more method of creating festive decor. Below we will tell you how to easily and quickly make a large three-dimensional snowflake.
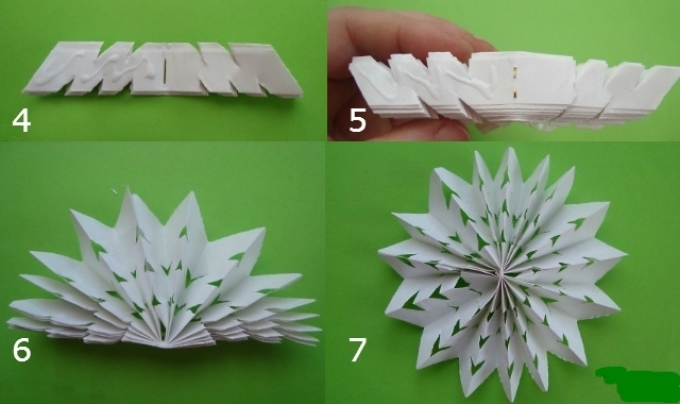 Schematic diagram for manufacturing
 Snowflake-accordion:
- First, take the paper and cut the strips of the same width from it. Their width can vary from 7 to 15 centimeters.
- Fold the workpieces in half, and then draw on them a contour of the future ornament. Take the scissors( you can use manicure) and gently cut the picture.
- If you chose not very thick paper to make a snowflake, then you can fold two pieces together and cut them together.
- Then each part separately fold an accordion. Make sure that all segments of the workpiece have the same size. If at least one of them is more or less than necessary, then you simply can not glue the two parts together.
- When the accordion is ready, grease the edges with glue, fasten and wait until it dries completely. After that, take a snowflake and spread it smoothly.
If you want the New Year's decoration to be brighter, then use it for paper of different colors. For example, combine white with blue, pink, peach or mint. Also, if you want, you can glue several small beads or bright glass on the snowflake.