
The famous puzzle, representing several colored sectors, united in one cube, appeared in 1974.The Hungarian sculptor and teacher decided to create a textbook to explain to students the theory of groups. To date, this toy is considered the most sold all over the world.
Contents of
- The structure of the Rubik's cube and the names of the rotations
- A simple and easy way to build: Instruction for children and beginners
- The fastest way. Jessica Friedrich method
- 3x3 Rubik's cube assembly scheme in 15 moves
- How easy it is to assemble the Rubik's cube: Video
But, success to this puzzle came only when the German businessman Tibor Lakzi paid attention to it. He, together with the inventor of games Tom Kremer, established not only the production of cubes, but also organized the promotion of this puzzle to the masses. It was thanks to them that there were competitions on high-speed assembly of Rubik's cubes.
By the way, people who deal with this assembly of this puzzle are called speedcubers( "speed" - speed).It is not difficult to guess that the speedy assembly of the "magic" cube is called spidkubing.
The structure of the Rubik's cube and the names of the rotations
In order to learn how to collect this puzzle you need to understand its structure and find out the correct name of certain actions with it. The latter is important if you are going to find an instruction for assembling a cube on the Internet. Yes, and in this article we will refer to the entire action with this puzzle, according to well-established expressions.
The standard Rubik's cube consists of three sides. Each of which consists of three parts. Today there are also 5x5x5 cubes. The classical cube has 12 edges and 8 corners. It is painted in 6 colors. Inside this puzzle there is a cross, around which the sides move.
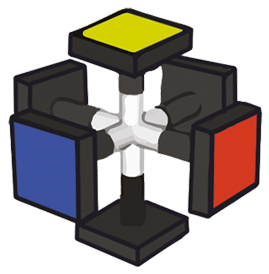 Cross with
 centers At the end of the cross the square with one of six colors is rigidly located. Around it, you need to collect the remaining squares of the same color. And, the puzzle is considered assembled, if on all six sides of the cube its color will be collected.
IMPORTANT: In the original puzzle, the yellow color is always in front of white, orange - red, and green - blue. And if you disassemble the puzzle, and then fold it incorrectly, then this can lead to the fact that it will never be able to assemble.
In addition to the cube centers, the constant components of this puzzle are the corners. Each of the eight corners consists of three colors. And no matter how you change the position of the colors in this puzzle, the composition of the colors of the corners in it will not change.
IMPORTANT: The Rubik's Cube is assembled by placing the corner and middle sectors in line with the colors of the central sectors.
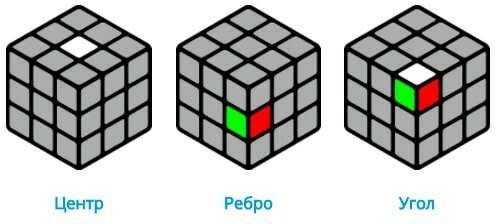 Element name
 Now that we understand the design of this puzzle it's time to move on to the names of the sides and rotations and their designation in the specialized literature.
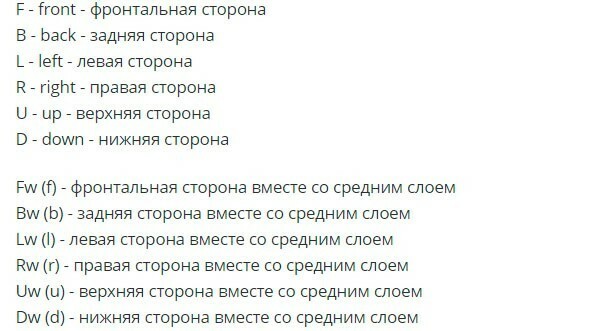
In the process of assembling a Rubik's cube, it may be necessary not only to move the sides, but also to change the position of this object in space. Specialists call these movements interceptions. Schematically it is displayed like this:

IMPORTANT: If you find only the letter in the cube build algorithm you found, change the position of the side clockwise. If the sign of the apostrophe is indicated after the letter "'", then the side is rotated counter-clockwise. If the letter "2" is indicated after the letter, it means that the side must be rotated twice. For example, D2 '- rotate the bottom side counterclockwise two times.
Simple and easy way to build: Instruction for children and beginners
The most detailed assembly instruction for beginners is as follows:
- At the first stage of assembling this popular puzzle, start with the right cross. That is, on the fact that on each side of the cube the color of the edges and centers will be the same.
- To do this, find the white center and white edges and collect the crosses according to the below diagram:
 The most popular movements of the
 - After the above actions, we must receive a cross. Of course, from the first time the cross will not be correct and you need to slightly transform the resulting version. If done correctly, it will be enough just to swap the edges between each other.
- This algorithm is called "puff-puff" and is shown in the diagram below:
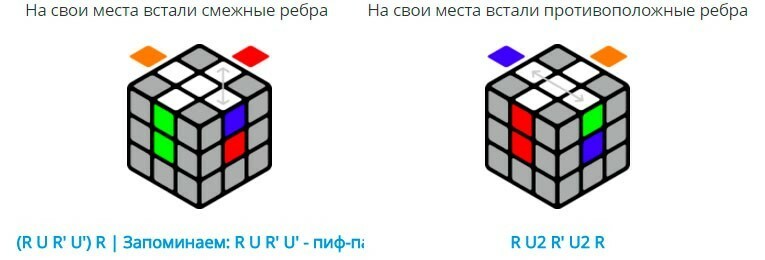 Algorithm "pif-paf"
 - Let's move on to the next step in assembling the puzzle. Find a white corner on the bottom layer and place a red corner above it. You can do this in different ways, depending on the position of the red and white corners. We use the "bang-paf" method described above.
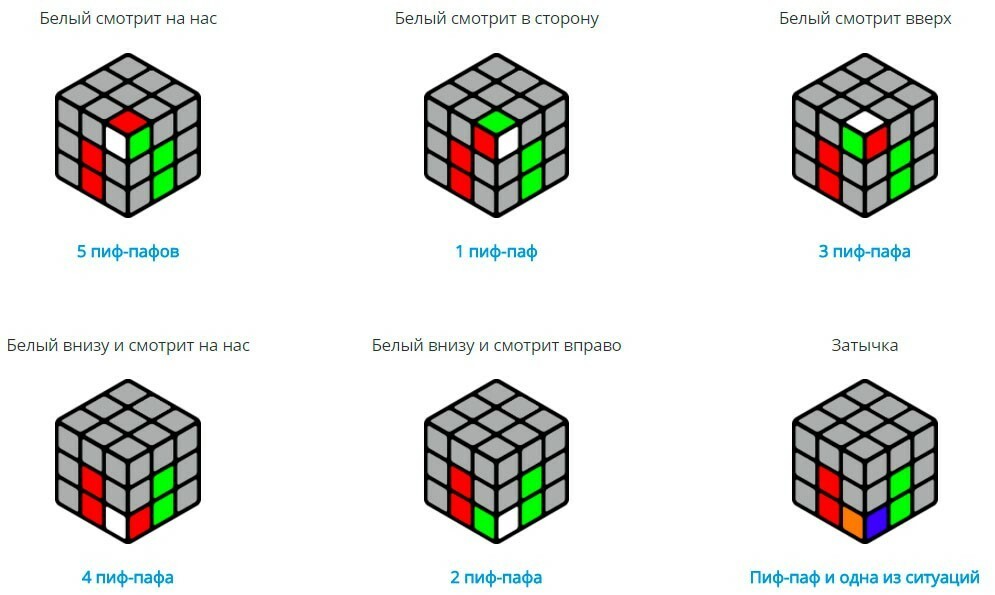 Changing the position of sectors
 - As a result, we should get the following:
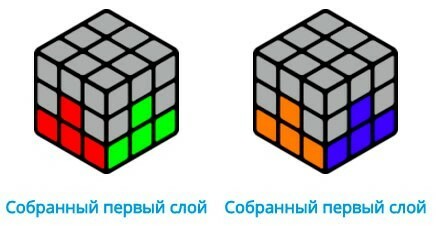 The first layer with the center of the same color
 - Begin to collect the second layer. To do this, we find four edges without a yellow color and arrange them between the centers of the second layer. Then turn the cube until the color of the center is the same as the color of the face element.
- As with the previous layer, to achieve this, you may need one of several options:
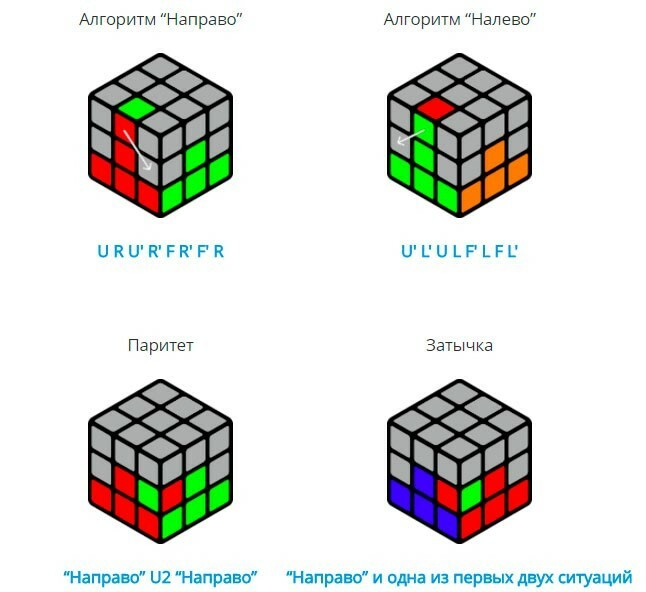 Assembly Options
 - After we successfully completed the previous step, proceed to assembling the yellow cross. Sometimes, he "gathers" himself. But, it happens very rarely. Most often the cube at this stage has three variants of the arrangement of colors:
 Options for the arrangement of the yellow sectors
 So, the yellow cross is assembled. The further action in solving this puzzle is reduced to seven variants. Below is shown each of them:
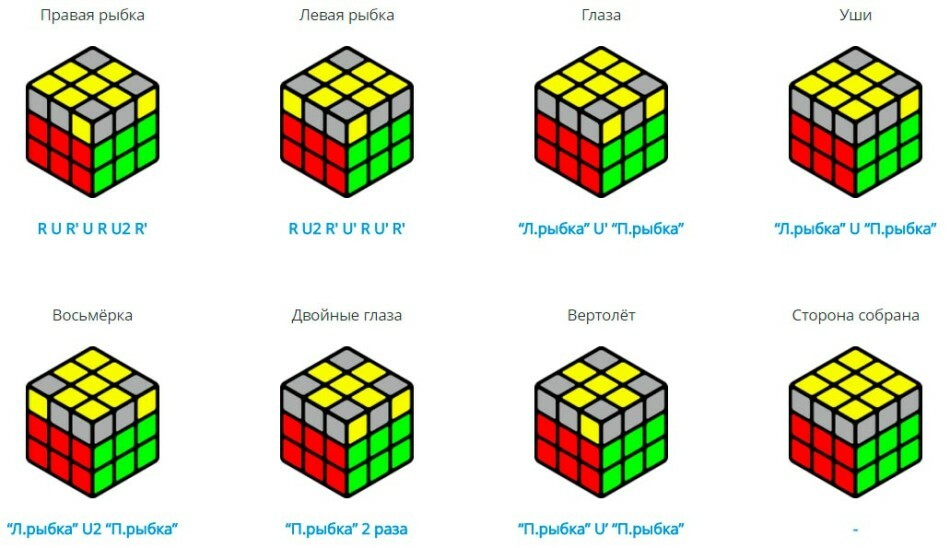 Assembling the yellow side
 In the next step we need to collect the corners of the top layer. Take one of the corners and put it back into place with the movements U, U 'and U2.In this case, you need to consider. To the colors of the corner were identical colors on the lower layers. When using this step, keep the cube white to yourself.
 Next assembly step
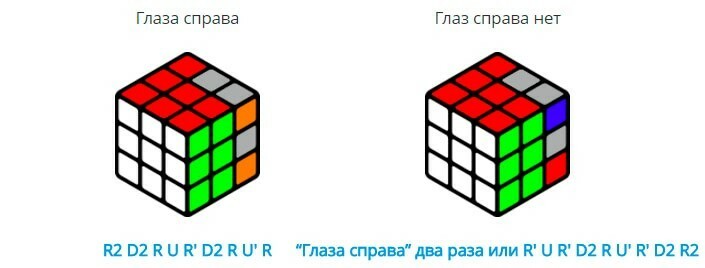
 - The final stage of the cube assembly is the assembly of the edges of the top layer. If you have done all of the above, four situations can arise. They are very simple:
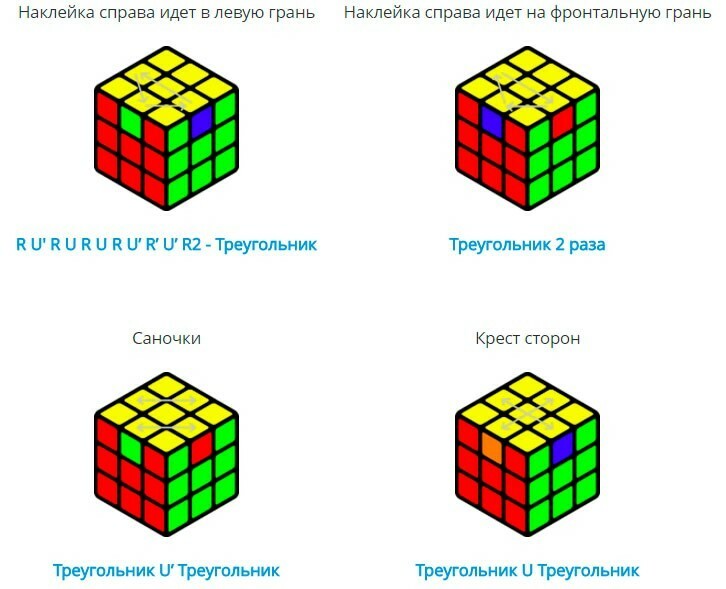 The last step is
 The fastest way. Method Jessica Friedrich
This method of assembling the puzzle was developed by Jessica Friedrich in 1981.It is conceptually not different from most known methods. But, it's focused on the speed of assembly. Thanks to this, the number of assembly stages decreased from seven to four. To master this method, you need to master "all" 119 algorithms.
IMPORTANT: This technique is not suitable for beginners. It should be studied when your cube assembly speed is less than 2 minutes.
1. At the first stage, you need to collect a cross with lateral faces. In the specialized literature this stage is called "Cross" ( from English Cross - cross).
2. In the second stage, you must collect two layers of the puzzle at once. It is called "F2L" ( from English First 2 Layers - the first two layers).To achieve the result, the following algorithms may be required:
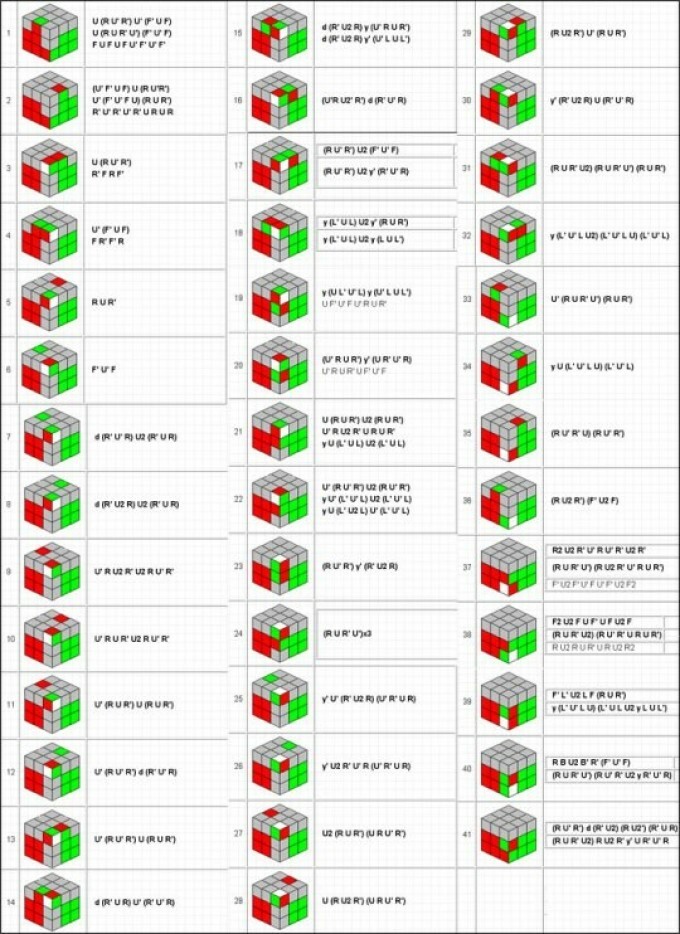 Stage F2L
 3. Now you need to assemble the top layer completely. Pay attention to the sides is not worth it. The name of the OLL phase( from the English Orientation of the Last Layer).To build, you need to learn 57 algorithms:
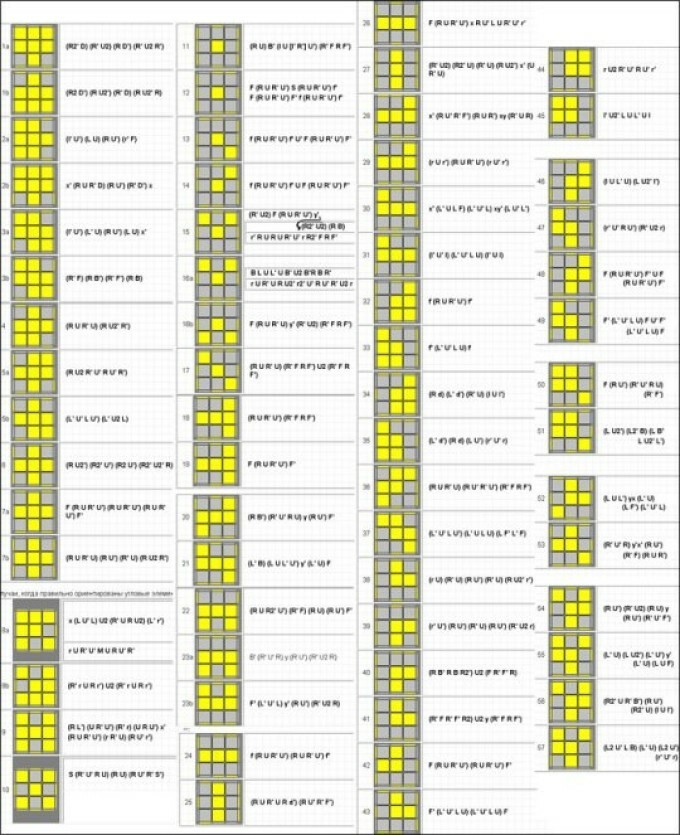 Stage OLL
 4. The final stage of the cube assembly. PLL( from English Permutation of the Last Layer - arrangement of elements of the last layer in places).Its assembly can be carried out using the following algorithms:
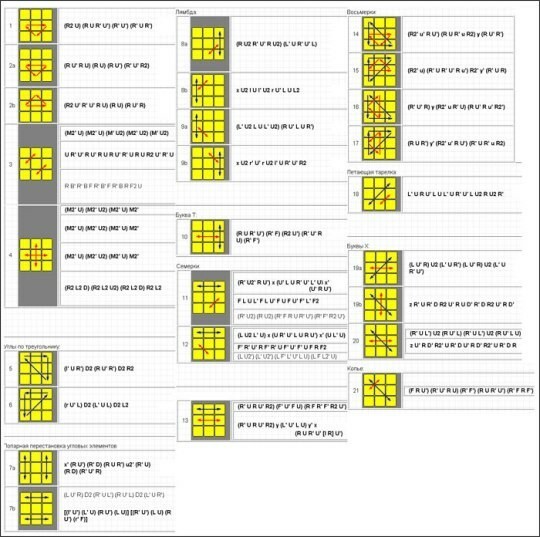 PLL stage
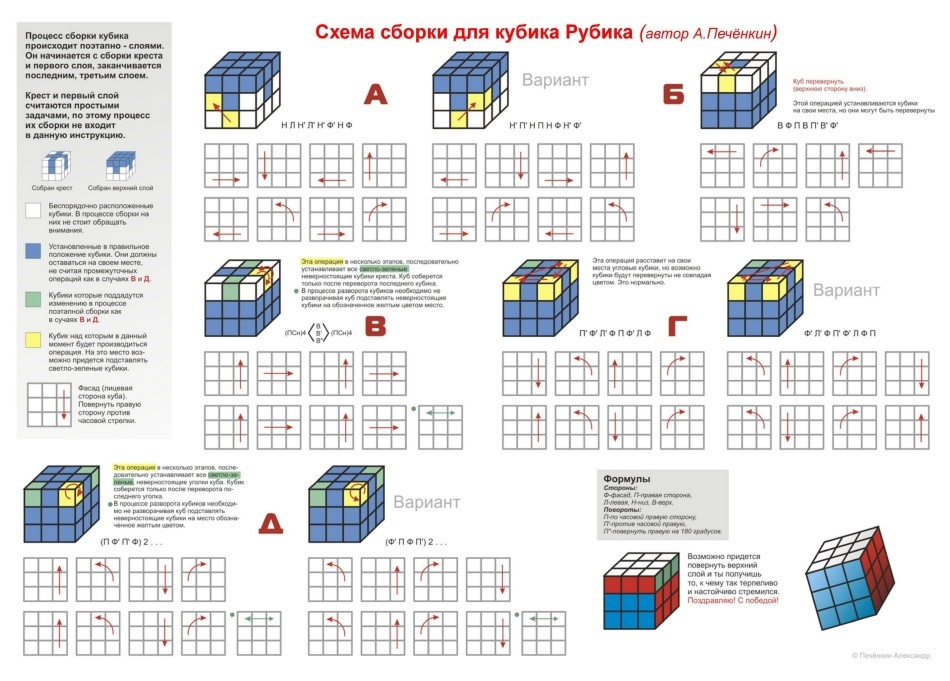
 Assembly scheme for a 3x3 Rubik's cube in 15 moves
Since 1982, when there was a competition for high-speed assembly of the Rubik's cube, many fans of this puzzle began to develop algorithms that will help to properly place the cube sectorsminimum of moves. Today, the minimum number of moves in this puzzle is called "Algorithm of God" and is 20 moves.
Therefore, for 15 moves to collect Rubik's cube is impossible. Moreover, a few years ago, an 18-way algorithm for assembling this puzzle was developed. But, it can not be used from all positions of the cube, so it was rejected as the fastest one.
In 2010, scientists from Google created a program that helped calculate the fastest algorithm for building a Rubik's cube. He confirmed that the minimum number of steps is 20. Later, from the details of the popular designer, a Lego Mindstorm EV3 robot was created, which is able to assemble a Rubik's cube from any position in 3,253 seconds. He uses in his "work" 20 step "Algorithm of God" .And if someone tells you that there is a 15-step cube assembly scheme, do not believe it. Even Google's capacity is "not enough" to find it.
 Another