No girl can resist the beautiful styling. Do not hurry to lose their popularity a variety of techniques braiding braids, because these are the best options for hairstyles for girls. Having studied carefully several schemes, you can create a stylish style yourself and change your image every day.
- For beginners
- Option No. 1
- Option No. 2
- Option No. 3
- For long hair
- Option No. 1
- Option No. 2
- Option No. 3
- Option No. 4
- For medium hair
- Option No. 1
- Option No. 2
- Beautiful weaving
- Beautiful weaving
- Option №1
- Option №2
- Option №3
- Option №4
- Option №5
- With tapes
- Option №1
- Option №2
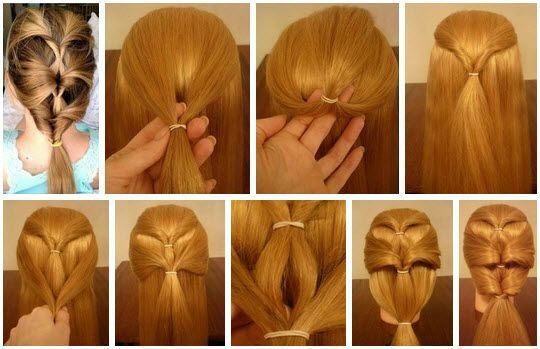
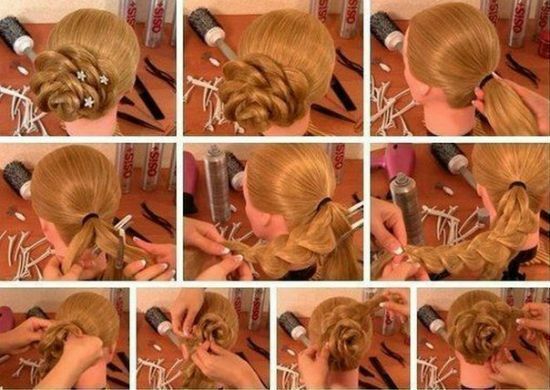
For beginners
to contents ^Option №1
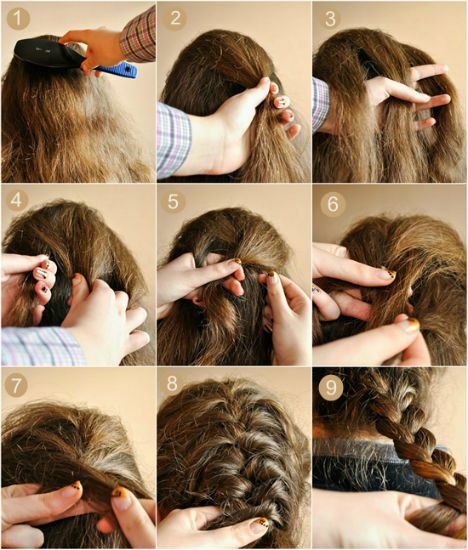
- First you need to wash wellhair, blow dry and carefully raschTo eat, in fact for weaving, the curls must be perfectly smooth.
- With your left hand, a strand is taken in the center.
- One more prick is separated from the left and right side( should be approximately the same thickness).
- The left strand is superimposed on top of the central strand and passed under the right one.
- We need to monitor the strength of the weave so that the braid does not fall apart.
- To the right, take a thin strand of loose hair and connect to the main one.
- Take an additional strand on the left side and add to the main one.
- This scheme continues the weaving until the end of the hair.
- Once the braid is finished, the tail is fixed with a beautiful rubber band.
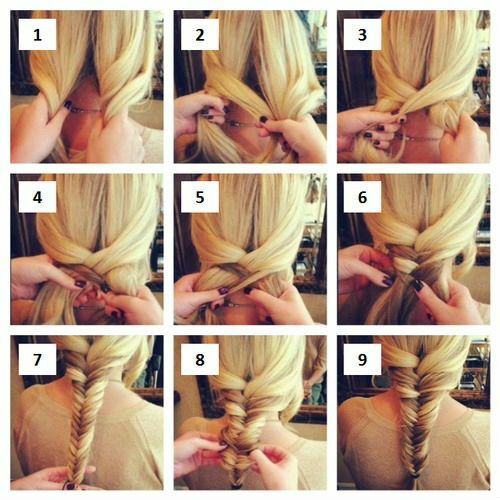
Variant №2
- Hair is well washed, dried, combed. On the vertex, a tight tail is tied. It should be ensured that the hair is smoothly combed and no "roosters" are formed.
- The tail is divided into 3 approximately equal strands.
- Under the middle is placed the right strand. Then the left strand is placed under the middle one.
- From the loose hair on the right a curl is separated and added to the main one, then placed under the middle one.
- Separates the free part of the hair on the left and joins the main one, then puts it under the central
- . According to this scheme, the braid goes to the end.
- Above the tail can be decorated with an elastic band or bow. This is the French spit on the contrary, which is perfect for almost any occasion.
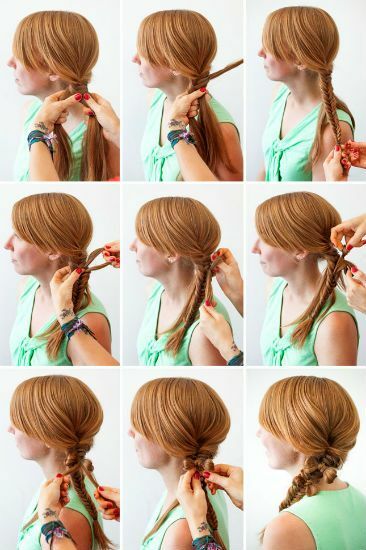
Option # 3
- The dried hair is combed to the right side.
- In the field of the right temple, 3 not very large strands are taken and a simple braid is trudging.
- The weave continues to the left temple.
- In the end, the hair is wrapped in a thin curl and fixed so that the hair does not fall apart.
For long hair
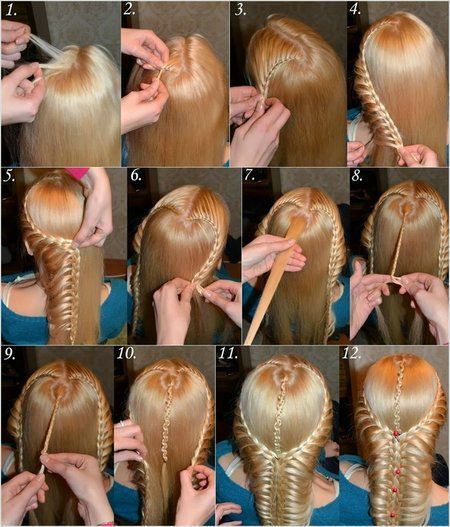
to the table of contents ^Option number 1
- Clean and combed hair is divided into two equal parts.
- The left part of the main strand is separated and superimposed on top of it.
- The actions from the previous paragraph are repeated on the right side.
- Additional strands intersect and connect to the main strands.
- The actions from point 2 are repeated again.
- In this scheme, the braid is padded to the very end. This hairstyle is suitable for graduation, but can be done for every day.
- In order for the braid to be more voluminous, it can be slightly fluffed by stretching the strands.
Read also about the types http://woman-l.ru/vidy-chelok/ chelok
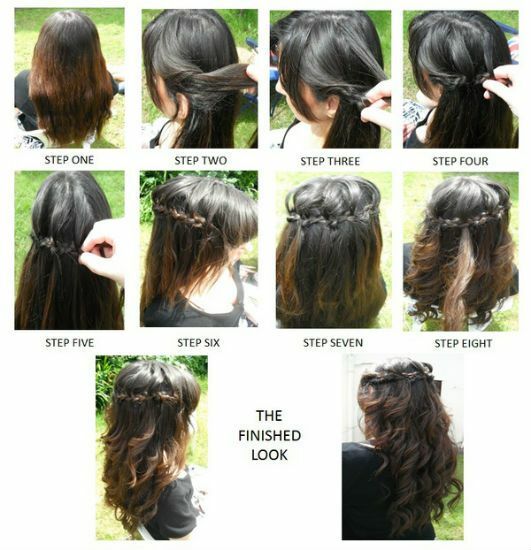
to the table of contents ^ Variant №2
- Hair is combed well, even parting is done.
- On the right side, 3 equal strands are taken and a simple braid is trudging.
- To ensure that these hairstyles with braids do not fall apart during the day, you need to gradually add the hair from the main body of hair. As if weaving a braid.
- The braid is weaved to the middle of the nape and fixed.
- The strands are slightly stretched, which gives an additional volume.
- The same scheme braids the braid from the left side, but now is placed on top of the first.
- The end of the hair is carefully fixed and hides under the weave so that the tail is not visible. This is an ideal hairstyle for little girls, because it remains neat throughout the day, and the hair will not catch the eye of the child.
loading. ..
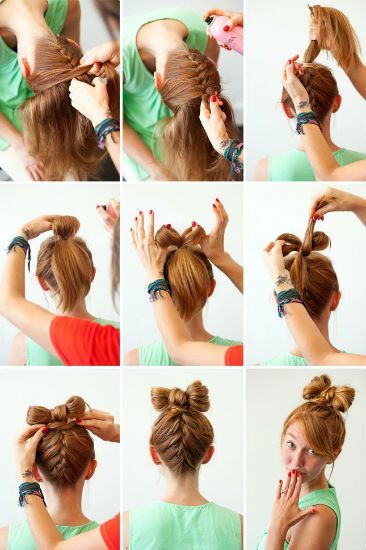
Variant №3
- The following master class will help to create a beautiful and stylish hairstyle. First, braid-fish tail is braided.
- You should not do too tight weaving and at the end of the braid is fixed with a simple rubber band, then it can be replaced.
- Just above the middle of the braid, one strand stretches and a small loop is made.
- On the opposite side, the same loop is made.
- With the tips of elongated strands a bow is fixed so that it does not fall apart.
- The ends of the strands are neatly masked, refueling in the braid.
- Under this scheme, you can make a few bows.
Variant №4
- Hair combs, and on the vertex 3 strands of equal thickness are taken.
- During weaving, additional strands are added on each side.
- The braid adds to the middle.
- The scythe on the back of the head, but upwards.
- Two braids are connected in a tail and tied with an elastic band.
- A loop is made from the tail, which is divided into 2 parts.
- In the middle, the eyelets are intersected by the remaining hair, and gently fixed in the shape of a bow.
To medium hair
to the table of contents ^Variant No. 1
- The dried hair is combed and leveled with an iron so that the curls are perfectly smooth.
- In the area of the temples, on the right and on the left, one string is taken, which are fastened to the back of the head with an elastic band.
- The tail is passed inside, flagella are formed.
- Once again, the right and left are taken by the hair straightening, which are fixed with an elastic band from behind. The tail is passed inside, again forming flagella.
- This scheme makes another tail.
- In the end, the hair collects in the tail and combs.
loading. ..
Pay attention to the styling of hair http://woman-l.ru/ukladka-volos-v-domashnix-usloviyax/ at home
to the table of contents ^ Option №2
- The hair is well combed, if necessary aligned with iron.
- Separated 2 strands, approximately equal volume.
- On the right side, near the temple, the third lock is taken and thrown through the second.
- On the left side, near the temple, the fourth strand is taken and is thrown through the first.
- The fifth and sixth strands are added in the same way, the braid is padded to the end.
- Below the tail is tied with a thin elastic band and the hairstyle is completely ready.
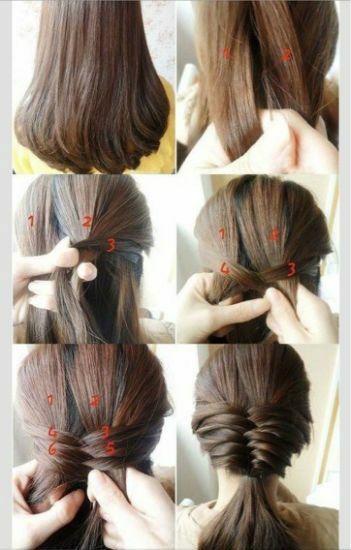
Beautiful weaving
to the table of contents ^Option No. 1
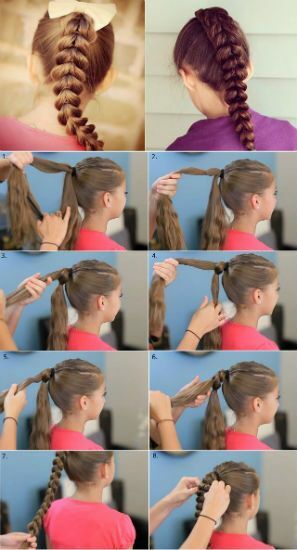
- The washed and dried hair is combed. On the back of the head a small part of the hair is taken and a tail is tied with a thin rubber band.
- The tail is divided into several equal strands. Take 2 additional strands near the forehead and begin the process of weaving a simple braid.
- During the weaving, we gradually add tufts from the tail.
- The braids are weaved to the nape of the neck.
- According to this scheme, a pigtail is plied on the left side.
- In the nape of the head, the braids are joined and braided as one to the end.
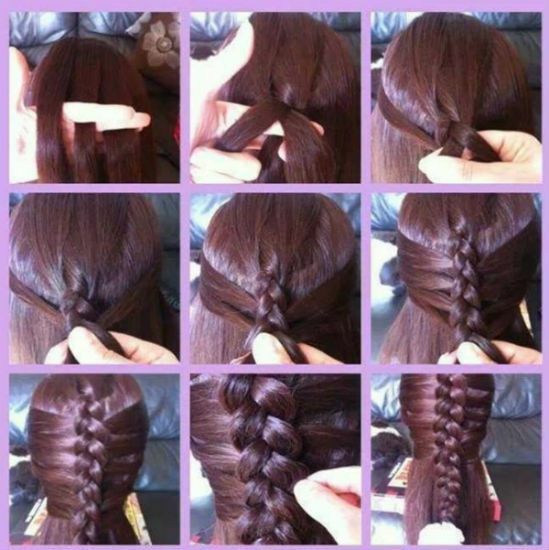
Variant 2
- First, the hair is combed well, then the strand is taken and put on the index finger of the left hand. The second strand is clamped between the index and middle finger. The third one is between the middle and ring fingers.
- The third strand is passed under the central one, the first is shifted from the top.
- The left and right sides are taken by additional strings, which are added to the main ones.
- According to this scheme, the braid goes to the end, leaving rested curls at the bottom.
Variant №3
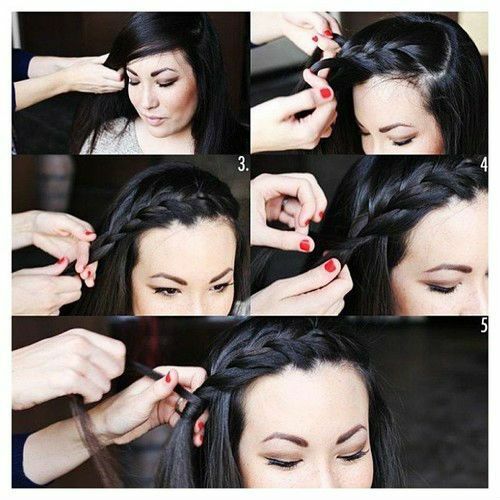
- On well-combed hair, an oblique parting is made on the right side. Take 4 roughly equal in volume strands.
- A simple braid is braided.
- Having reached the back of the neck, you need to use free curls on the left side for braiding.
- Once the braid is woven to the end, it is twisted with a neat circle.
- For studs, studs are used.
- This hairstyle is ideal for daily use and for special occasions.
Variant №4
- To braid the African braids, you need to carefully comb the hair and make part.
- In the nape of the neck a small area is allocated, a thin strand is taken.
- The string is well combed and the yarn of the kanekalon is taken, which is pre-whipped into a koltun and fixed in the root area.
- Then the strand is divided into 3 approximately equal parts and the tightest pigtail is braided. As soon as the level of natural hair is reached, a little kanekalon is weaved into the string. Due to this, the braid acquires a uniform volume.
- You can fix the end of the braid in various ways - rubber, glue or bead.
This technique can not only braid even braids, but also create a variety of patterns directly on the head.
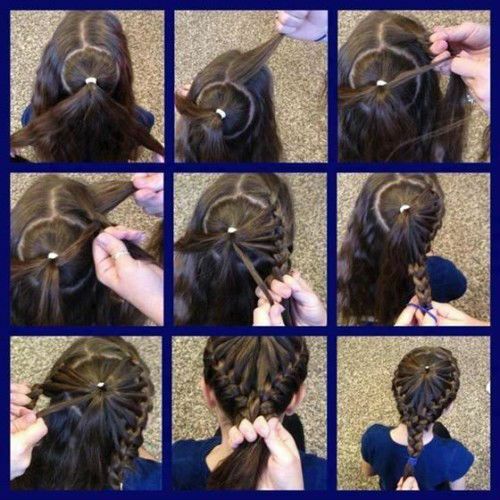
Option number 5
- Hair is carefully combed, leveled, parted. On the vertex, 3 thin strands are taken and the braid starts to form on the left side.
- Gradually add extra strands.
- This scheme braids the braid on the right side, but the hair remains intact in the middle.
- A simple thin braid is twisted in the middle.
- 3 braids are joined together and fixed with small hairpins, so that the hair does not fall apart.
With
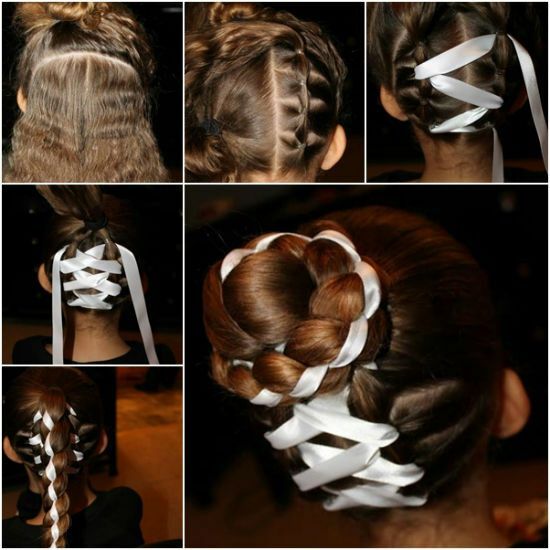
tapes to the table of contents ^Option # 1
- Hair is combed well, and 3 strands of the same thickness are taken at the top of the head.
- The ribbon is fixed on the central strand and a tourniquet is made.
- A simple braid surrounds the head, a pebble is tied on the back of the head.
Variant №2
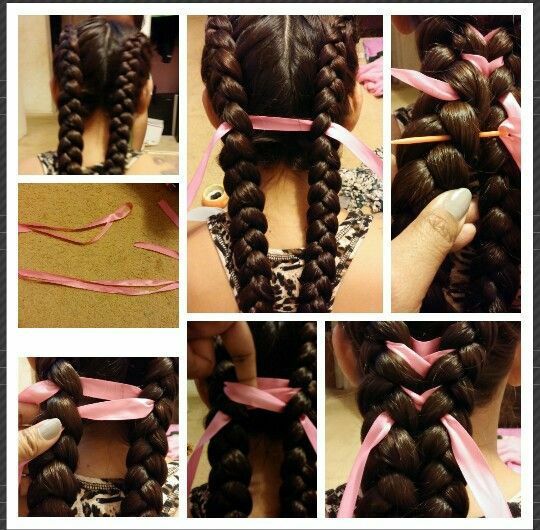
- Two tight braids are twisted.
- The tape is taken and fixed in the braids. All actions should be careful so that the hairstyle is not disheveled.
- With the help of a pencil, the tape is refilled in braids, then tightened.
- The result is one thick braid, complemented by a bright ribbon.