

Dolls can be deservedly called the most popular toys of our time. They are full of toy store shelves, children, especially girls play with them, and parents buy them in huge quantities. However, they are not only designed to play, depending on the type, the doll may have a lot of destinations.
- A bit of history
- A doll from old clothes
A bit of history
About when the first dolls appeared, the disputes between scientists have been going on for a very long time. It is believed that the first such reflections of man appeared more than 35 thousand years ago( at least this age was determined by scientists for a doll found in the territory of modern Czechia).It was made from the bones of a mammoth, its limbs were mobile. They were found in Egyptian tombs dating back to the 20th century BC, and on the territory of Ancient Greece, in which dolls were made from burnt clay during the fifth and fourth centuries BC.
As for Slavic dolls, they were made mainly from water soaked ash and wood bark. They were called women. And the doll was not considered a toy at all, but an amulet that was passed from generation to generation along the women's line.
Over time( hundreds of years later), the purpose of the dolls has changed.
It's hard to believe, but not so long ago( in the nineteenth century) this toy could not afford to every family. And those families who could get such a valuable toy, kept it in a place that was in sight, but it was inaccessible to children - the children of the dolls were in no way given, they served as decoration of the premises.
This master class will help you to join the creation of dolls. Detailed instructions will allow you to do this easily enough.
to the table of contents ^Doll from old clothes
If you have never encountered making dolls by yourself, it's best to start with the simplest techniques. This master class invites you to create quite lovely babies from improvised materials.
To create such babies you will only need a piece of woolen fabric( you can take an unnecessary piece of clothing or unnecessary socks, tights), needles and threads. No patterns, special sizes you will not need. You need to keep only the form.
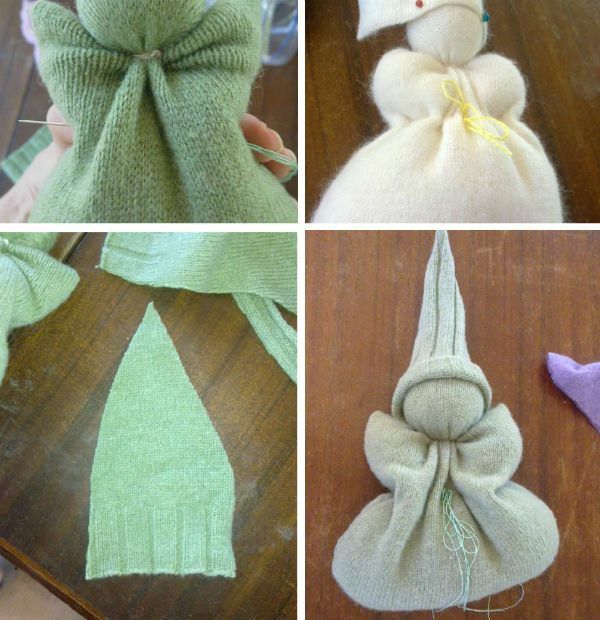
So, cut out a rectangular piece from the chosen fabric, the approximate size of the segment on the photo is 30x12 centimeters. The corners of the fabric should be rounded, as shown in the figure.

Now go to the creation of the head.
To create it, take a little fleece and, starting little by little, roll a tight ball of the desired size. Note that children have relatively large heads with respect to body proportions, an approximate ratio is the head 1/3, the trunk is 2/3.Our babies have such proportions: ¼ head, ¾ body just because they are in sleeping bags that give volume.
Now sew side seams with faces facing each other. You can do this on a sewing machine, or manually, using a slip stitch or a stitch. Fold the segment in half in length, and, starting from the end of the folded side, stitch down and along the cut off corner. Remember that you need to leave a hole in the center of the bottom, it must be large enough so that you can insert inside the head of the baby made from fleece. Then start from the other side, and go back, leaving the hole.

Now insert the fleece that you rolled into the head. To denote the head, you will need to tie a thread under it. To do this you will need a fairly strong thread. Turn out your fabric and fold in half to find the exact center at the top, insert the pin vertically at this point, and then push your fleece ball through the hole and attach it to the pin. The pin will hold the ball fixed while you lower the cloth around it. Do not wrinkle the ball from the fleece, it should be relatively folded. Holding the fleece ball in one hand, wind the thread around the neck carefully to fix the shape. Wrap a few times and tie the knot also several times.
To make a doll useful, add lavender inside, creating a doll for a lavender heart. Now just wrap one end of the fleece over, then the second, after the third and fourth. You should have a kind of nodule, as shown in the picture. A little squeeze the fleece in his hands, so he took over the smell of lavender.
Now fill the baby with soft material not too tightly, but without "gaps", remembering to insert inside the lavender "heart".Sew the bottom.
Now we turn to the creation of hands. To do this, tighten the sides and form the hands with your fingers( see figure).Mark with a few pins.
Next, select the hands. Pull a strong thread into the needle, next to one of the pins, insert the needle and make a few stitches, then stretch the needle to the other side - where the second pin is fixed, tighten well. Do this several times from side to side. Then tie the knot.
After that, make a small stitch in the "back" of the doll and return from the other side. Pull off, tie a bow several times and take out the pins that you inserted into the place where you marked the limbs.
It remains only to make a baby cap for yourself and the hack is ready. After training, you can proceed to create more complex crafts with your own hands.