
- Knit without breaking yarn. That is, if such a canvas is dissolved, then a whole thread is formed. It is made in rows - one goes in one direction, the other in the opposite direction. The resulting product looks the same both from the front and from the wrong side.
- The fabric consists of individual elements. They are called motives. They can have a rectangular or circular shape. First, the required number of necessary elements is produced. In this case, after the removal of one motive, the thread terminates. After that they are fastened together, forming an article.
For those who decided to tackle loin crochet, we offer free schemes and patterns.
Variants of simple patterns
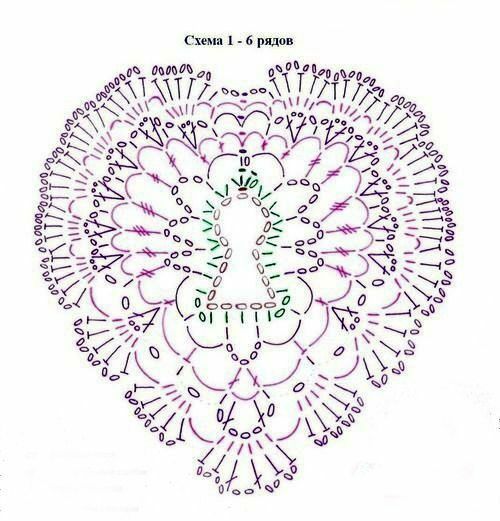
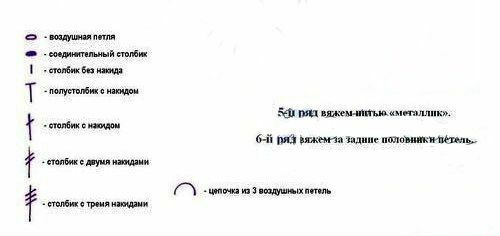
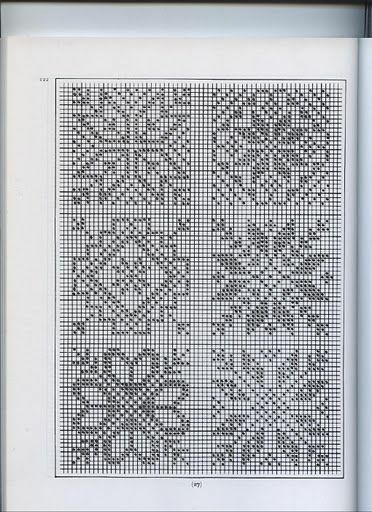
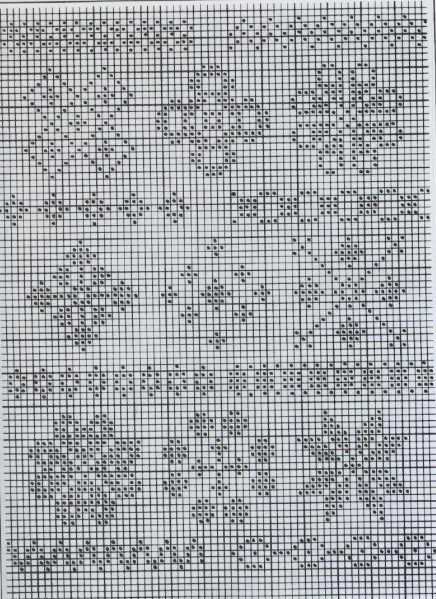
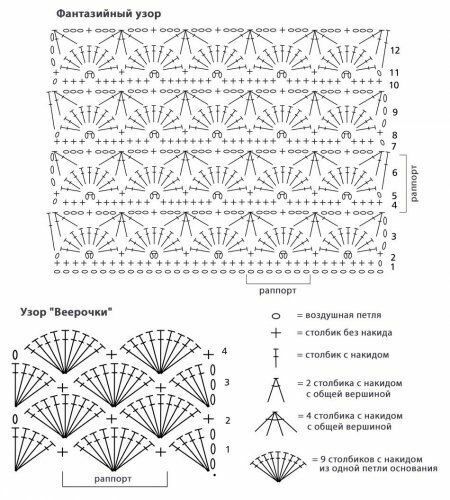
Using examples of patterns, you can knit different products, they are taken as a basis. Where the pattern is depicted, knitting is performed in rows. To make a thing out of motives, you must first link a few elements. Then they are stitched together with a thread and a needle. Thus, the canvas and individual parts of the product are formed. Graphic elements are visible on the images, each of them has its own designation. So the horizontal oval symbolizes the air loop. A vertical bar denotes a column without a crochet.
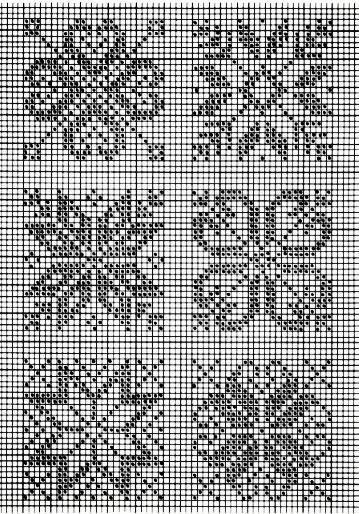
Here is a photo-list of patterns of simple motifs and patterns:

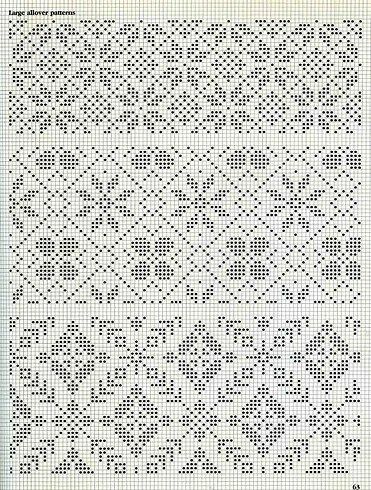
Schemes of a simple dress
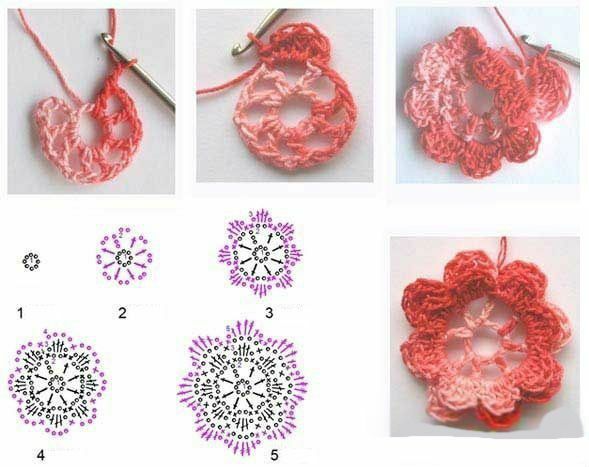
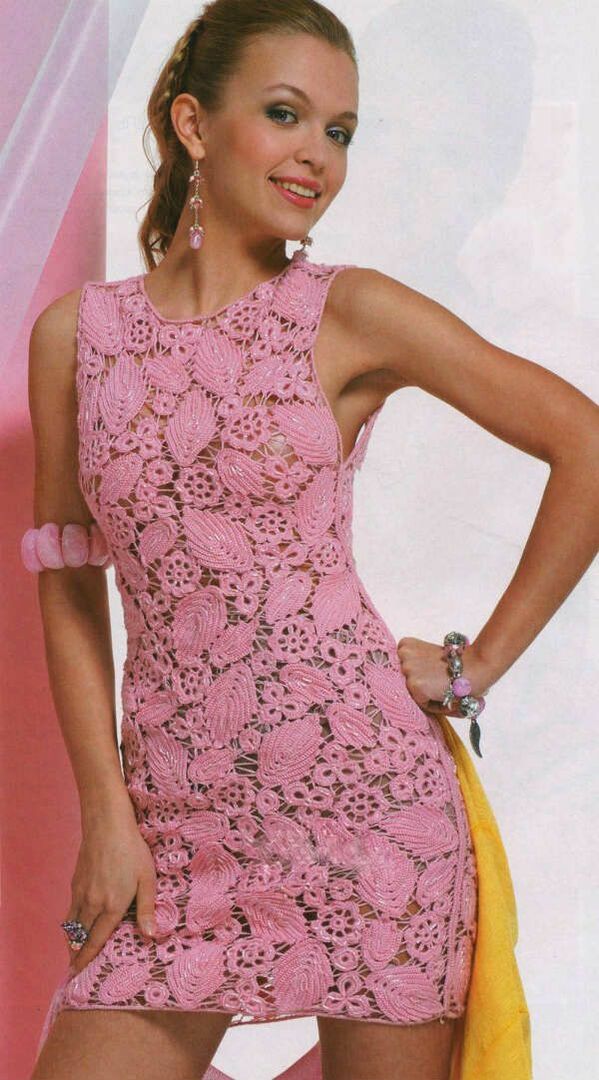
Beautifully look dresses in the technique of loin knitting. To make a pink dress, you will need a hook number 2, 400 g of yarn. As a decoration, pink beads are used. The technique of execution is a composite canvas. First, a pattern of the product is applied to the non-shrinking dense fabric. Using the cord "caterpillar" you need to contour its contours. Then the individual elements are knit: rings, flowers, trefoils, etc. The size of the leaves can vary, depending on the length of the initial chain.
After untying motives, they need to be arranged on a pattern and fastened with pins. In this case, the front side of the elements should be on the bottom. It is best to start with large elements, and then fill the space with small motives. After creating the necessary pattern, proceed to stitch the elements. Free space is filled with brides. For this purpose, 2-3 threads are stretched between neighboring elements, which then are braided. When the stitching of all the elements is finished, the outline is removed. Then, the connecting parts of the transmission and the back are made, making a small landing on the side in the chest area.
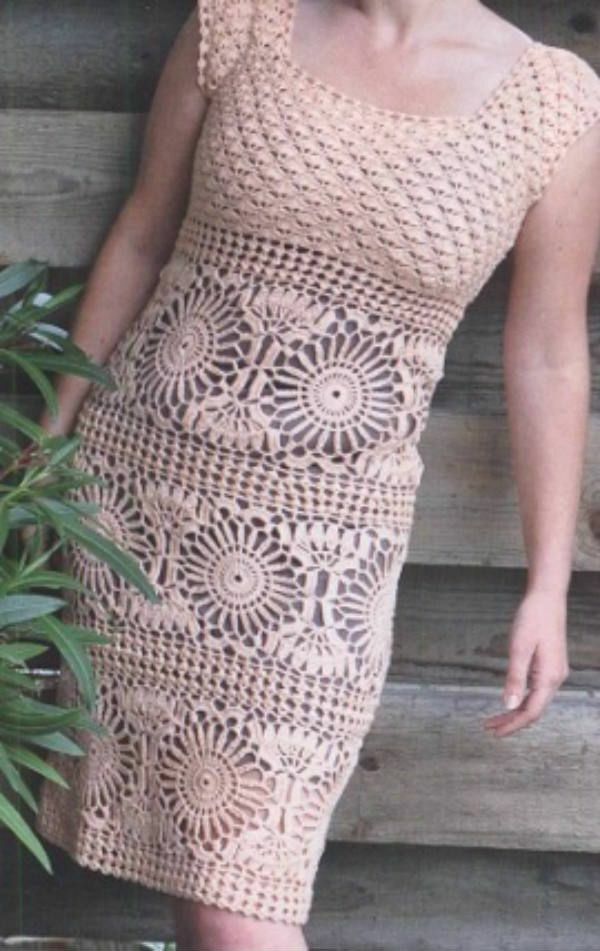
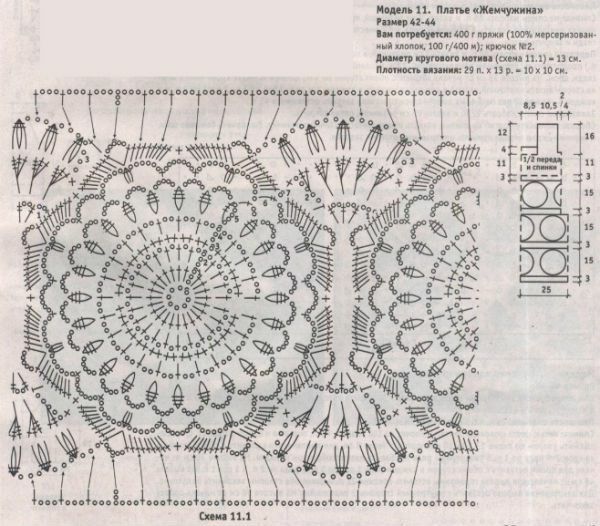
The second dress is made as follows: after the pattern is applied, the top of the article is knitted separately, as well as horizontal motif ribbons. In this dress these tapes are three. It is necessary to take into account the circumferential length of each tape, depending on its location on the pattern, because the dress should narrow to the bottom and expand in the hips.
When all the tapes are ready, they are stitched together. They need to "plant" the figure. If necessary, sew a lock. United motifs are sewn to the separately tied up top of the dress.
Schemes of children's hats
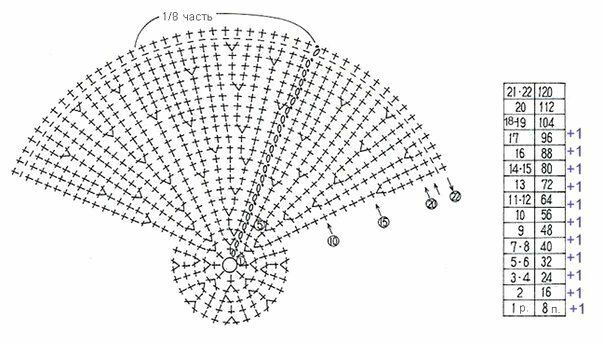
Making the cap is done in a circle. To make the calculation of the inner circle, it is necessary to determine the diameter of the head and subtract 2 cm from the obtained value. This is necessary for a more tight fitting of the baby's head with a cap. To calculate the diameter of the bottom, you need to use the formula for calculating the circumference of the circle:
P = 2πr
P is the circumference's circumference,
π is the Pi number( 3.1415),
r is the radius,
. For product size 44, the bottom diameter is 14 cmTherefore, in the process of knitting, you need to make increments until the diameter becomes equal to the desired value. To determine the height of the trull, it is necessary to do the fitting. For the formation of fields, an increase is made, the degree of which is determined during the fitting process. To this end, two bars are fastened to each 2nd loop. To give the product the desired shape, use a rigid tape, which is inserted into the first and last row of fields.
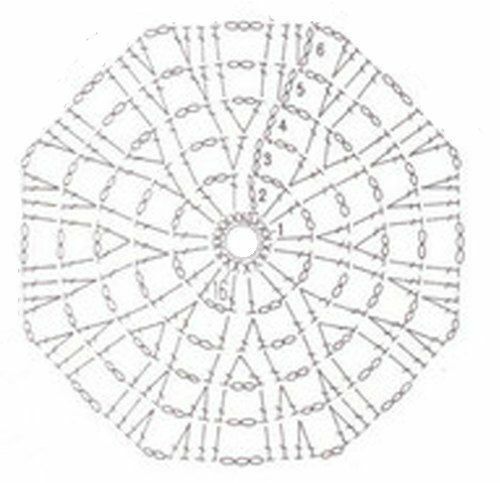
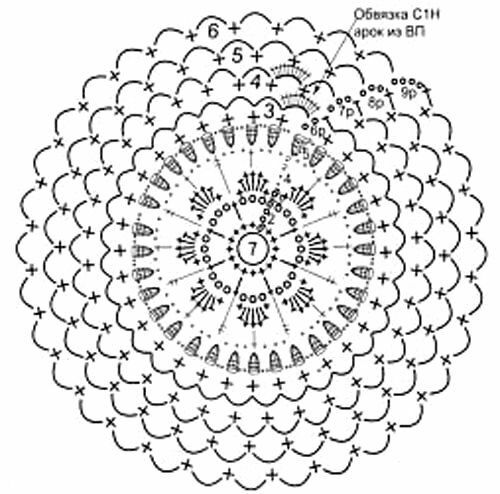
to the table of contents ^Schemes of Christmas balls
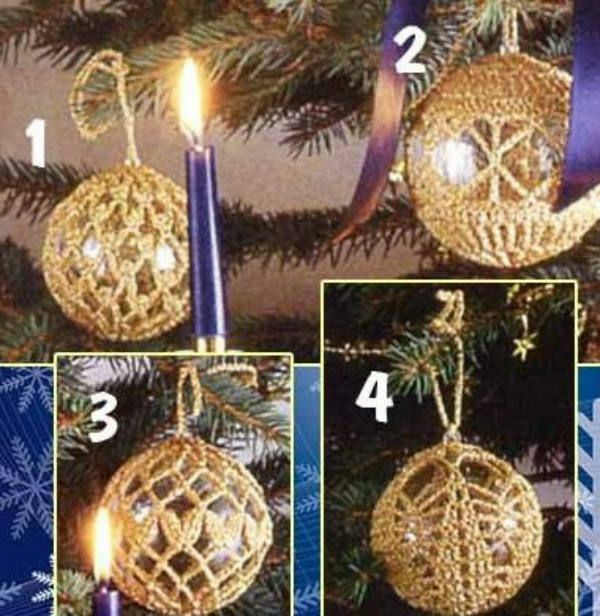
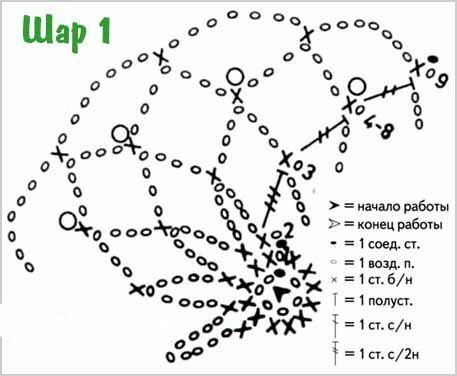
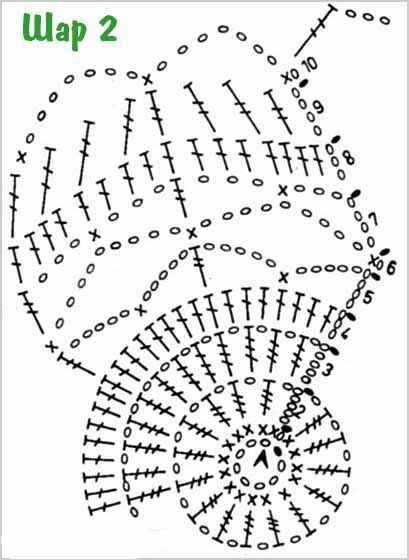

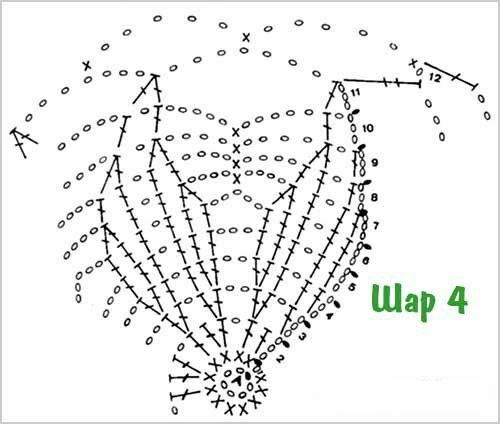
For manufacturing use the ready-made circuits. The ball is simply tied with threads according to the scheme of the pattern, adding / subtracting the loops and rows in the right place. At the end of the knitting of the ball, arches are made from the air loops, which are pulled together at the bottom of the article. Also loops are loops for hanging decorations.
to the table of contents ^Scheme of the elegant jacket
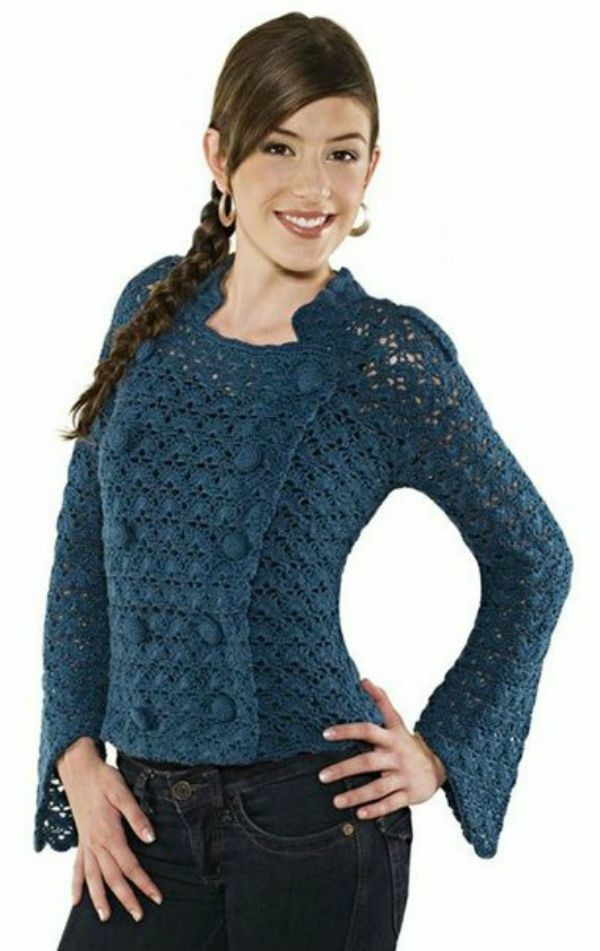
The size of the product is 42-44.For its execution, you need three skeins of yarn, a hook - 1,7 mm, buttons d = 25 cm - 10 pieces. The product consists of six parts:
Crochet crochet has the appearance of lace. This technique is already about three hundred years old. Its name comes from the French word - fillet, which means a grid. With the help of loin knitting, various products are obtained: skirts, shawls, socks, pullovers, blouses, trousers, etc. They all look a bit unusual, but beautiful and elegant.
To properly knit in this unique technique, you need to have at hand schemes for the manufacture of various products and examples of patterns to choose from.
- For beginners( basics, materials)
- Simple design options
- Schemes of simple dress
- Schemes of a children's cap
- Schemes of Christmas balls
- Scheme of a fancy jacket
- Scheme of a skirt
- Scheme of a shawl
- Scheme of a summer jacket
- Scheme of a pullover
For beginners( bases,materials)
To begin to engage in loin knitting, special materials are needed. For work you will need:
- Hook. From a variety of products choose a tool length of about 14 cm and a diameter of 1-8 mm. It can be made of wood, metal or plastic. The hook number corresponds to its diameter in millimeters. It is best to stock up tools of different sizes.
- Threads. For fillet knitting choose synthetic, woolen, linen, cotton yarn. They differ not only in composition but also in thickness. In the designation of threads use two digits. The first means the thickness of the product. The second is the number of threads twisted together.
The thicker the selected thread, the warmer the product. Therefore, thick yarn is used for knitting winter things. The diameter of the hook should match the thickness of the thread.
As a result, knitting can receive products of two types:
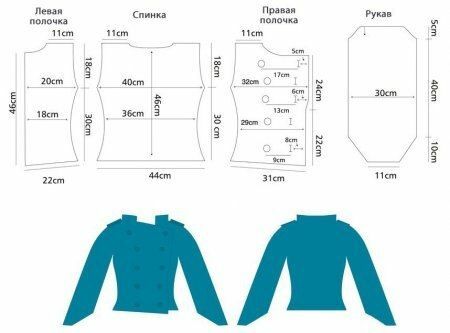
- Backrest. For her, a chain with a length of 44 cm is typed and 12 rapports of the pattern are knit. After doing 9 cm of canvas, do a decrease in half of the repeat pattern. After that, one more reduction is made in 3 rows. Continue to knit until the height of the canvas reaches 25 cm. After that, add half the rapport of the pattern on both sides. Having reached a height of 30 cm, leave half of the rapport on the sides unattached. This is necessary for the armhole. Having knitted to a height of 46 cm, leave 16 cm unaffected in the middle. This is needed for the neck. Formed parts of knitting are performed separately. Their length is 2 cm.
- Right shelf. For her, a chain of 71 loops is typed. Then do 10 rapports of the pattern. Two shortened rows perform on the edge of the shelf. For this, three rows are tied. In the fourth, six rapports are made and before the turn a column is made without a crochet. The next row is rotated, after turning, 6 rapports are knit, returning the loops of the third row. In the process, the armhole is loosened. Having made, thus, 22 cm canvases, you need to add half a rapport from inside the shelf. For the neck at a height of 46 cm leave 5 rapports. In the process of knitting, for the buttons it is necessary to leave holes, between which a distance of six centimeters is observed. As a result, the height of the shelf should be 47 cm.
- The left shelf. After dialing 43 air loops, six rapports are fastened. Two shortened rows are executed from the edge. This armhole is made as on the back. After 46 cm of linen, leave 1.5 rapports for the neck. After the reduction of half of the rapport, 3.5 rapports for the shoulders should remain. The height of the finished shelf should be 48 cm.
- Sleeves. After tying back and shelves, they must be sewn together. Knit the sleeve from the armhole. For this, three rapports are tied together. At the same time, a gradual addition is made, after which eight rapports should appear in the fifth row, and in the eighth ten. Fastening to the armhole is carried out with the help of connecting posts. Beginning with the tenth row, they begin circular knitting. After 40 cm begin gradual decrements for one rapport three times. In the end, there should be four rapports. After completing ten centimeters of knitting from the bevel, the work is finished. To make the bottom of the sleeves, you need to make a hem of one cm and sew it.
- Collar. Stepping away from the shoulder 11 cm, attach the thread. Next, knit, starting from the neck of the pattern "fan".At the same time, half the rapport is distributed to the shelves and 12 to the back. For the collar it is necessary to tie four rows.
- Straps. Make a chain of seven loops. Next, the columns are made without a crochet. The length of the finished shoulder is 8 cm. The second knit is similar.
- Finishing. The edges of the collar of the product and shelves are decorated with half-pins with a crochet. Sew the edges of the right shelf, bending 2 cm. Sew the bottom of the article, bending off 2 cm. Make out the buttons and sew, orienting on the pattern. Shoulders are sewn on the shoulders.
Scheme skirt
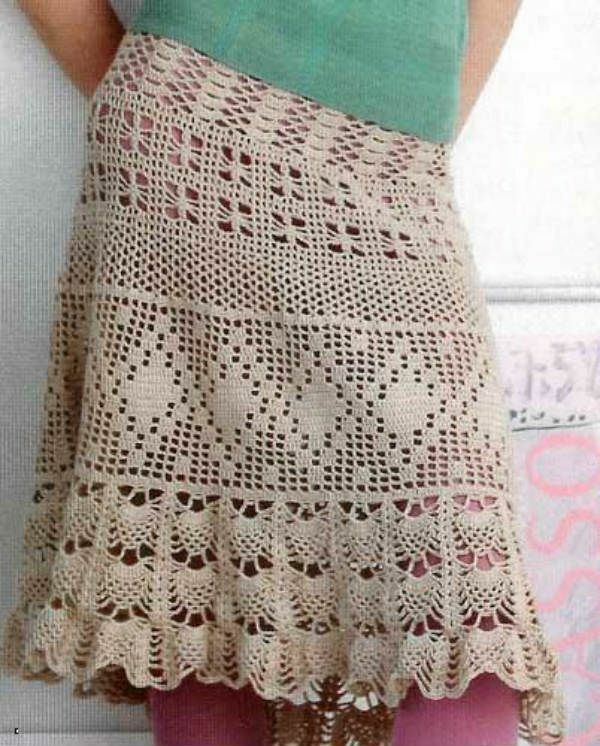

Make a chain of 12 loops. Next, a canvas 42 cm high with billets with a crochet is performed. Then begin knitting the middle part, along the long side of the resulting strip, performing a pattern according to the pattern. Having reached the required height, untie the upper part of the skirt. After tying all the details, perform the assembly of the product.
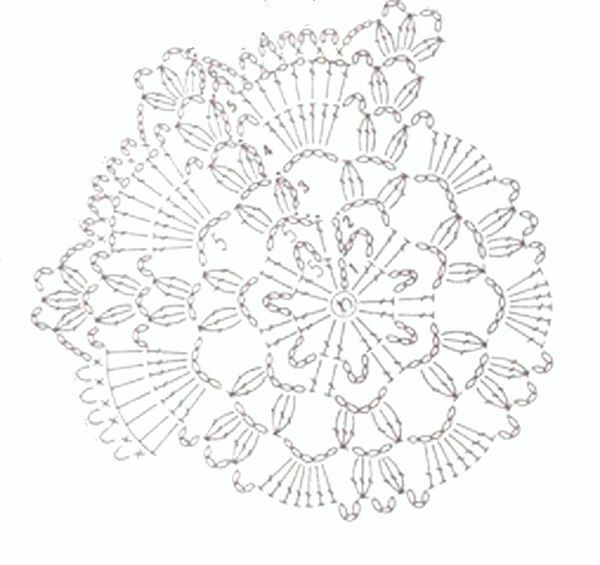
to table of contents ^Scheme of shawl
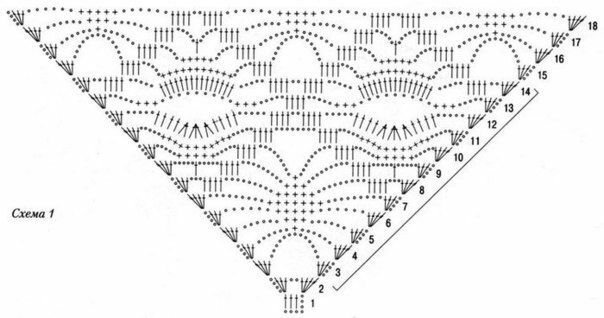
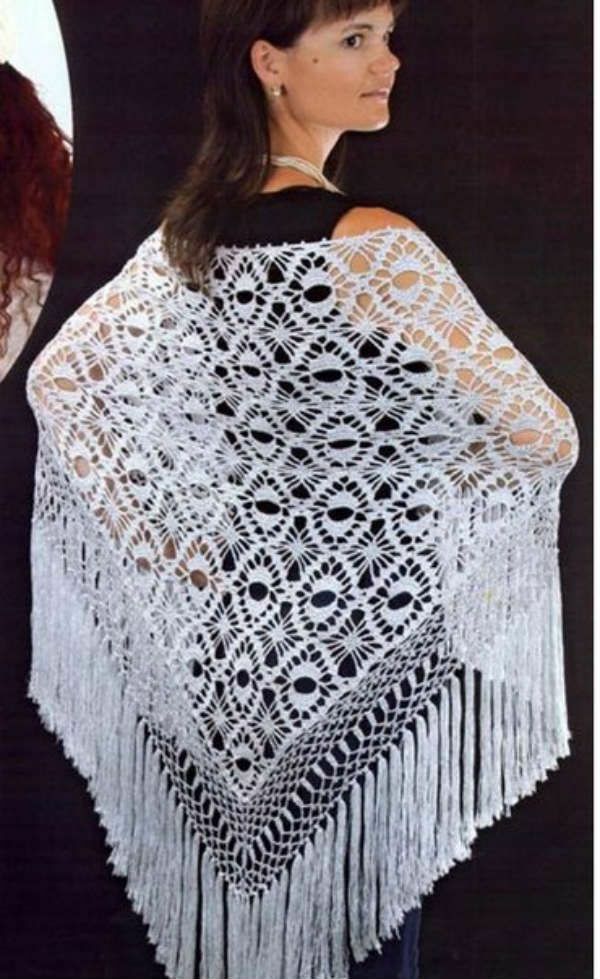
For knitting you need to take hook number 3 and yarn - 450 g.
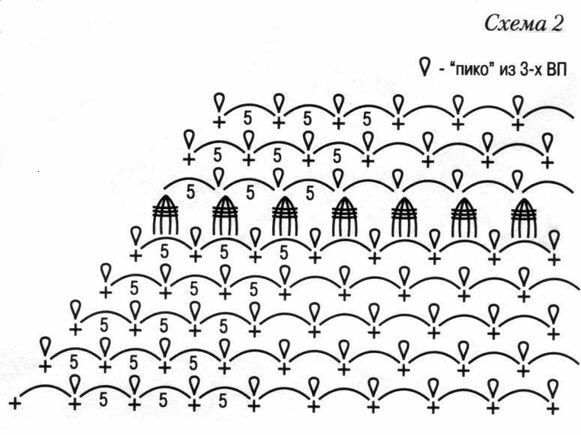
Knit is started from the bottom corner. At the same time, the extension is made in both directions. For knitting use the attached scheme. From the third to the 14th row repeat repetition is done. In the shawls on the photo 84 rows are tyed. Scheme number 2 is used for binding the bottom of the product. At the corner they make an arch. The top is made up in alternating rows. At first, five RLS are made, and the sixth row will be RPS with "pico".Under the arches attach fringe brushes.
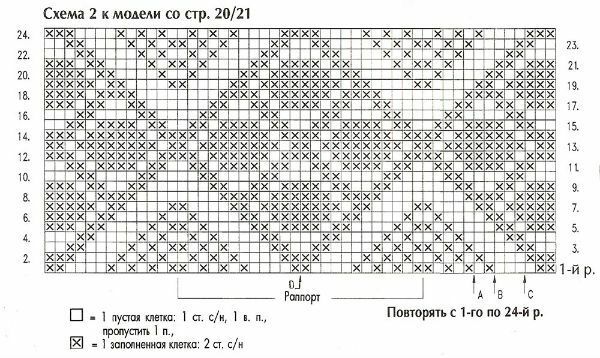
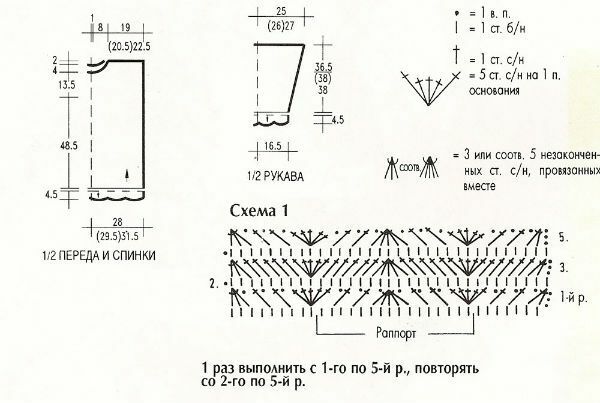
to the table of contents ^Scheme of the summer jacket
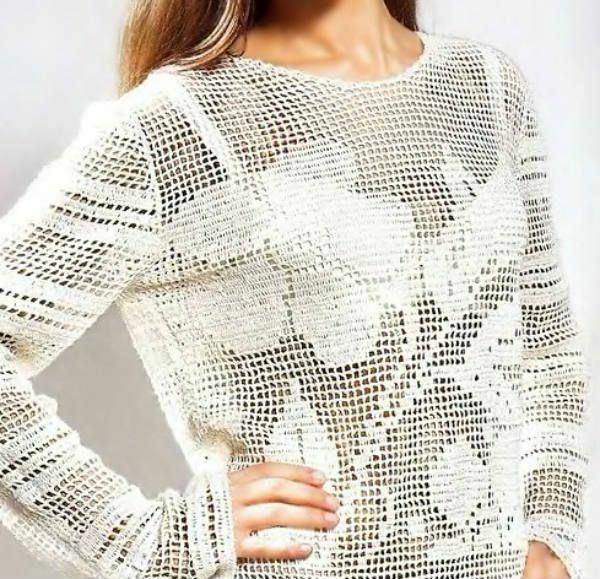
To make the product size 44, you need a thin yarn - 300 g. Also you need a hook # 2.
Workpiece manufactured:
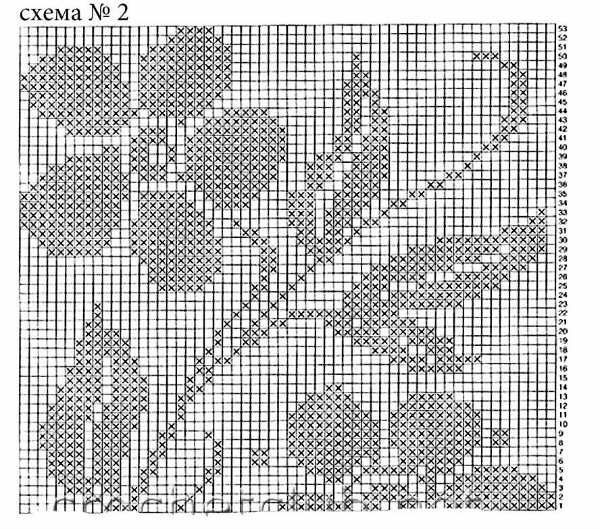
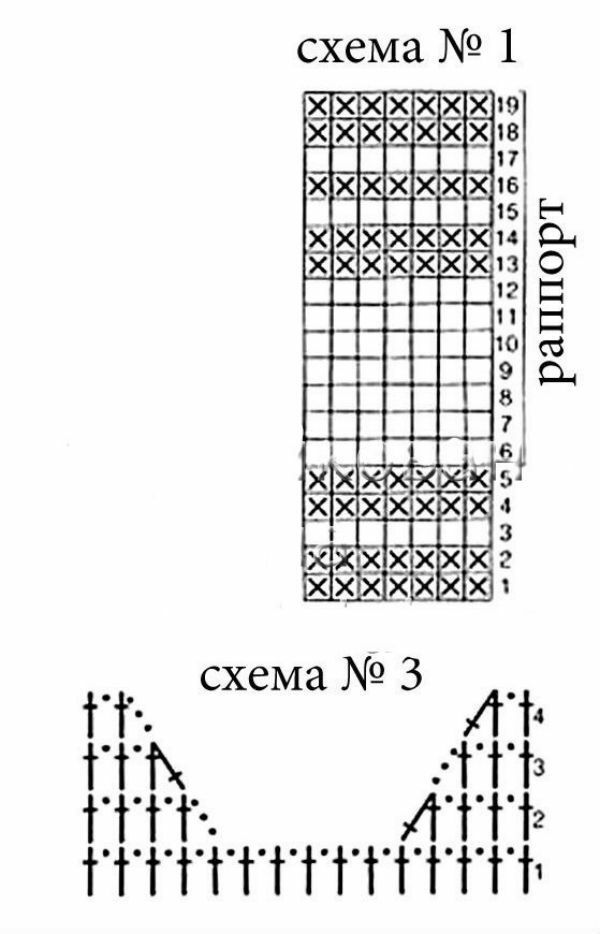
- To transfer, you need to execute a chain of 174 loops. The next three rows are made with piles. The remaining 12 rows are performed according to the scheme 1. After this, the main part of the jacket is started, correspondingly to the 2 diagrams. Having reached the neck, proceed to decrease, being guided by the scheme 3.
- The backrest is performed correspondingly forward, but focusing only on 1 circuit.
- For the sleeve, a chain of 132 loops is made. Then it is connected in a circle and the pattern is executed according to 1 scheme.
- Finally, the assembly and stitching of the product is performed. The edges of the sweatshirts are made out alongside the "step of the steppe."
Get acquainted with the technique of knitting socks with knitting needles for beginners http://woman-l.ru/texnika-vyazaniya-noskov-spicami-dlya-nachinayushhix/to the table of contents ^Scheme pullover
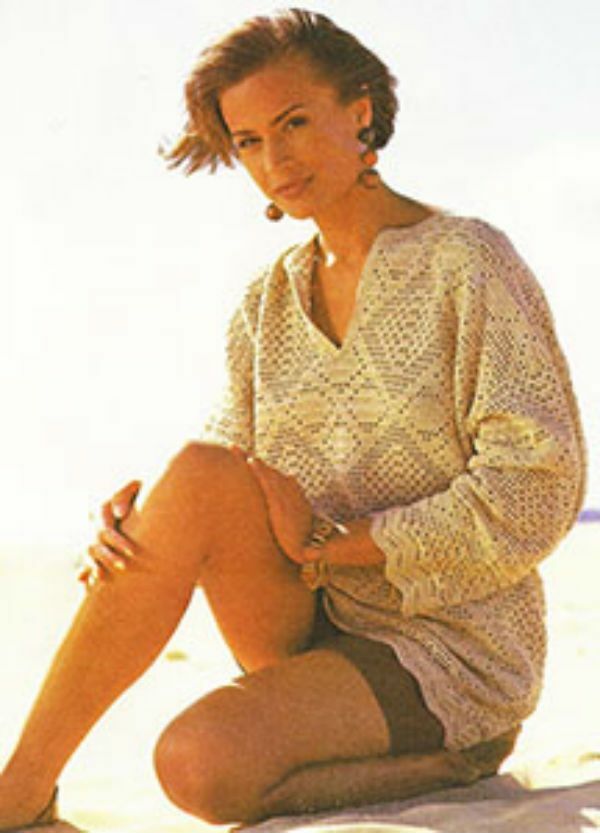
To knit this elegant pullover you will need hook number 3 and yarnsand color. At 44 size 750 g. Scheme 1 is used to make the product strips. The rest is based on the 2 scheme.
Workpiece execution:
- For the transfer, a chain of 167 loops is executed taking into account 3 lifting loops. Next, knit 48 cm canvas, focusing on the scheme 2. After that, the middle two loops are left unbonded for the cutout polo, and the remaining parts are knitted separately. After completing the 68 cm canvas, do a reduction for the neck. It is necessary to gradually reduce 18 loops.
- The backrest is similar to the front, but does not cut the polo. After completing 66 cm of canvas, 14 loops for the neck are left. In the process of its unbinding, it is necessary to reduce 12 more loops.
- 99 air loops are made for the hose, taking into account 3 lifting loops. After knitting 48 cells of 2 patterns. Then, addition of one loop through the row is made 24 times. After completing 48 cm of cloth, finish the work. The second sleeve also matches.
- Assembly of the product. Planks are made in seven rows. The bottom of the sleeves, the gear, the backs are framed in columns without a crochet in one row. The back and front are sewn together. Armholes are sewn into the armholes. The cut of the neck including the polo is formed by the columns without the crochet in two rows, and at the end by "step-by-step" in one row.