
Work with beads and beads is becoming more popular among people keen on decorative and applied art. Constantly there are many different techniques associated with this multi-faceted material. Our master classes on beading flowers are aimed at acquainting you with the most popular of them.
- Beadwork of flowers of orchids
- Beaded violets
- Bulk beadwork of beads
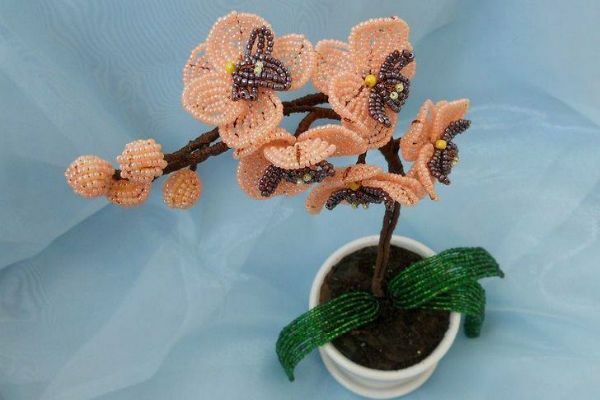
Beading of colors of orchids
Necessary materials for creating orchids:
- wire for weaving flowers and petals, not thick, so that it can bend well and weave;
- wire for the stem of the plant, thick to withstand the load of the whole product and not bent;
- beads for creating flowers and petals( orange, brown, green, two shades of yellow);
- yellow beads of medium size;
- planting pot;
- gypsum;
- brown thread or brown teip-tape( sold in stores for floristry or needlework), for winding the stem of the plant.
The order of creating petals of an orchid and assembling a flower:
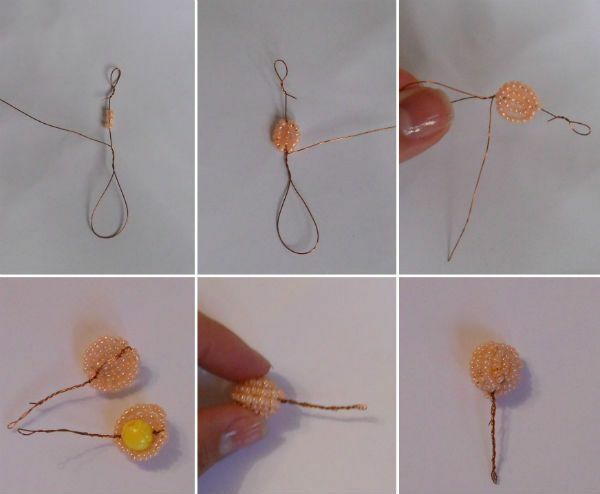
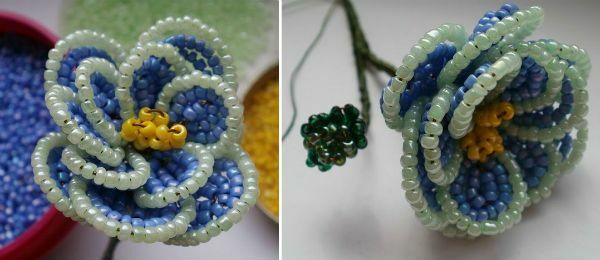
At one end of a thin wire, about a meter in length, make a small loop. From the free end we dress four beads of the main color of the future flower. The free end of the wire is now also bent into a loop but much larger, as shown in the pictures.

We take our four beads as the basis of the future petal. The next stage begins to build up the future petal, by stringing and braiding our base wire with beads of the primary color so that between the rows there were no gaps and gaps. Thanks to this, the finished product will look much more natural and aesthetic. It will be necessary to make three semicircles with wire with beads on each side of the base. To make it easier to understand the sequence, carefully study the picture.
After finishing the last half-circle of the petal, and fixing it, there remains a small piece of wire, which will need to be wrapped several times at the base of a large loop for the strength of the product.
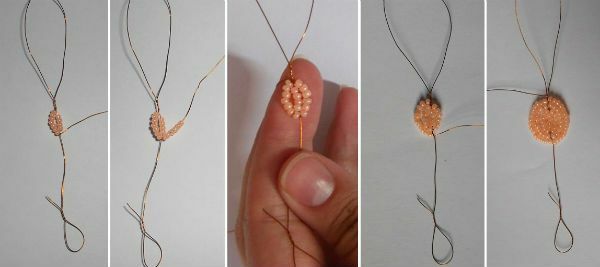
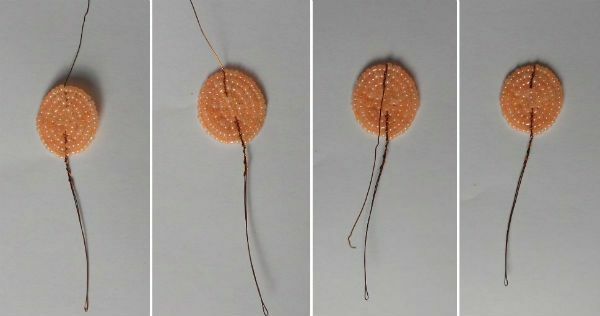
Now you need to fix the remnants of the wire, so that the petal is ready for the formation of the flower. To do this, a large loop is squeezed into the leg, and we straighten the wire with a small loop and pass it from the inside of the petal through its base to the foot, fix it and cut off the excess.
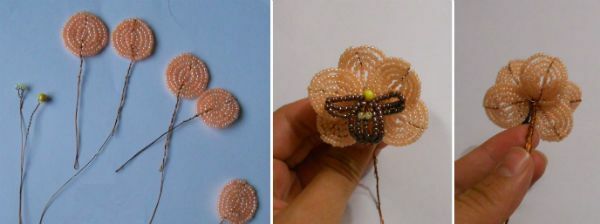
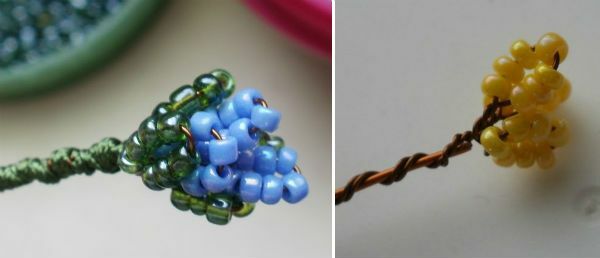
The flower will consist of five petals. The remaining four, we produce the same as described above. At this stage, you need to prepare two stamens, one of a medium-sized yellow bead, and the other of a yellow bead. Still need to collect small brown petals to decorate the middle of the future flower. Lateral brown petals should be made from the base in eight beads and one semicircle on each side. And the petal, which will be in the middle, consists of a base of six beads and two semicircles from it.
To assemble a flower, all the prepared parts must be joined by twisting the wires. We focus on the hints indicated in the pictures. The main thing for the strength of the product is not to forget to tightly wrap the finished flower with a separate piece of wire, thereby forming a reliable foot of the flower. In total for the orchid branch it is necessary to make five flowers.
The order of creating buds of an orchid:
The bud is created by the main color, with a base of three beads and one pair of semicircles on each side of the base. To give the bud a three-dimensional shape, the third row of bead semicircles must be made one bead less and rather tight.
For one bud you need two such volumetric petals to sew them together with a wire into a ball, having inserted the bead first. To form the future branch, you need to make four such buds.
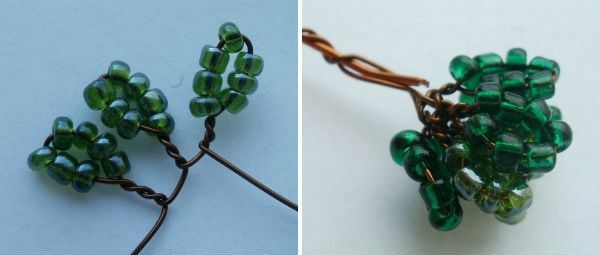
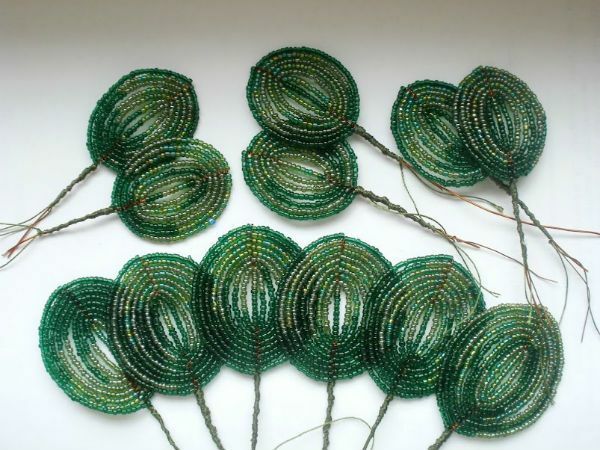
The order of creation of leaves:
Creation of the whole orchid takes place according to the same system of French weaving. Leaves are made in the same way as petals, only oblong in shape. They will not be more massive than the other parts, for them you can pick up a thicker wire.
Make the leaves as long as you want and in any quantity. You can flush the leaves with green wire for strength, as seen in the pictures.

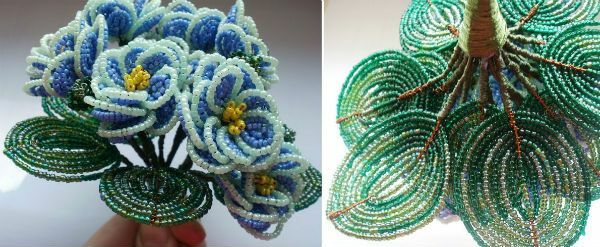
The final collection and decoration of the orchid branch:
Form a stem of two wires of different diameters, twisting them together for strength. All the flowers and buds are attached the same way with the wire on the stem, as shown in the pictures. At the very bottom of the stem, fix the leaves. The barrel should be tightly wrapped with brown threads or tap-tape to hide the wire. Place the finished product in a pot of gypsum. To decorate the pot, you can paint the plaster under the color of the earth, or fill it with small stones, bark of a tree.
Mosaic weaving of orchid flowers:
The following schemes are suggested, according to which it is most convenient to perform mosaic weaving of petals for an orchid. Choose the desired color scheme for the future product, and make three petals according to Scheme # 1.
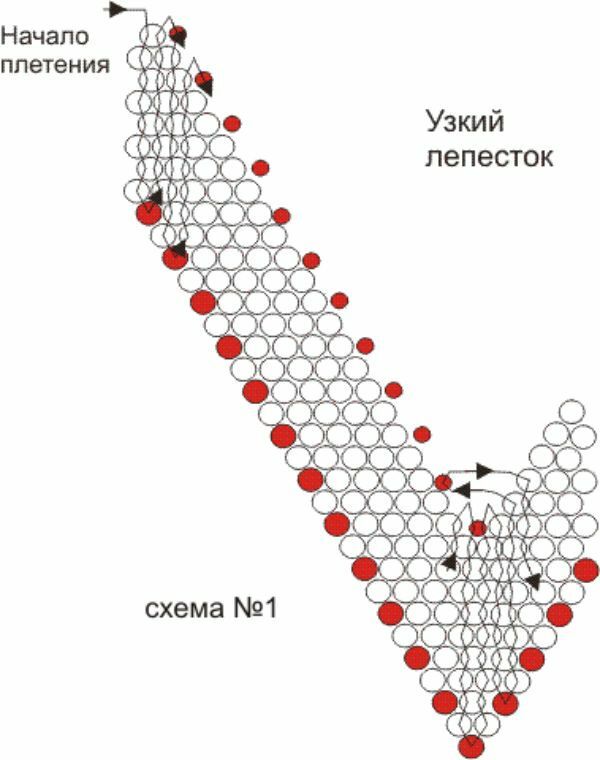
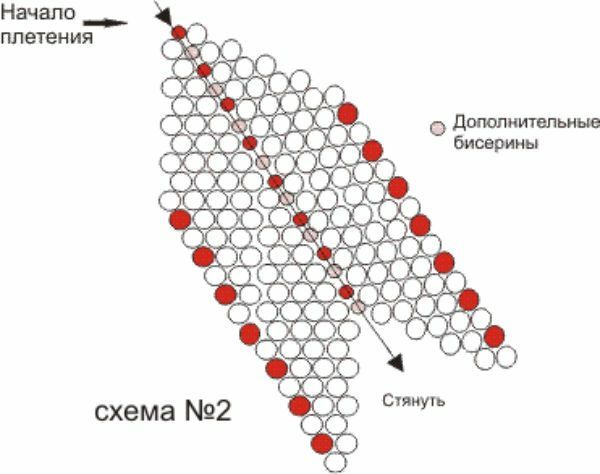
According to the scheme number 2 you need to add additional beads. After that, go back to the center of the weave and pull the petal to get it bumpy.
In order to make the petals larger, at the very beginning simply add beads. And make all the previous manipulations.
One of the petals needs to be sewn over the edge, in the middle insert jewels, stamens made of beads and beads.
According to the Scheme number 3, you need the edges of the petals to make them even more beautiful and natural.

You can use a ready-made orchid according to your wishes, it will be an excellent decoration for your interior or emphasize your personality as a brooch, hairpin.
to the table of contents ^Beaded Violets
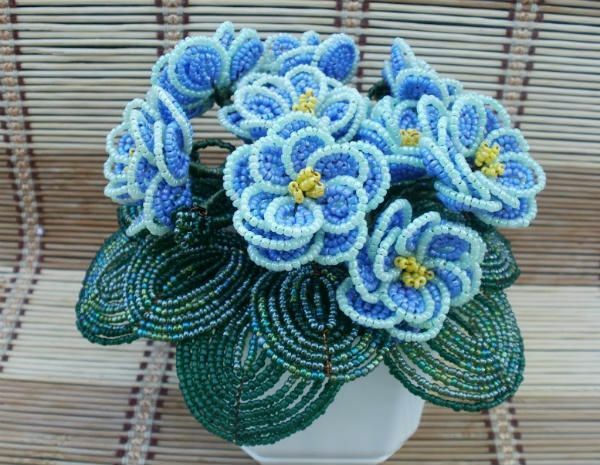
Materials needed to create the violet:
- beads according to the desired color and size of colors;
- wire is flexible enough for weaving and thicker for fastenings of details;
- tool for cutting wire( nippers, scissors);
- thread for winding stems or tapes;
- flower pot of the right size;
- gypsum or other solution for planting and fastening the product.
Create a violet:
On a piece of fine wire, make seven loops, each of seven beads. Form a bud according to the example suggested in the picture. For the strength of the stem, insert the wire thicker. So make the necessary number of buds.
If you want a blossoming bud, then on the line with the loops you need to make in the middle of the loop the primary color of the future flower.
You need to wrap the stems with a green thread or with a tape tape.
To create stamens, you need to perform all the steps to create buds, only three loops.
A large flower is made in the same way, only four turns. The number of colors can be varied.
Leaves are created in the technique of French weaving. The volume and length of the leaf can be varied.
To assemble the composition, you need to combine the created flowers and buds.
We attach the leaves to the twigs with flowers as shown in the picture.
Finally, it is necessary to fix the plant in the pot with gypsum or other solution.
to the table of contents ^The voluminous pyatilistnik from beads
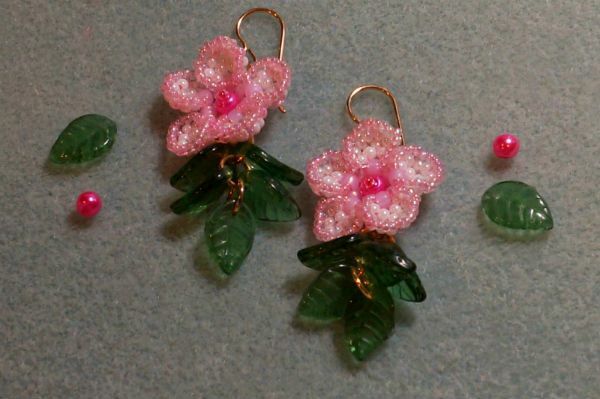
Only at first glance it may seem that in order to make a beautiful volumetric flower from beads, much labor and knowledge is needed. Of course, it will be necessary to get on, but such work is possible for everyone. On the example of this master class, you yourself will understand this. In it, we will create a delicate flower of a delicate cherry blossom
You can use ready-made decoration of such themes in many cases. Feminine and romantic flowers look like pendants, pendants, earrings, brooch rings, and so on. You can also make original buttons from flowers, locks on a bag or purse, stripes for gloves, hats, scarves.
In this lesson we will work with pink and white beads, but you can use beads of any color, at your discretion, depending on what fate will be waiting for the finished product, and how you will wear it. Most often it is better to choose a color for the eyes or accessories.
Getting started.
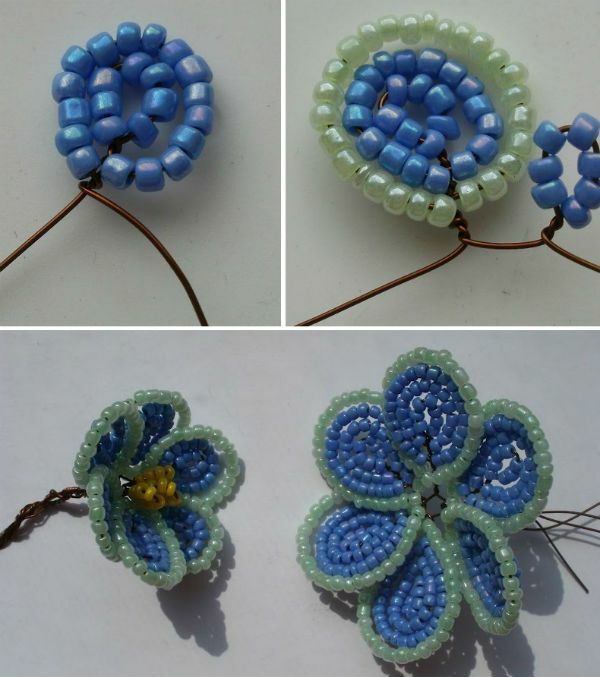
Type five beads, and thread them into the ring. Between each bead of the first row weave one more - this will be the second row.
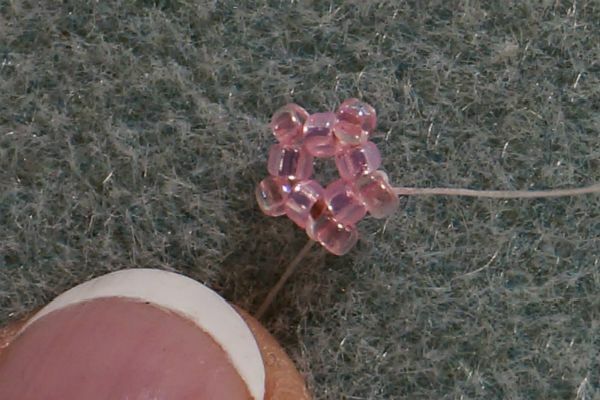
After that, we add one bead between the beads of the second row. We do the same on the fourth row.

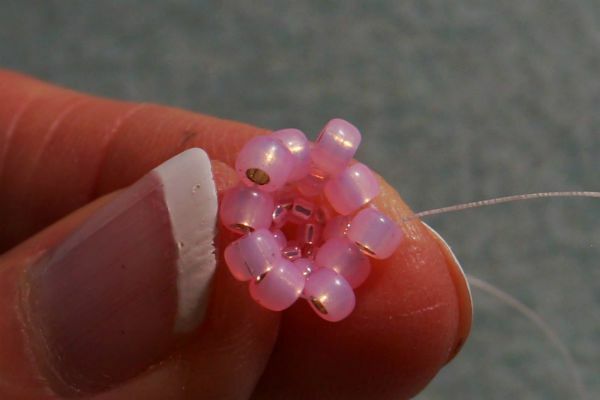
Visually, our product should expand to the sides, forming future cherry blossoms. You create it from the center to the edges, gradually enlivening it.
After the fourth row, you can start forming petals.
Take the smaller beads. Above the bead of the previous row, we need to make loops of three smaller beads, start baiting the petal.
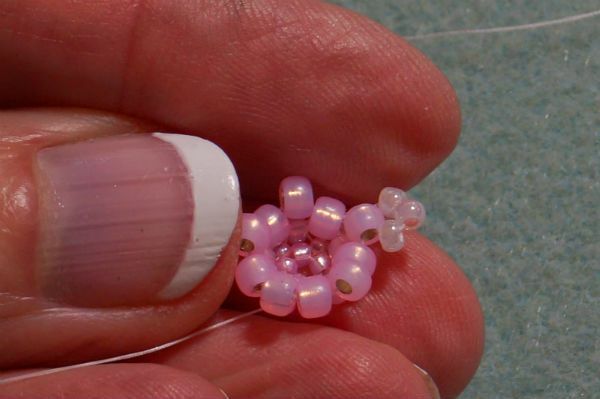
Make the petal more voluminous.
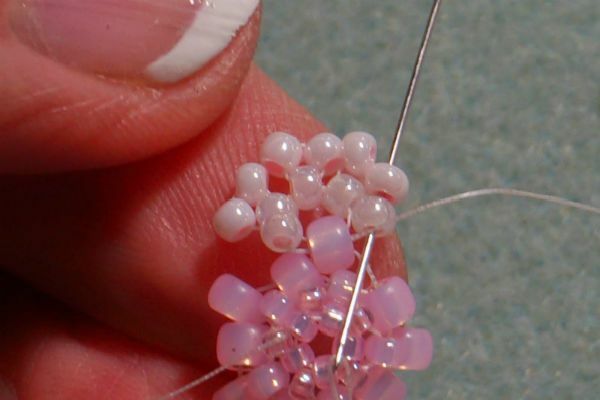
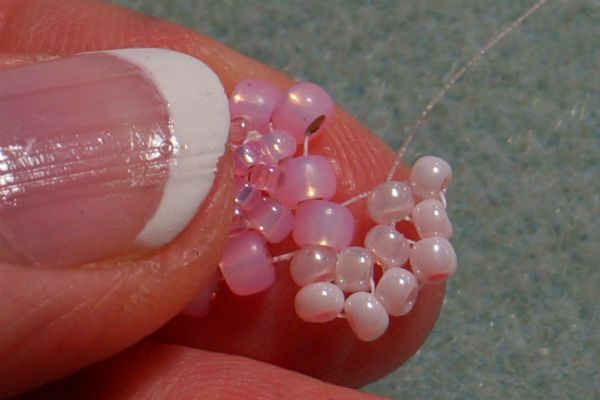
Now take the beads of even smaller size and make them a little bit of petal.
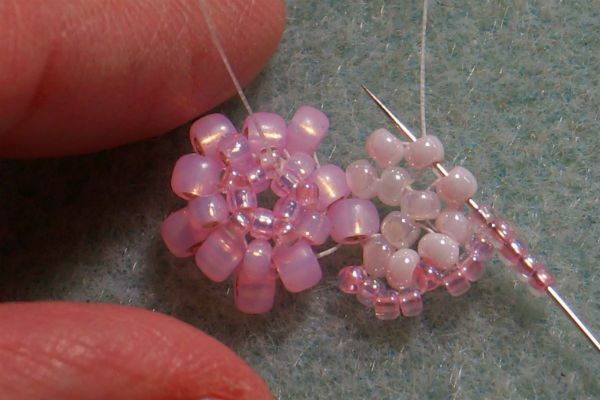
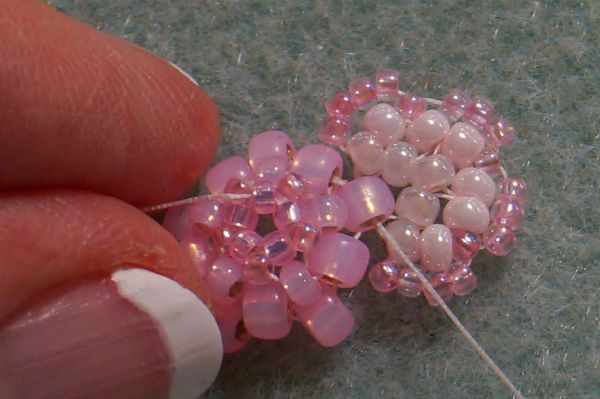
The finished petal must be pulled together to make it bulge.
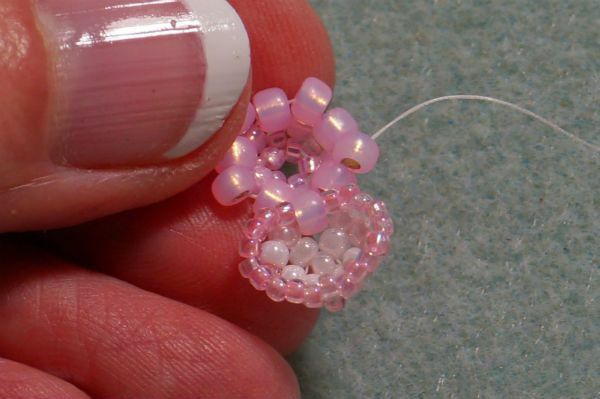
By the same principle do the other four petals.
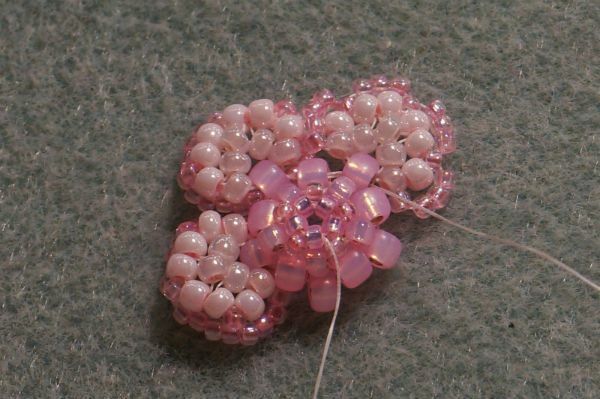
Bead products will be an excellent addition to any interior, both at home and at work. Also many products can be used as decorations, which will give uniqueness and perfection to your style and will complement it.