Contents
- How to knit slippers with knitting needles, crochet?
- Yarn. What do you need to know?
- Knitting needles and crochet hook. How to choose the tool number?
- Basic knitting techniques for spokes
- Basic knitting techniques for hook
- Beautiful knitted slippers with knitting needles, description
- How to tie square 1 and square 2. Dressing the toe / toe of the product
- How to tie square 3 and square 4. Decorating the side pieces of the product
- How to tie a square5 and square 6. Heel decoration
- Slippers for beginners
- Men's knitted slippers with knitting needles, scheme
- Materials and tools:
- Upper cuff
- Middle part
- Lower edge
- Outsole
- Viewabout: How to tie male slippers hook?
- Women's knitted slippers with knitting needles, scheme
- Children's knitted slippers with knitting needles, scheme
- Knitted slippers for felt soles, diagram
- Knitted knitted slippers for knitting
- Video: Knitting Japanese knitted slippers
- Video: Masterclass knitting-crocheted shoes
- How to tie slippers with crochets and crochets: advice and feedback
- Video: Knitted slippers with seamless seams. Knitted slippers
How to knit slippers with knitting needles, crochet?
Before you start working on slippers, pick up the material and tools.
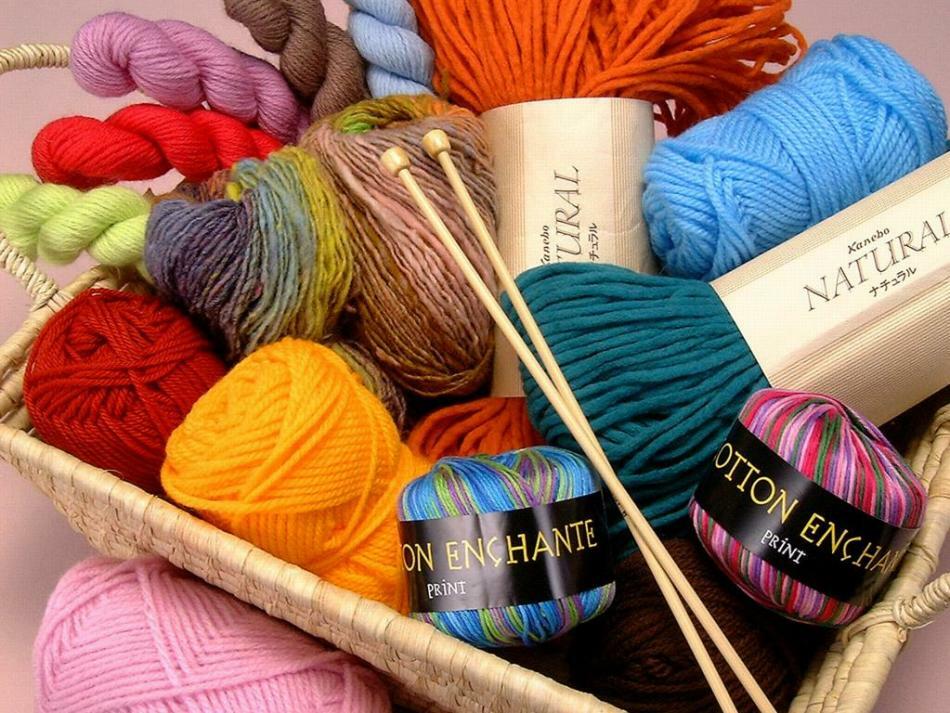 Everything you need for knitting
 Yarn. What do you need to know?
Yarn varieties
- Natural
- cotton
Pros: Yarn, easy to work;wide color scale
Cons: long-term drying after washing;if the temperature is incorrect, the product can "sit down"
- liner
Pros: yarn, easy to work;fast drying after washing
Cons: the color range is limited by natural shades;at the wrong temperature washing mode the product can "sit down"
- wool
Pros: the yarn is warm;large selection of colors and types
Cons: yarn is very whimsical in subsequent care, with the wrong temperature wash mode the product can "sit down", with improper drying / ironing - stretch;often irritates the skin and can cause allergic reactions( especially in children);quickly wears with an active toe
- Mixed
Combines the best properties of natural and synthetic materials
- Artificial
- polyester
- acrylic
Pros: good color choice;the yarn is easy to work with;good heat capacity( especially acrylic)
Cons: yarn can be electrified;is characterized by poor hygroscopicity;In the process of wearing on the product, so-called "coils" may appear;some note the characteristic "creak" of the yarn
Knitting needles and a crochet hook. How to choose the tool number?
- For thread thickness less than 4 mm, the thickness of the spokes should be 1 mm larger. For example, the thickness of the yarn in the figure is 1 mm, the knitting needles - 2 mm
- For yarns more than 4 mm thick, the thickness of the spokes should be 1.5-2 mm larger. For yarns 3 mm thick, the best working knitting needles will be 6 mm
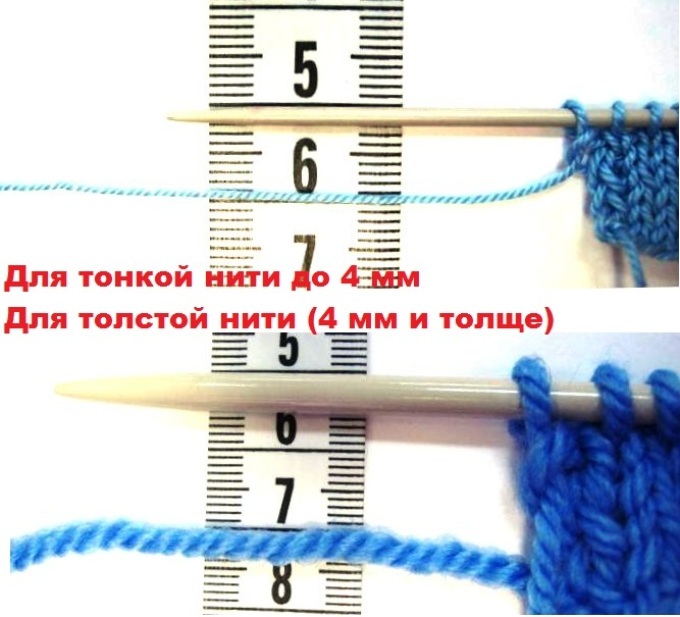 spokes How to choose knitting needles and yarn
 - If you are going to knit a volumetric pattern with braids, the spokes should be even 0.5 mm larger
- Openwork pattern or pattern with lowered loopsrequires spokes 0.5 mm smaller than suggested by the thickness of the yarn
A small reminder for the choice of the thickness of yarn and spokes is presented in the infographics below
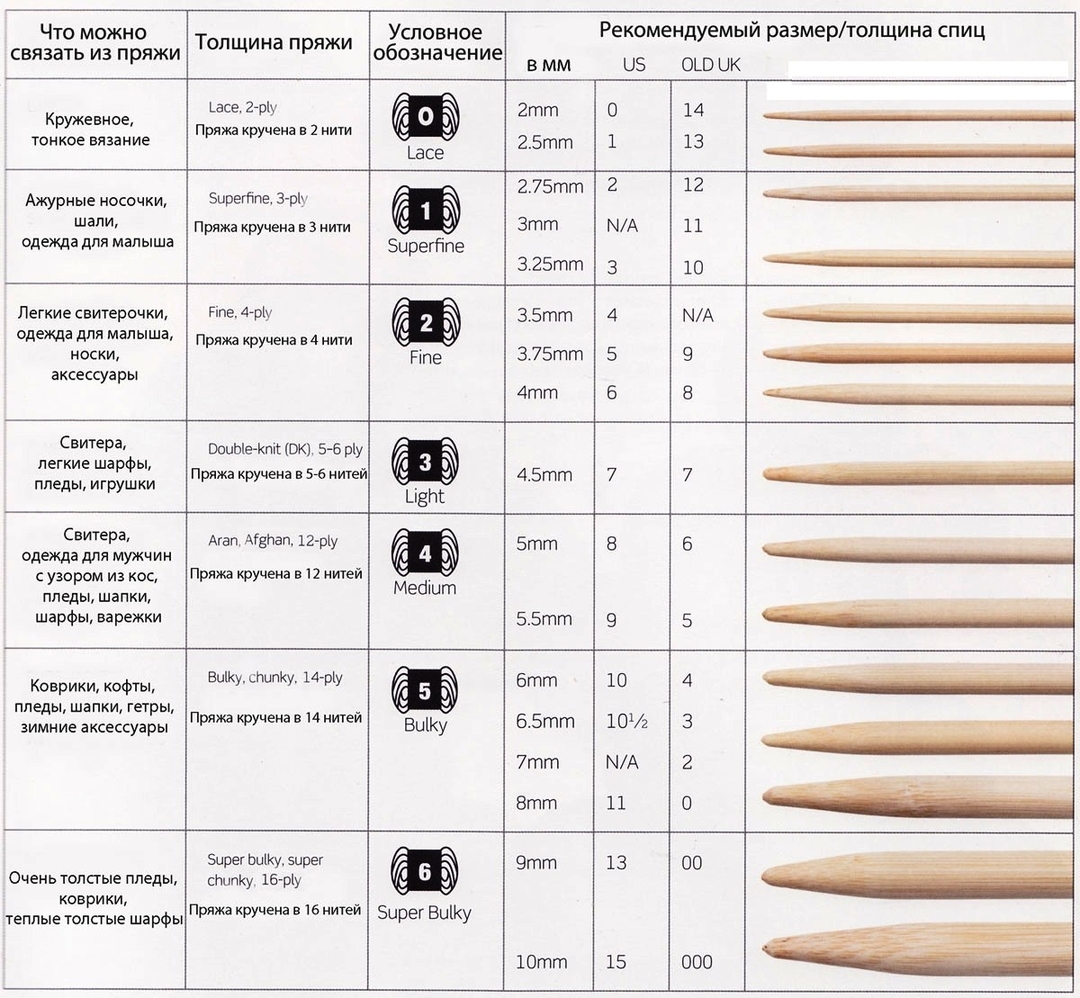
The hook is selected by analogy with the spokes
Important: The tool number corresponds to its thickness. For example, No. 2.5 means that the thickness of the spokes / hook is 2.5 mm
Basic knitting techniques for spokes
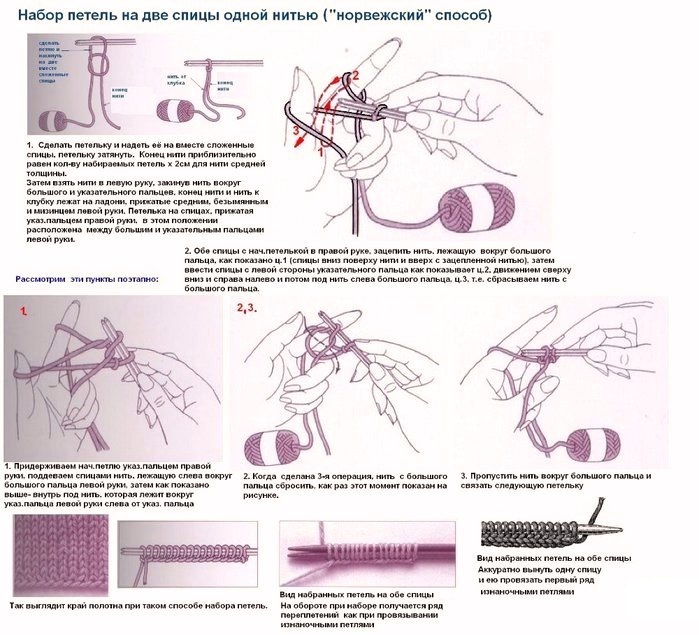
- The simplest set of knitting needles
Tip. If you work with fine yarn, the loop set is better done with 2 spokes, so the edge will be more elastic
- To calculate the length of the free end of the thread for the set of loops in centimeters, multiply the number of loops in the description by 2
- Make the loop in any convenient way for you and put onher on the spokes folded together. Tie a little tight
- Loosen the threads around the thumb and index finger of the left hand. The free end of the thread should be on the thumb, the thread from the coil - on the index finger. Fix the threads by pressing the fingers with your free fingers
- Loop the needle on the knuckles with the right index finger of the right hand
- Hook the needle around the thumb( movement 1 in red dotted line in the diagram)
- Drive the needle with the hooked thread on the left side of the index fingerline on the diagram)
- Make the spokes move from top to bottom → right to left → under the thread on the left of the thumb. Then discard the thread from the thumb, forming a loop on the spoke( movement 3 with a dashed line in the diagram).Type the required number of loops
- How to knit the front loop
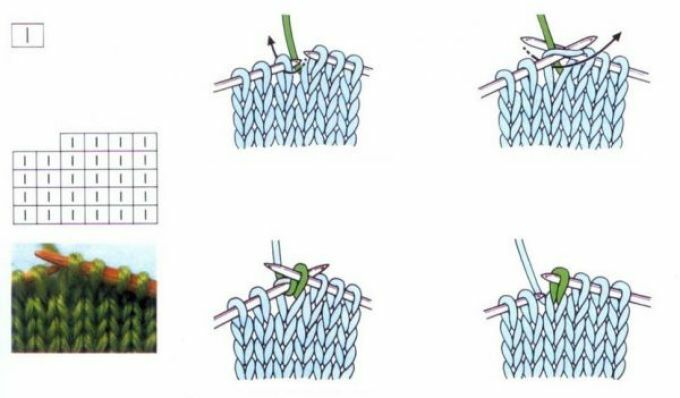
- How to knit the reverse loop
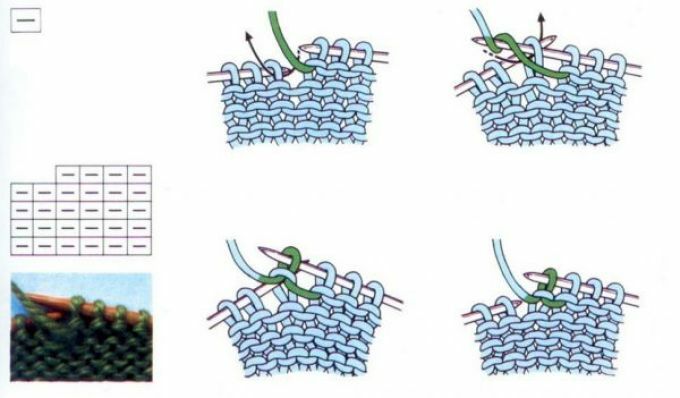
- How to knit the cuff
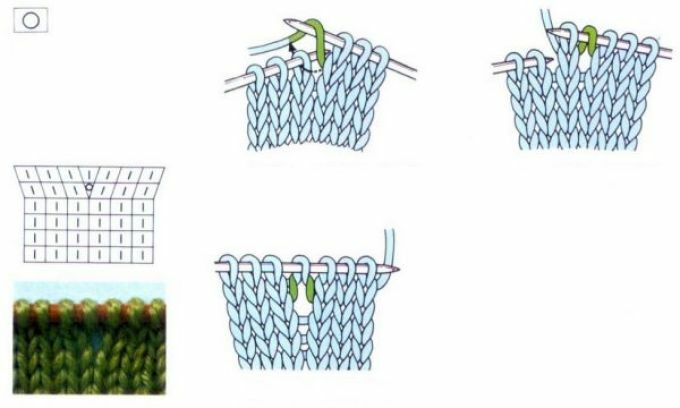
- How to knit two loops together facing the slope to the right
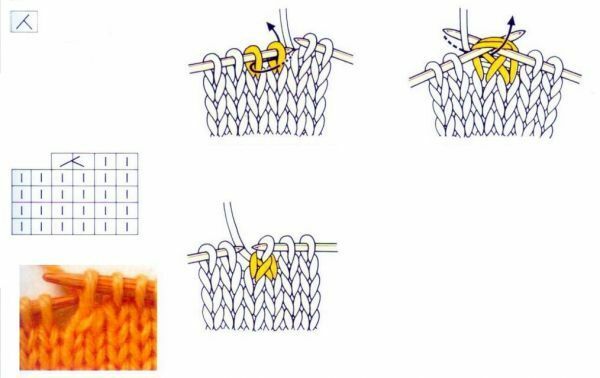
- How to knit two loops together facing the slope to the left
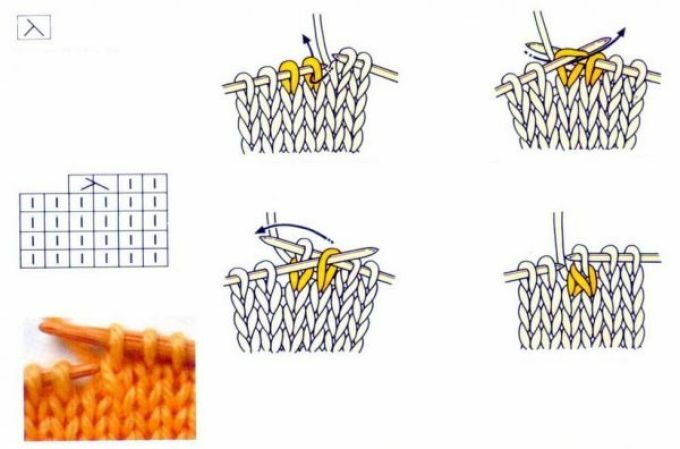
- How to close the loops

Basic knitting techniques for the hook
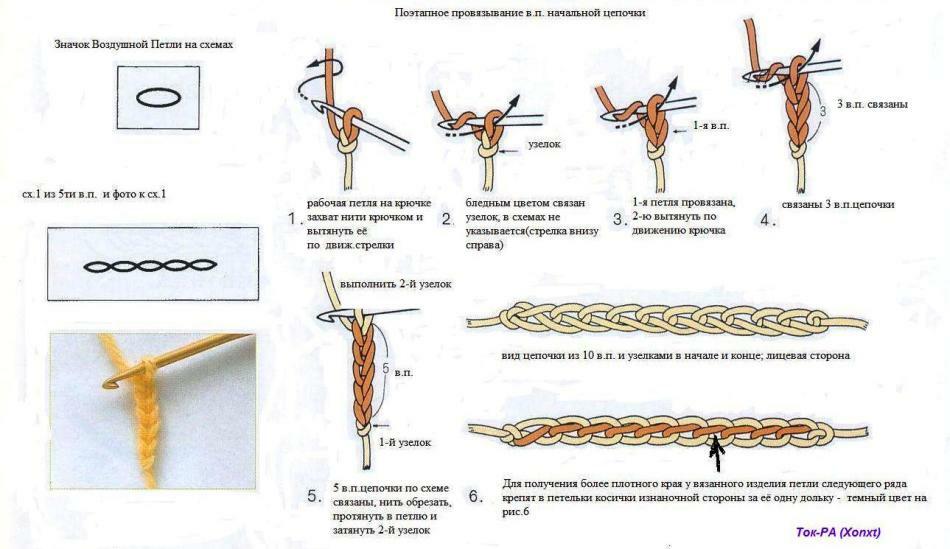
Firstair train loop
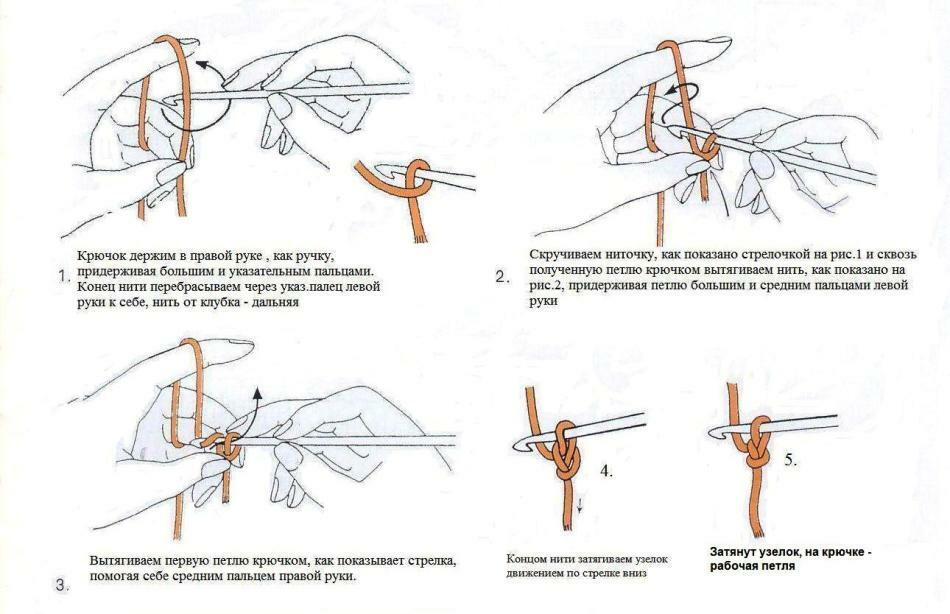
- First loop and air chain
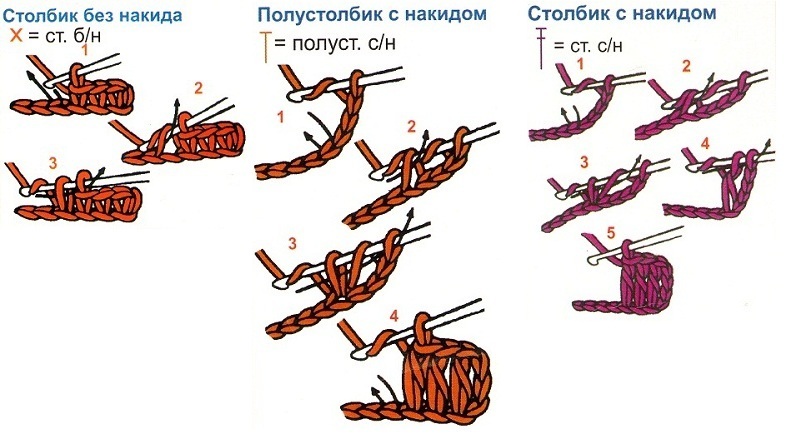
- Column without crochet, half cushion with crochet, column with crochet
- Elastic of bells, ring, connecting post
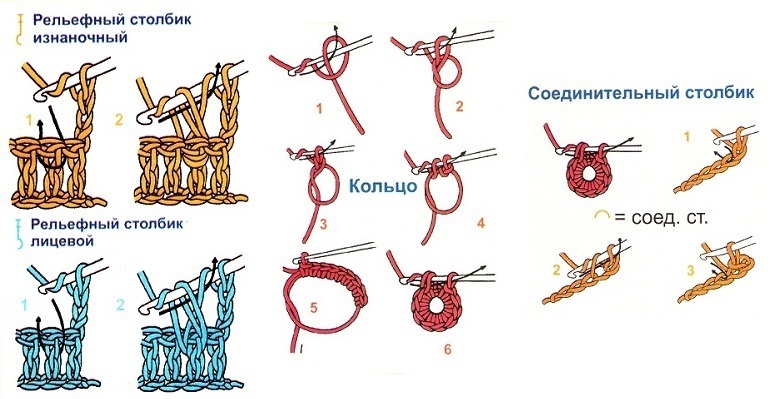
Fundamentals passeds, knitting
Beautiful knitted slippers with needles, description
Trendy slippers in patchwork style will surely please and warm dear people to you. The knitting technique is very simple and even for beginners knitters.
In addition, the pattern "Diagonal-bound squares" is suitable not only for knitting slippers, but also for making plaids or decorative pillows.
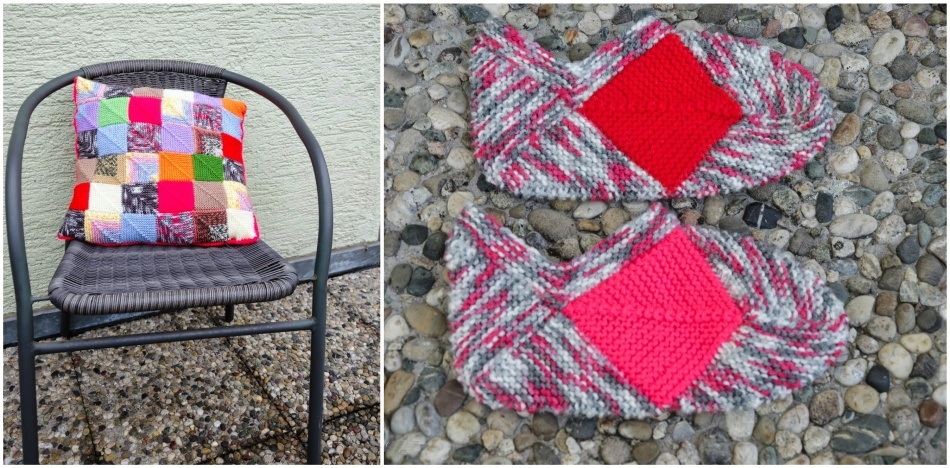 Pillow and slippers in patchwork style
 A small foreword before the work of
- Determine the length of the foot. How to do it correctly will tell the photo below
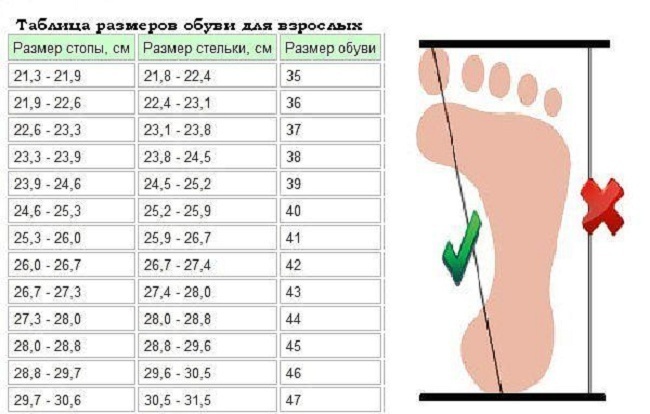 Correspondence of the length of the foot to the size of the insole and shoes for adults
 - The diagonal of the base square should be equal to ½ the length of the foot. For example, for a foot with a shoe size of 37 and a foot length of 22.6-23.3 cm, you will need a square with a diagonal of 11.3-11.7 cm and a side of 8-8.5 cm
Board. Before you begin work directly above the slippers, tie the square probe from the selected yarn and calculate the loops according to the performance of the yarns you selected, your knitting pattern
- The following description assumes that the finished product will correspond to the average female size( 37-38 or M)
- Necessary materials and tools:
- yarn of your choice( for women and men slippers - 300-400 g, for children - 150-200 g)
- spokes 2,25( corresponding to yarn characteristics)
- Basic knitting -
Face and purl rows are tied with facial loops
- Knitting density: 46 loops = 10 cm
_2"> How to tie square 1 and square 2. Drawing of toe / toe of product
Type 37
loops first and all odd ones:
front loops 2nd row: 1 edge, 16 face loops, 3 loops together front( remove one of the three loops without tying, 2nd and 3rd loops-You tied the face together, put the loop off on the knotted one), 16 facial, 1 edge. After tying the row, 35
loops were left on the spoke: 1 edge, 15 facial, 3 loops along the front, 15 facial, 1 edge. After tying the row on the spoke - 33 loops
5th row: 1 edge, 14 facial, 3 loops along the front, 14 facial, 1 edge. After tying the row on the spindle - 31 loops
Knit by subtracting three loops in each even row until 9
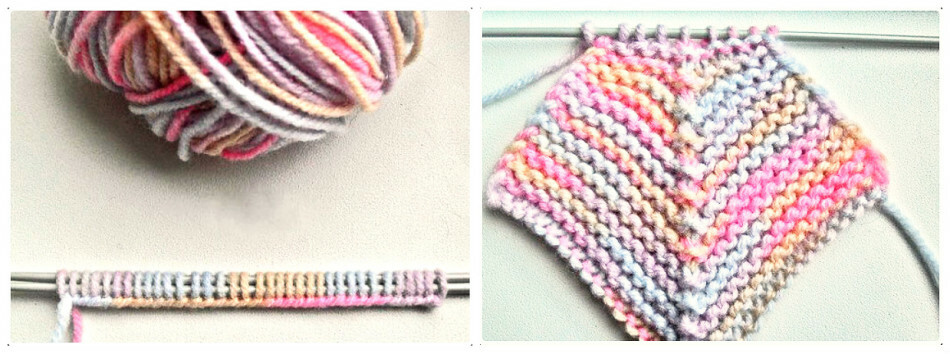
loops remain on the knitting needles. Check the bound element and make sure that the diagonal of the square is ½ the length of the foot of the future owner of the slippers
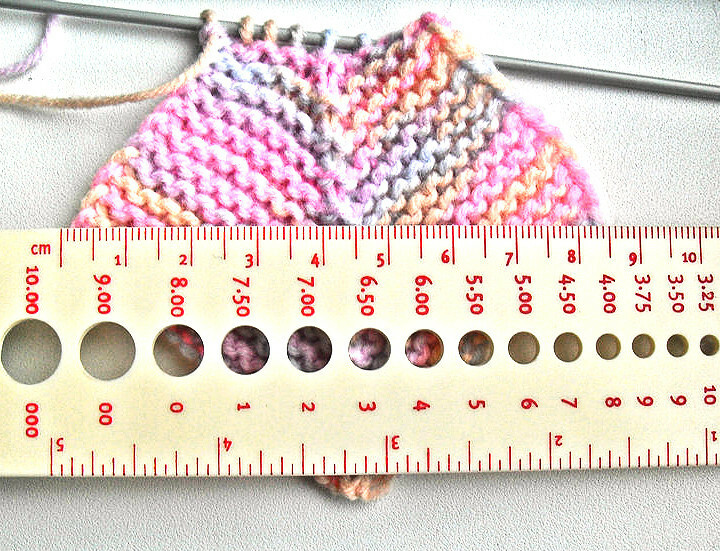
.there are 9 loops of square 1. They will become the basis for the square 2
1st row: 9 loops of square 1 are sewn with the front loops, add 14 loops along the edge row of the left side of the square. On the spoke: 23 loops
2nd row: tie 14 loops facing and extend the row 14 with loops along the other edge of the square. You have 37

loops on the spoke. Similar to square 1
All odd rows: face
All even: 3 center loops tie together the face
When the last loop is closed, you will get a kind of "boat" that will form the toe of the future slipper
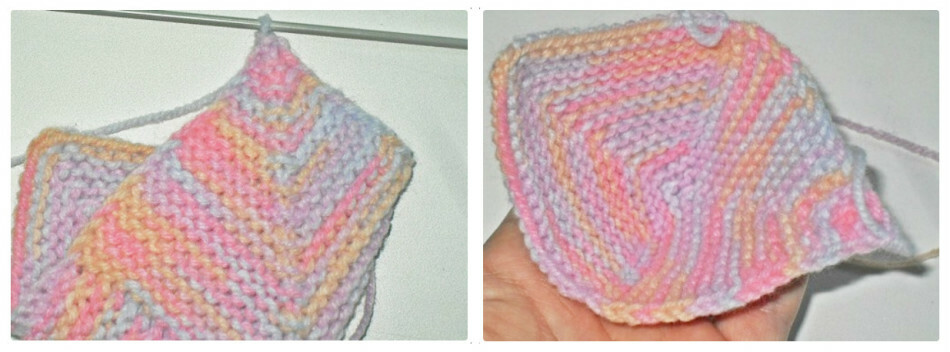
How to tie a square 3 and a square 4. Decorate the side parts of the
Type 37 face loops along the edge row of one side of the
sock Continue to knit according to the
pattern All odd rows: front
All even: 3 central loopstie together the facial
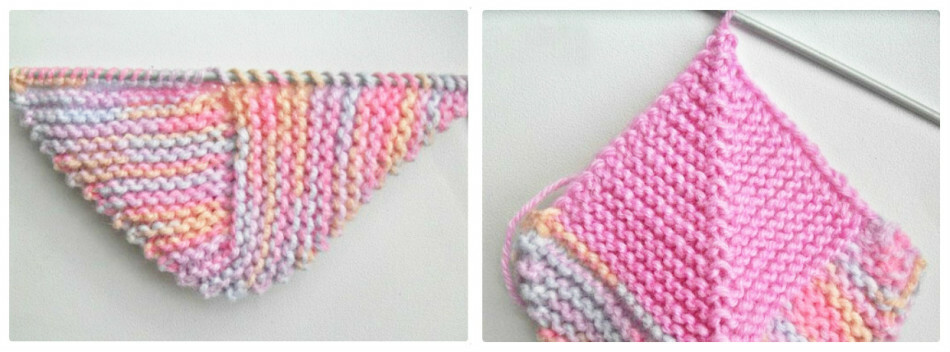
When square 3 is completed, tie the symmetrical square 4
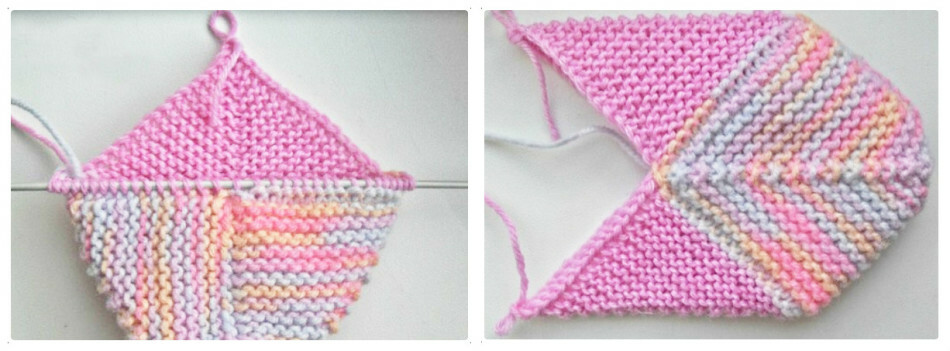
How to tie the square 5 and the square 6. Heel shape
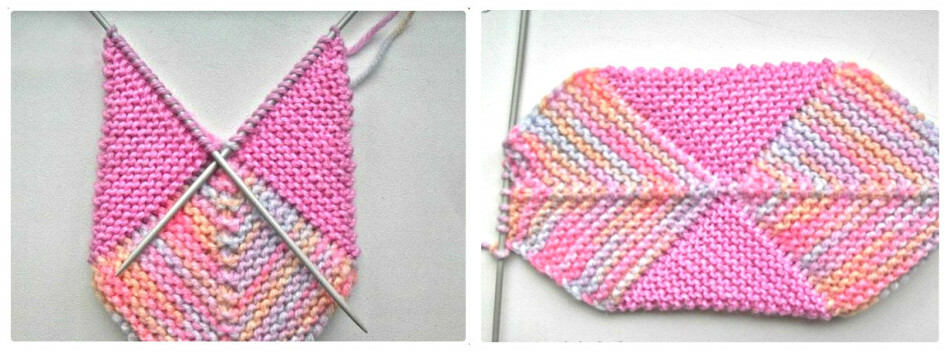
Continue the work according to the old scheme
Type the 37 sides of the squares( 3 and 4) on the sides of the squares( 3 and 4)
All odd numbers:face hinges
All even: 3 center loops tie together the front
Continue to knit until there are 9
loops on the knitting needle. Similar to the wearing of the toe of the article, decorate the last square of the heel

. Remain aboutormit armhole to the ankle and sneakers ready. The knitting algorithm of the second slipper is the same as the first one. The
is made in any convenient way for you
- with knitting needles
- hook
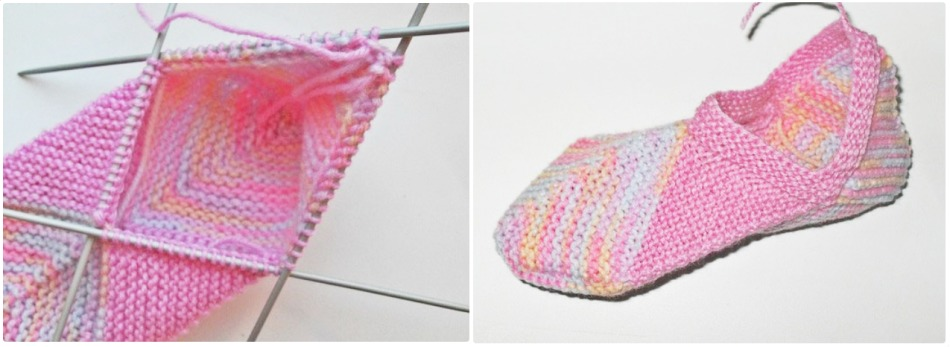
Slippers with knitting needles for beginners
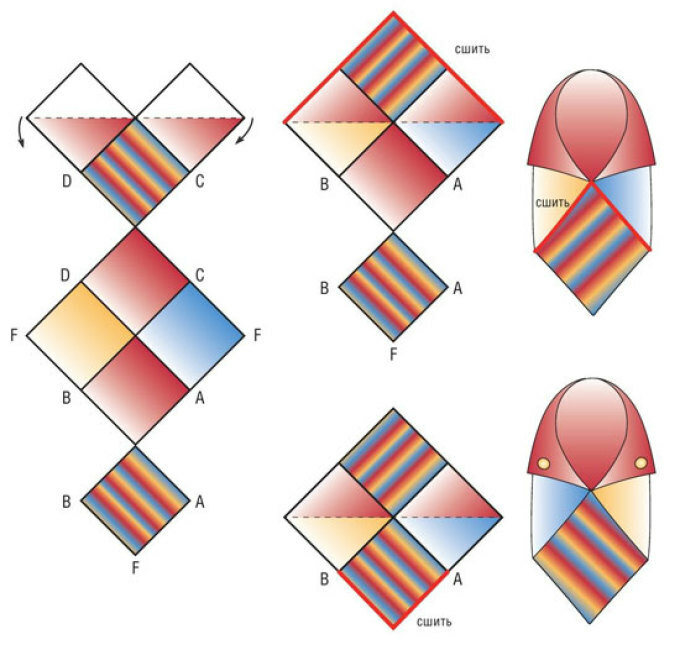
If the previous slippers seem too complicated for you because of the elements that are tied to each other, try to tie the model,below is
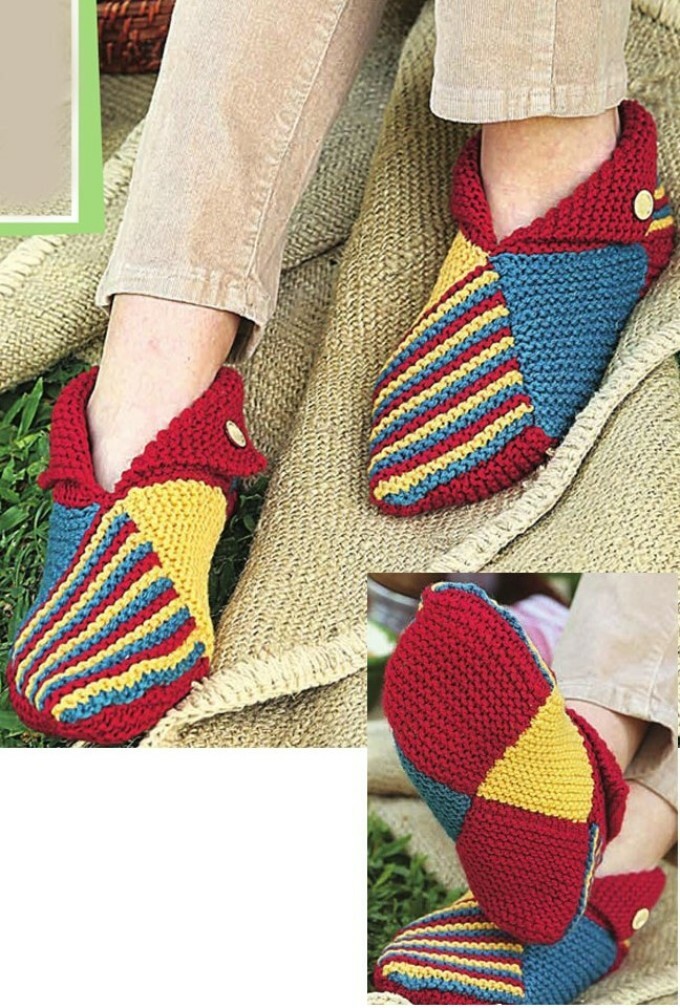
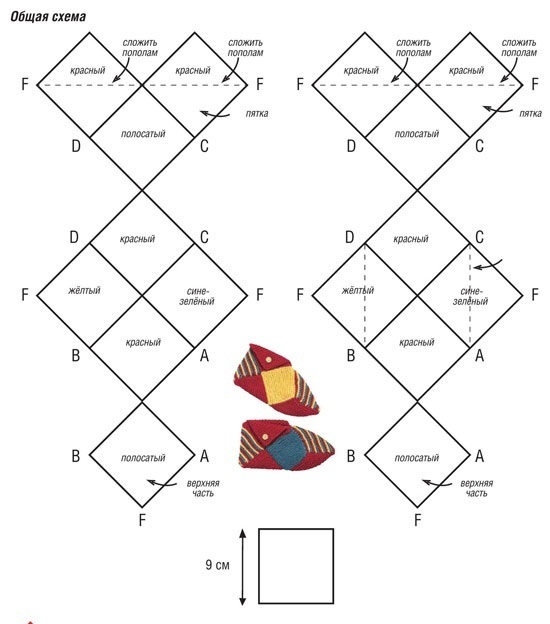
All you need to do is to connect 8 squares with a side of 9 cm and a diagonal of 12.7( length of the foot 25 cm, size 39-40)
The basic knitting is a handkerchief
After all the squares bFLS are ready, place them according to the diagram and sew
wonderful and cozy slippers ready
Men's knitted slippers spokes scheme
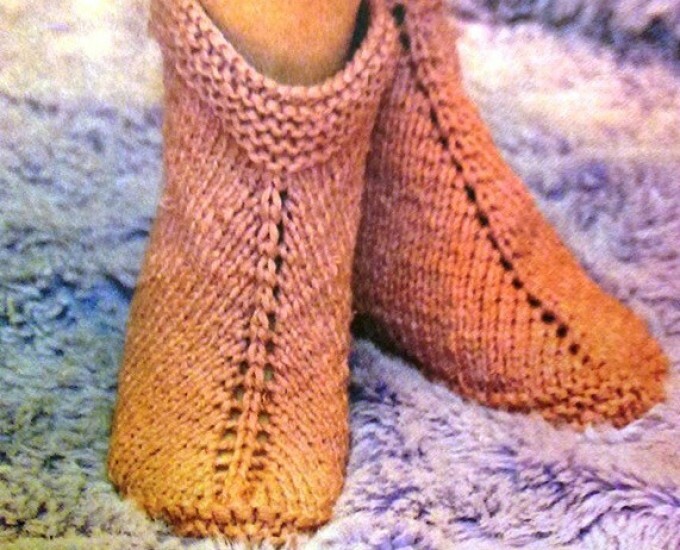
This model is characterized by ease of execution, as there is no typical sneakers "nosochnogo" subtraction of loops, which discourages inexperienced knitters.
These slippers will warm both the men's legs and small children's tops.
Materials and tools:
- Thick yarn with density( 110 m / 50 g) - 200 g
- Knitting needles( according to yarn) - # 4,5
Basic knitting: front( odd rows are tied with front hinges, even - with purl)
Knitting density: 16 loops = 10 cm
Knitting algorithm for slippers, size 43( 27 cm along the length of the foot)
Upper cuff
- Type on the knitting needles 55 loops
- Spray the first nine rowsGarter stitch
- 10th row: all hinges andKnown
Middle part of
Highlight the central knitting loop( 28th in a row).The loop can be identified with a pin, a special ring-marker, a bright thread
11th row: edge loop, 26 face loops, cap, central loop is sewn on the front, cap, 26 facial loops, edge loop. On the spoke there are 57 loops
12th row and all subsequent even rows up to the 38th row: the back loops
13th and all the following odd rows up to the 37th row: the edge loop, the front loops section, the cap, the central loop is fastenedfacial, nakid, facial hinge section, edge loop
37th row: edge loop, 40 face loops, cape, central facial loop, capitulum, 40 facial loops, edge loop. On the spokes - 85 loops
Bottom edge
39th row: all front( edge, 83 hinges, edge)
40th row: all front
41st row: all front
42nd row: all front
Outsole
43rd row: Edge, 2 hinges together facing with a slant to the left, 37 eye loops, 2 hinges together with a slope to the right, a central hinge, 2 hinges along with a slope to the right, 37 hinges of the front, 2 hinges along with a slant to the left,.On the spokes - 81 hinges
44th row and all even rows: purl loops
45th row: Edge, 2 hinges together facing with a slant to the left, 35 eye loops, 2 hinges together with the slope to the right, the central front, 2 hinges togetherwith a slope to the right, 35 eye loops, 2 loops along with a slant to the left, edge loop. On the spokes - 77 loops
47th row: edging, 2 loops together facing with a slope to the left, 33 eye loops, 2 loops along with a slope to the right, central facial, 2 loops along with a slope to the right, 33 eye loops, 2 loops along withtilt to the left, edge loop. On the spokes - 73 hinges
Hinges closed.
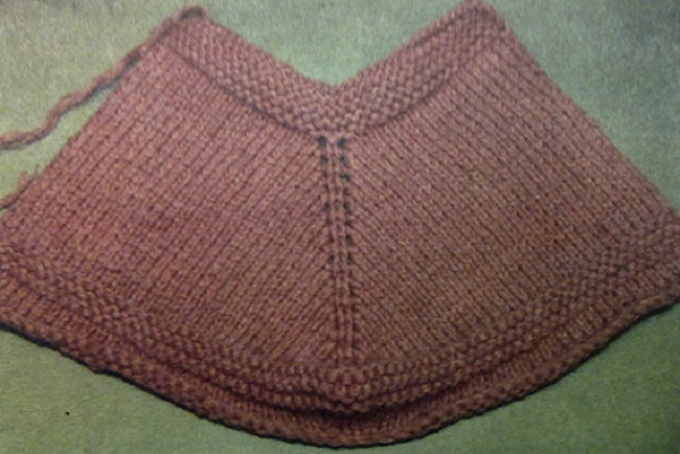 Ready slippers before assembling
 The second half-pack is similar. Make a seam along the edge edge and sole.
Video: How to tie men's slippers crocheted?
Women's knitted slippers with needles,
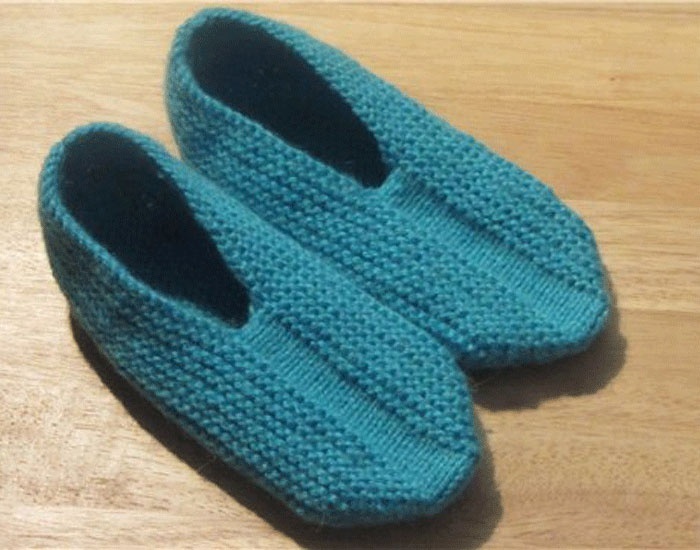
scheme Delicate and very elegant slippers, look like elegant slippers-ballet shoes
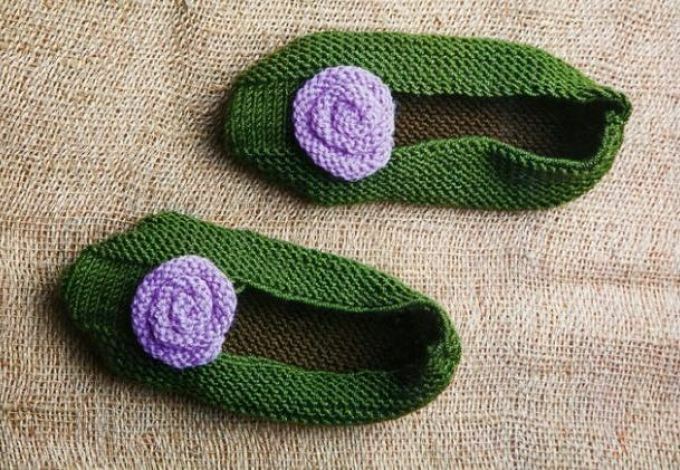
Materials and tools:
- Yarn - 100-150 g
- Knitting needles( according to yarn) - # 2,5
Basic knitting: front(odd numbers are tied with front loops, even ones with backspans)
Additional knit: forehearth( all rows are knitted with hinges)
Knitting density: 20 loops = 10 cm
Knitting pattern for slippers, size 37( 23 cm along the length of the foot)
Dialon the spokes of 35 loops, continueOperate on the
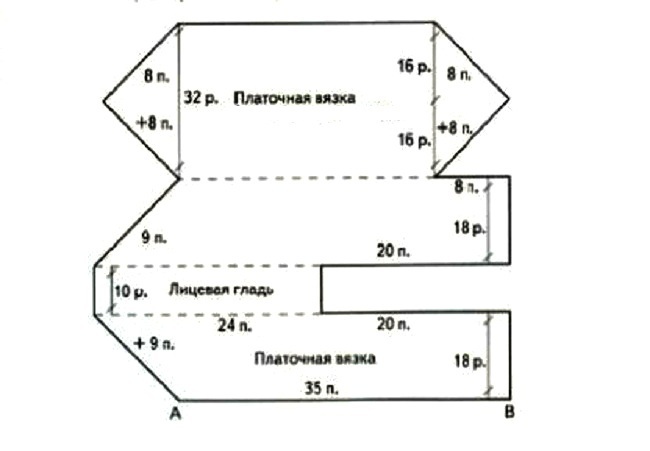 scheme 1st row: Edge loop, 33 Front hinges, Edge
2nd row: Edge hinge, 32 face hinges, add one loop from the broach, 1 face, edge
3rd and all subsequentRows up to the 17th: facial hinges
4th row: edge loop, 33 facial loops, add one loop from the broach, 1 facial, edge. On the spoke - 37 loops
6th row: knit by analogy with the 4th.
Repeat the insertion of the loops until there are 44
loops on the spokes. Close the 20 loops on the flat side of B( see diagram), the remaining loops knit with the front face( 1o rows)
From the B side, re-dial 20 loops. Produce 18 rows of garter stitching, removing at the beginning of each face series on the A side 1 loop( bind 2 loops 1 front).Repeat the decrease 9 times
From the B side, close the 8 loops. Proceed to the design of the hem of the half-pair( you can use a thread of a darker color)
The sole is knitted with garter stitch. In each even row, add 1 face loop each side of the row. Repeat the process 8 times. The number of loops will increase by 16.
Then, in each even row, reduce the 1 row on each side of the row. Repeat the reduction 8 times until you return to the original number of loops.
Close the hinges. Perform the seams.
How to tie the rosette:
- Type 50
- loops on the knitting needles. 6 rows of
- wire. Close the
- loops. Close the loops
- . Twist the bound ribbon in the shape of a flower, fasten with threads.
- Sew the rose to the
Decorate sneakers can be decorative bows, buttons, paillettes, etc.
The second half-pair is knitted in mirror symmetry
Children's knitted slippers with knitting needles, the
scheme. By analogy with the previous scheme, you can associate wonderful children's slippers
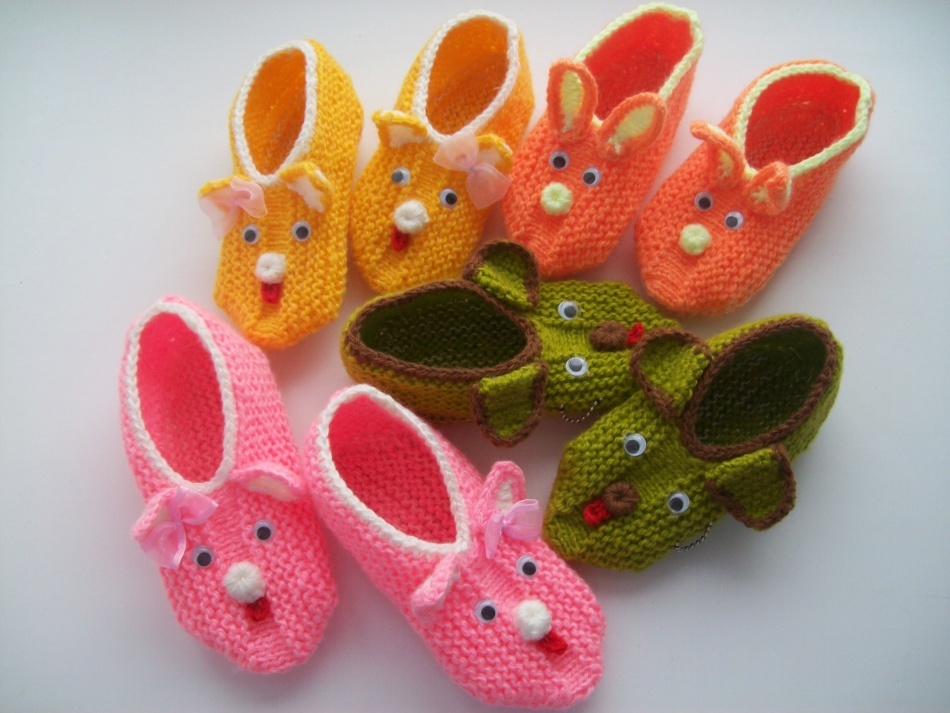 And another great idea of simple children's slippers, tied with your own hands
For making such slippers you will need two rectangles:
- one -for the sole. Accordingly, the width of this element is equal to the width of the foot, the length to the length of the foot. Do not forget about the seam allowances!
- second - top sneaker. The width should be the same as the width of the outsole rectangle, the length is 2 times the length of the first part
Sew the rectangles according to the scheme and decorate
at their own discretion. Important: the slippers are stitched in mirror image!

Knitted slippers on a felt sole,
Scheme The proposed option does not require much time and effort, but will provide warmth and comfort
Everything you need:
- felt sole
- yarn
- knitting needles and threads for stitching
- Tie a long canvas in the form of a scarf. The length and width of the linen depends on the size of the insole
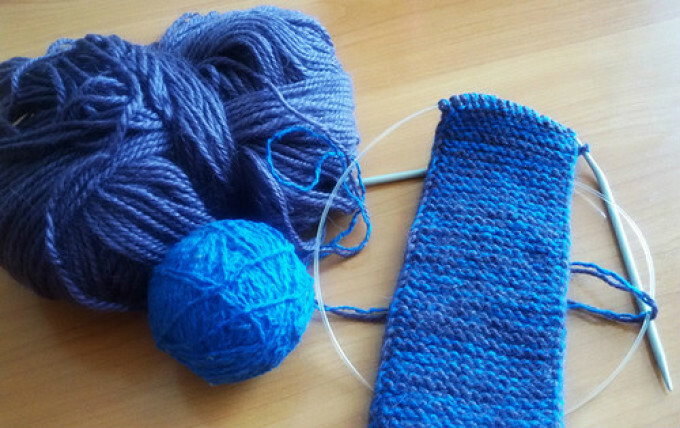
- When the fabric is ready, sew it to the insole, referring to the scheme for the children's slippers presented above, and the photo below.

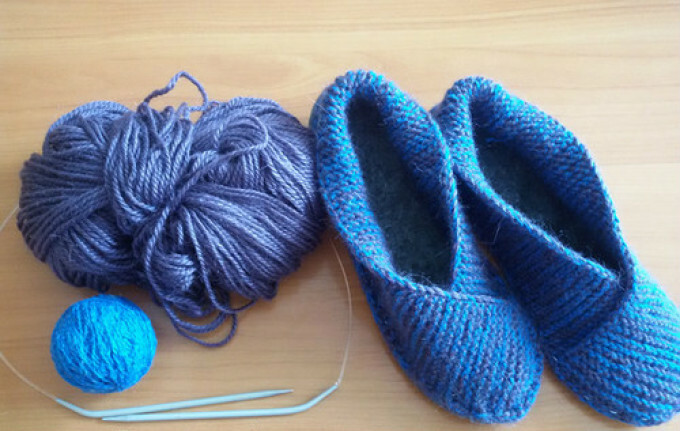 Knitted knitted slippers,
Scheme Slippers-Knitted socks, known as Japanese knittedslippers, very comfortable and, like all Japanese, extremely simple to manufacture.
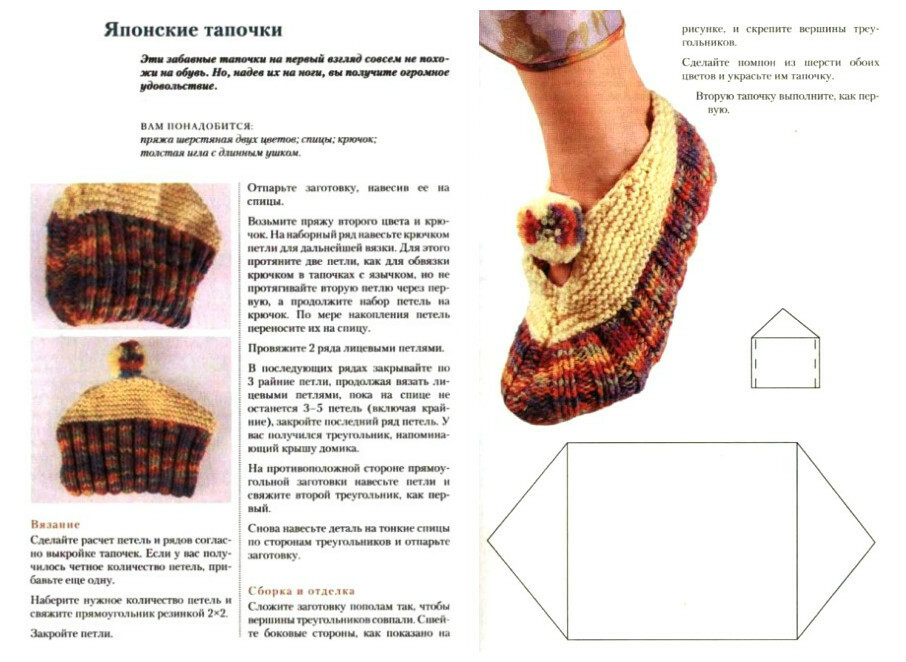 Video: We knit Japanese knitted slippers with knitting needles
Knitted crocheted crochet slippers, diagram
A detailed master-class on knitting crochet slippers crocheted is presented in the video below
Video: Master class on knitting sneakers with crochet hook
How to tie slippers with knitting needles andcrochet: advice and feedback
Video «Knitted slippers with seamless seams. Knitted slippers "will reveal the secrets of the
