
The Victory Day is a great day for the country. In May 1945, the Great Patriotic War ended and a new period of history began, which would have been impossible without the heroic deed of our dear veterans. Congratulations and attention signs are only a small part of what we can give in gratitude to the heroes, and the gift in which the soul is invested will help to share with them a piece of warmth and memory. Make greeting cards by May 9 with your own hands or with children, and we'll show you how.
Great Victory Day
In 2017 we celebrate 71 years since the Great Victory. Heroes and heroines, who fought many years ago for the happy future of the Motherland, showed steadfastness both at that time and later. Time inexorably, thinner their ranks. But the memory is alive, and veterans will again share stories with the modern generation on this landmark day.
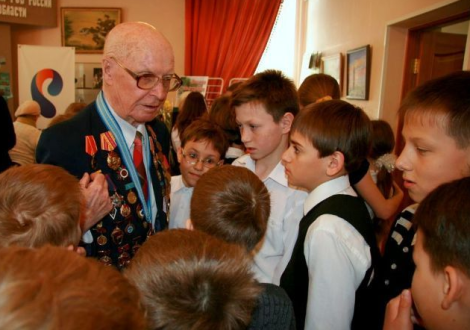
Give them a piece of yourself, show signs of attention, adding warm words with a bouquet of red carnations and a sincere card made by oneself. Let this be just a trifle, but veterans, these amazing grandfathers and grandmothers, will be incredibly pleased.
An ordinary postcard from the store is full of bright colors, but lacks individuality, there is no warmth in it. It's not so difficult to make an original card yourself, you can use already ready ideas or show your imagination by creating your masterpiece. In addition, it is easy to involve children in this fascinating process. Technician, in which you can make a postcard to May 9, many:
- Application is the easiest way that even the toddlers can master. In addition to colored paper, glue, scissors, almost nothing is needed.
 Application
 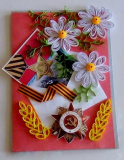 Quilling
 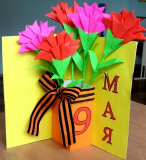 Volumetric card
- Quilling is a complicated, at first glance, method, and in practice it requires assiduity, accuracy. But with its help you can make any volumetric drawing or inscription.
- Postcards with 3D effect or volumetric application. Such techniques require accuracy, but they look very impressive. They can be decorated with inscriptions, symbols of victory, etc.
Make it easy to create a postcard by May 9 with your own hands all kinds of templates: stars, carnations, pigeons, etc.
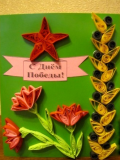
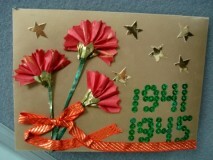
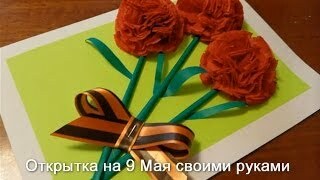
Simple postcard with voluminous carnations
This card can be made with children, some specialskills are not needed, everything you need:
- Colored paper( green, orange, black).
- Red corrugated paper or napkins.
- A4 cardboard( white and red).
- Adhesive, scissors.
 Adhesive, scissors and colored paper
 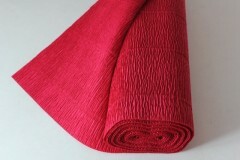 Corrugated paper
 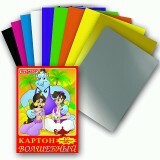 Color cardboard
The postcard is made as follows:
- Cut out 3-4 smooth circles with a diameter of about 5 cm from a red napkin. Fold them together, bend several times in half, secure in a corner with a stapler.
- Use scissors to make neat cuts to the paper clip on the workpiece. Than there will be more of them, the more terry will be a carnation.
- Make 5 more such blanks( two for each flower), well fluff them.
- Cut out stems from green colored paper( 3 pcs.) - straight strips about 3 mm wide, as many squares 2 × 2 cm, several leaves( 1-2 for each flower).
- From the squares make sepals, for this, each workpiece is folded in half diagonally, the top part is cut in a semicircle, it should look something like a heart. Last folded three times accordion.
- Inside the sepals, insert two red billets, glue them so that they sit tight.
- From orange colored paper, cut a strip 2-3 cm wide, paste thin black stripes on it. As a result, the St. George Ribbon should turn out. You can simply draw with a black marker line on an orange workpiece.
- From white cardboard to make a blank for a postcard, neatly folding it in half. You can leave the sheet as is, then it is better to make the flowers larger.
- Glue all the details to the base, the last should go St. George ribbon.
How to make carnations from paper - video
Tips for
Carnations do not have to be red, well on the card by May 9 look pink or white, in this case, the basis is better to make of colored cardboard. Carnations of white color can be decorated, for this, at the stage of cutting round blanks along the edges, the line should be marked with a red or pink felt-tip pen.
In addition to a star, a pigeon can decorate a postcard, which is also a symbol of victory. You can simply cut it out of white cardboard, drawing wings, eyes, etc. Or fold it out of paper using origami technique and the corresponding scheme.
If there is a real St. George ribbon, you can not just paste it, but tie it with a bow, fixing it in the base of a bouquet of carnations.
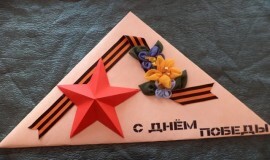
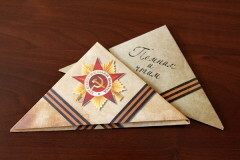
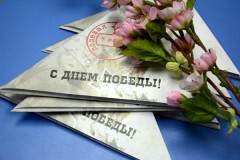
Front triangle
These treasured triangles waited with a sinking heart. The news from the front came in envelopes of a triangular shape. 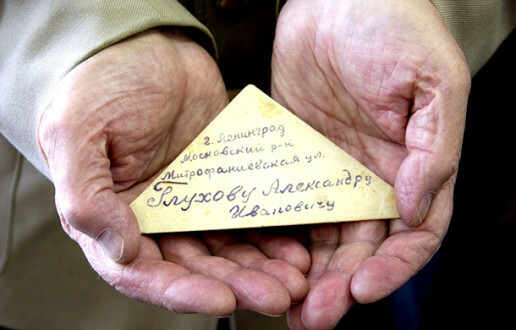 A similar greeting card with a greeting embedded in it - a touching sign of attention. To make it, you need:
- White sheet( A4).
- Brewed black tea.
- Sponge.
- Colored paper( red, green, orange, pink).
- Glue and scissors.
- St. George ribbon or orange double-sided paper.
The process itself is quite laborious, but not so complicated:
- Use tea sponge to dye a sheet of paper using a sponge. Dry it. This method will make the paper old, giving it a touch of the old era.
 Strongly brewed tea
  Sponge
- On one side of the sheet write or print greetings to veterans, on the other( along the right side, closer to the right corner) - the inscription "Happy Victory Day" and an improvised post stamp over it.
- Fold the sheet by bending the upper right corner to the left side to get an even sharp angle.
- Upper left corner bend to the right, to the lower border of the previous fold.
- The corners of the lower rectangle should be bent from both sides to the bottom of the upper part. The lower part should be put in the upper part.
- From red colored paper, cut out the star by pattern, fold it along the fold lines.
- From the white cut three blanks for the flowers of the apple tree. To do this, you can also use a template or carefully cut the blanks into 5 petals. The radius of the billet is about 3.5 cm. Each blanks are made to be thicker, pushing the middle with the blunt side of the pencil.
- Cut a few very thin strips for the stamens( 5-7 per flower).Stick them in the middle of each workpiece, coloring the tips in yellow.
- From pink paper, cut out the circles for the core( 1-1.5 cm), cut them along the contour with scissors and paste them into each flower over the stamens. The latter slightly curl up.
- From the green paper, cut a square( 4 × 4 cm), fold it diagonally, apply a sheet outline and cut. At the base of each leaf, make a small incision, slightly bend and glue, this will give the workpiece volume.
- If there is no finished St. George ribbon, then you can draw black stripes on orange two-sided paper. The tape should be pasted along the left side of the triangle( the plane without the inscription), then fold it at the top, slightly along the second side and the tip again bend.
- In the left corner of the triangle, glue the star workpiece.
- Between two folds of the tape, glue a green leaf and on top of it - three apple blossoms.
You can decorate such a card with other elements at your discretion.
How to draw a triangle letter - video
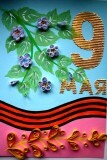
Greeting card in the quilling technique
Similar cards can be made at any age, quilling is a fascinating occupation with which you can create real masterpieces. The original postcard by May 9 is easy to make according to the proposed scheme or to put on paper any drawing at its discretion and decorate it using the same technology. Veterans will be pleased to receive such a voluminous postcard with spectacular design and hearty wishes inside.
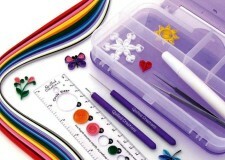
Set for quilling
The thematic correspondence to the Victory Day is achieved not only due to the basic symbolism, but also by using the colors of the St. George ribbon: black and orange( red) - the colors of gunpowder and fire. For production you need:
- Watercolor paper or thick cardboard for the substrate( A4).
- Color paper( black, orange).Toothpick or wooden skewer for quilling.
- Adhesive and brush for it.
- Scissors.
You may need round patterns( a special ruler with circles of different diameters) and templates of letters and numbers printed on the printer, with their help the entire composition will be smooth and accurate.
You need to perform the work in the following order:
- Of colored paper, preferably two-sided, cut thin strips of the same width. The more of them, the better, this will help to control the density of design.
- Prepare the substrate by folding the cardboard in half. On the front side of the pencil, draw a contour for the future inscription( in this case it will be a large figure "9" and the word "Maya" under it, slightly overlapping each other).
- Inside it is best to paste a preprint printed on a color printer in the congratulations in the verses with the symbols of 9 May. Effectively looks aged paper, the edges of which are decorated by the method of breaking off.
- From the colored strips make different curls, loose and tight. A tight curl wraps tight around the toothpick, the tip is immediately glued. The free ones are first wound, then loosen to the desired size with the help of round patterns of different sizes, and then they are glued. You can fold the strip in half, and then twist each edge and glue. Folding each edge in the opposite direction and using free twisting, you can get eight. Combination of the elements will add variety, for this, when sticking, it is better to leave loose tails, and then join together, getting twigs, flowers, etc.
- In a chaotic order, fill the contour with curls of different colors. Places where the number and letters of each other overlap, leave blank.
- From white paper cut long strips of the same width as colored ones. Glue them along the edge of the entire composition to give a complete and integral look.
 If the quilling technique seems too complicated, then by a similar scheme it is possible to fill the contour with balls rolled from colored napkins torn to pieces of different sizes.
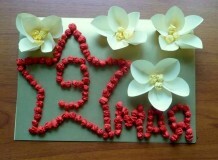
Of the balls made from a red napkin, you can lay out the contour of the star and the inscription "9 May", pasting them to the base. Such a card will effectively complement the three-dimensional flowers of the apple tree, the process of manufacturing of which was described above. It is best to take as a basis not white paper, but colored designer( golden or silver), kraft paper or artificially aged.
Dove
Making such a simple but touching postcard will take a minimum of time. All that is needed is a white, thick paper and scissors. If desired, you can use the appropriate template:
- Rectangular sheet folded along.
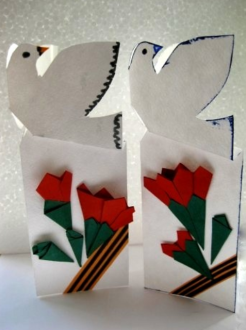
- In the upper part of the billet, draw a contour of the pigeon with raised wings, the breast should be adjacent to the fold.
- Cut out the image on the contour without touching the bottom part. In the decomposed form between the pigeons should be an interval in the area of the breast. At the base of the birds, dotted with two lines of bend with a distance of 7-10 mm.
- Fold the postcard, bend it along the fold lines of the accordion.
- Black marker to draw a dove eye, outline the contour of the wings.
- Free space under it to arrange in any convenient way, for example, simply paint with colored pencils, writing greeting inscriptions, paste bulk applications in the form of flowers, stars, St. George ribbons.
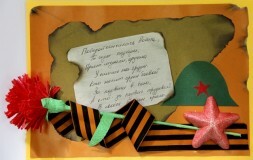
Original cards, made with own hands from kraft paper, on the front side of which a multi-layered application is pasted:
- A letter on a white sheet.
- Aged sheet with printed text of the poem on May 9 or sheet with notes of the song "Victory Day".
- Volumetric red or yellow star.
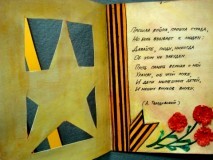
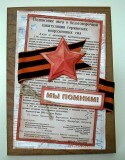
- St. George's ribbon.
- A small rectangle with a congratulatory or thematic inscription.
You can add elements at your discretion by changing their shapes, color, quantity. Colored acrylic contour paints will add volume compositions, make it multifaceted. Be creative, veterans will be very pleased! Related Videos:
 1:27
1:27  12:09
12:09  15:36
15:36