
Glue wallpaper - a creative and very fascinating, because it is with their help you can decorate the interior, arrange the necessary color accents and even visually expand the area of a small room. But in order for this process to be a good result, it is necessary to prepare walls qualitatively for wallpaper gluing.
How to put the walls properly under the wallpaper?
Preparation of walls for wallpapers is to create a perfectly smooth surface, which is achieved during priming and puttying. First of all, the walls are cleaned of dirt, grease, paint, soot stains, old wallpaper and tumbling pieces of plaster.
For better adhesion of the putty to the surface of the walls, they must be covered with a primer. To do this, take a special roller and evenly, without omissions, apply to the walls one layer of primer solution.
After letting the primer dry, starts the putty on the work surfaces, see the video:
The quality of the putty should consist of two stages: starting and finishing the walls.
- Start-up putty( this name should be on the package of this finishing material) is used if the walls in the room have large differences, uneven surface, deep cracks, holes and holes left after the stinging. The maximum thickness of the layer applied at one time should not exceed one and a half centimeters.
- Only having achieved a level surface of the walls( since the thin finishing layer is not able to hide the defects of the poorly executed starting plaster), proceed to the finish putty.
For its application it is necessary to purchase the finishing putty mixture, which helps to make the walls perfectly smooth, because with its help you can eliminate the smallest cracks and defects. To identify these defects, during the finishing putty apply special lighting.
How to apply the putty?
- The starting putty of the walls under the wallpaper is applied with a large spatula. Holding the spatula slightly obliquely, a small portion of the prepared putty put in one motion( diagonally).By overlapping layers, you will avoid the formation of bumps and uneven transitions.
- When working on corners, it is best to use a corner spatula.
 For this, a small amount of putty must be applied to the entire height of the slope or angle, then carefully level the surface with a corner spatula. Complete drying of the plaster coat will take place only in a day.
 - After making sure that the starting filler is completely dry, you can start finishing the walls. At this stage, you need to take just two spatulas: large and small. Spreading on a large spatula small portions of putty( using a small spatula), apply an even layer on the surface of the wall. The thickness of the layer should not exceed 2 mm.
- It is advisable to pre-coat the next layer of the putty with the first layer primer.
- When the finishing layer has dried, the surface of the wall is finally sanded with sandpaper, for convenience use a hand-held blaster. Priming the walls under the wallpaper. How to do it right?
Primer for wallpaper is the final stage of preparation of walls for gluing wallpapers. So, the walls have already been applied with plaster or a finishing coat. Now it is necessary to apply the primer.
View video how to properly primed wall for wallpaper:
Ignore this stage is undesirable, because after the initial processing on the surface of the walls can remain microscopic particles of dust and invisible to the eye of pollution, which can affect the quality of the wallpaper sticker. Priming leads to the fact that the wall surface becomes strong and stops getting dirty.
In addition, the primer:
- "Dusts" the surface of the walls.
- Reduces the consumption of glue.
- Protects walls from increased humidity, improving their moisture resistance.
- Does not prevent normal air circulation, allowing walls to "breathe" and protect them from spreading mold and fungus.
Sequence of primer application
- Using the manufacturer's instructions, a primer solution is prepared.
- Mixing a mixture of water and primer, you can use an electric drill, equipped with a special nozzle. If there was not one in your household, you can make it yourself from a thick wire and attach it to a power tool like a mixer's blades.
- In general, the process of priming the walls is like the procedure of whitewashing the ceiling. Apply the primer with a wide brush, simply "coating" it with walls. If possible, the primer layer should be uniform( no blemishes and missing dry areas).If the walls in your apartment are flat enough, you can use a paint roller instead of a brush.
- The drying time of the first layer must be specified in the instructions for the putty. Observe it must be rigorously.
- Re-priming of the surface to be treated is also mandatory( regardless of the condition of the wall and the material it is made of).This will prevent the possibility of uneven impregnation of the walls and guarantees the high quality of their preparation for gluing the wallpaper.
How to calculate the number of wallpapers?
Correct counting the right amount of wallpaper will save you from having to buy them, at the risk of buying the wrong wallpaper( in case of their lack).If you buy too many wallpapers, you will have to puzzle over where to put a lot of unnecessary scraps and pieces.

How to calculate wallpapers per room?
- In order not to err in the calculations, it is necessary to determine the total perimeter of the walls. To do this, it is sufficient to measure the length of two adjacent walls, multiplying the result by two.
For example: the length of one wall is 7 m and the other is 6 m. We calculate by the formula:( 7 + 6) х 2 = 26 m. The total perimeter of this room is 26 m.
- Now it is necessary to measure the height of the ceiling, taking into accountthe fact that the length of the standard roll of wallpaper is 10 m, and its width is 53 cm. The necessary number of wallpaper is counted by the number of bands.
If the ceiling height is 2.5 m, from one roll you will get 4 strips with a total width of 212 cm( 4 x 53).Divide the total perimeter of the room by the total width of the roll and get the number of rolls we need: 2600: 212 = 12.26.To glue this room, we need 13 rolls( the resulting number should be rounded upwards).
- When using wallpaper with a large pattern( requiring the displacement of the bands for its joining) you will have to buy a few additional rolls. The seller-consultant will help you to make the correct calculation. Usually for a small room( the perimeter of which does not exceed 22 m), two additional rolls are purchased.
You can make an independent calculation of wallpaper on the room, finding on the label the size of the rapport( the step, the regular pattern repeating in the figure) and multiplying the amount of displacement by the number of bands.
 Please note that the larger the rapport, the more cuttings you will get in the process of fitting the picture. You can use these wastes when gluing wallpapers in the piers, above the doors, in the windowsills and the windows.
 - Flizelinovye wallpaper have a meter width, so in the formula for calculating the total perimeter of the room enter this figure. In all other respects, the calculation of the number of non-woven wallpaper is similar to the calculations made for standard rolls: determine the total perimeter of the walls and take into account the height of the ceilings.
The room with additional corners requires large material costs, as the technology of pasting corners with non-woven wallpaper is somewhat different from the same procedure applied to conventional wallpaper. Therefore, you will need to purchase an additional roll.
- All the above calculations are valid only when the walls are pasted with wallpaper of one type and pattern. For a design repair involving combining wallpapers with different patterns and textures or inserting inserts that visually zonate the space of the room, you need to use a different calculation method. But this is a topic for a separate conversation.
How many meters of wallpaper on a roll? The length of the usual roll of wallpaper is 10 meters. But the length of the wallpaper for painting is not regulated by a single standard, therefore on building materials bases one can find rolls with such a distance:
- Length of linen and textile wallpaper: 10-50 m.
- Length of felt wallpaper: 32-50 m.
- Length of jute wallpaper: 7.7 m.
- The length of the fiberglass wallpaper: 10 m, 30 m, 50 m.
Where to start gluing wallpaper?

How to properly paste wallpaper? Here a lot depends on how correctly the first band is glued: it must be strictly perpendicular to the floor plane. And since in our apartments you can rarely find a room with perfectly straight and straight angles, then the angle can not be used as a vertical landmark.
Window and doorways always have a strictly vertical orientation, so you need to focus on them. By gluing the first strip of wallpaper, you need to do this in parallel to the opening, from which you are more comfortable to get started.The view that wallpaper gluing should always start from the window should remain in the distant past, when cheap paper wallpapers were pasted over, as it allowed to visually hide the joints, making them not very noticeable.
Most modern wallpapers are pasted, so the problem of visible seams has disappeared by itself and you can start the process of gluing wallpaper from both the window and the doorway. It does not matter, and the direction of this process: by gluing the wallpaper, you can move both clockwise and counterclockwise. You can not just change the direction you have already chosen.
Moreover, in recent years, great popularity began to use vinyl wallpaper with a very small pattern, perceived as an integral canvas. With the help of such wallpapers you can hide the uneven terrain of the walls and they are not too demanding for the perfect verticality of gluing. Therefore, if you have these wallpapers at your disposal, you can start pasting even from the corner. The only contraindication can be only excessive curvature.
How to glue a paper wallpaper?

Pasting of walls with wallpaper depends largely on the type of materials used, because different types of wallpaper for walls require different technology of gluing. Paper wallpaper is the cheapest type of wall covering and there are two types:
- Paper wallpaper simplex are made from one or two layers of paper, and these layers do not stick together. They are afraid of moisture, tear easily and quickly burn out in the sun. The only advantage of such wallpapers is their low cost.
- Paper wallpaper duplex is printed on double-layer paper with pre-glued layers, due to which they have good moisture resistance, resistance to sunlight and relative strength.
Adhesive technology:
- The preparatory stage of work with paper wallpaper includes cutting edges, sorting rolls for homogeneity of the color and cutting out the strips of the desired length from them.
- Cutting a roll into a cloth, the pattern is adjusted at the same time. The length of the stripes should correspond to the height of the room( from floor to ceiling), plus 10 cm of stock for wallpapers with small ornaments and 20 cm for wallpaper with a large pattern. Such a stock is especially necessary for premises, on separate sections of walls having different heights due to insufficient horizontality of ceilings or floors. From excess at the bottom get rid of, cutting them off on skirting boards. Surpluses are masked at the top with a curb.

- If the wallpaper is equipped with an edge, it must be cut( for thick wallpaper - on both sides, for thin ones - only on the side that should overlap the joint).Strips, designed to glue the wall, located on the right side of the window opening, are released from the right edge, all others - from the left.
- On thin paper wallpaper apply cold liquid glue with a fly brush( evenly distributing it from the middle to the edges) and immediately glue the blurred strip to the wall. The first strip must be glued strictly vertically.
- Paper wallpaper is smoothed with a soft cloth( from the middle to the edges), preventing the formation of air bubbles.
- Light wallpaper is smoothed by placing a piece of white paper under the rag. Excess glue is immediately removed with a piece of damp foam rubber, as the surface of the paper wallpaper can easily be damaged or stained.
- On thick wallpaper duplex warm adhesive applied twice. First give the wallpaper impregnated: from this their surface becomes wavy, and the edges curl. After the second application of the glue, the wallpaper is smoothed: this is an indication that they are ready for gluing.
- Gluing the corners, make a small( 3-4 cm) the opening of the previous panel directly on the angle itself, and the next strip is pasted from the corner.
By gluing a wall on which there are switches and sockets, first turn off the electricity.After this, remove the protective covers, glue the panel, use a sharp knife to make a cross-shaped cut, and then cut out a hole of the appropriate size and shape. Screw the covers again.
View the video as correctly glue wallpaper :
How to glue vinyl wallpaper?
Vinyl wallpapers are more durable, they can be recommended for wall finishing in new buildings, because they are not afraid of even the shrinkage of the walls. How to paste wallpaper from vinyl?
- When cutting a roll, it is necessary to adjust the pattern and leave an allowance of at least 10 cm: this will save you from mistakes and unpleasant surprises if the height of the room has certain differences.
Vinyl wallpapers are thick enough, so they are glued solely to butt: otherwise the seams will be too noticeable.- Adhesive for vinyl wallpaper is versatile, it can be used for gluing wallpapers of various types( including metal, fabric and bamboo).
- The method of applying the adhesive is always indicated in the instructions attached to each roll. Most often, glue is applied only to the wall, but some types of vinyl wallpaper require its application and on the strip itself.
How to paste wallpaper yourself?
View the video as glued vinyl wallpaper on its own:
The algorithm for gluing this:
- Applying the strip to the glue-impregnated wall, its surface is carefully smoothed with a special rubber roller in the direction from the middle to the edges: this will help get rid of air bubbles. Surplus glue immediately removed with a soft cloth.
- With special care, the joint line is rolled. The lagged edges of the wallpaper are again smeared with a flat brush and pressed firmly against the surface to be pasted.
- An excess of wallpaper next to the skirting board on the ruler is cut with a sharp clerical knife. Ideally, their lower edge should go to the plinth by 5-6 mm, closing the place of joining the plinth and the wall. It is more convenient to completely remove the skirting boards, cover the room with wallpaper, and then return the skirting boards to the place.
- When stitching corners use strips with mandatory allowances in the upper and lower parts: in the place where the panel should fit into the corner, the cuts are cut. Having pasted the corner, the strip is carefully rolled with a roller, removes excess glue and cuts the allowances.
Ideal when the inscribed in the corner enters an adjacent wall for 3-4 cm.The partition behind the heating battery is best or painted, selecting the paint in the tone of the wallpaper, or sticking the wallpaper so that they are 15-20 cm in front of the battery. It is most convenient to use a roller equipped with a long handle.
Vinyl wallpapering requires that all rolls belong to the same batch.
How correctly to glue non-woven wallpaper?

Flizeline wallpaper is considered to be one of the best wall coverings. Contrary to the beliefs left over from Soviet times, wallpaper on a non-woven base is best pasted, starting not from the window opening, but from the corner.
How to paste non-woven wallpaper?
- Before flocking, non-woven wallpaper is cut in the amount necessary to finish the entire room. Do this on the floor with the film spread on it beforehand, cutting the wallpaper with a very sharp knife. Each subsequent strip must be docked according to the drawing. After cutting, it rolls into a roll starting from the lower end( the front side inside).
- Sticky non-woven wallpaper requires proper preparation of glue. To do this, you must follow the manufacturer's instructions exactly.
- Adhesive for non-woven wallpaper is not applied to the strip, but to the wall, evenly spreading it with a special roller. In this case, you can not save glue: it should be so much that the strip of wallpaper can slide freely on the wall. At the same time, it is impossible to allow the formation of profuse swells, as this can lead to unwanted wrinkles.
- Each strip is rolled from top to bottom, in accordance with the pre-marked lines of vertical marking. After making sure that everything is in order, the strip is smoothed by movements directed from the middle to the edges. Formed wrinkles are smoothed until they disappear completely.
- Having pasted a strip, cut off the upper and lower allowances left, and the glue marks on the ceiling are removed using a sponge.
Therefore, in a room with a large curvature of the walls, it is better to allow a slight divergence of the seam( width in a hair) than to allow the strips to clash.Sticking the wallpaper on a non-woven base does not allow even the slightest overlap, since they will be extremely noticeable even from afar.- If at the time of sticking problems, you can tear off the strip from the wall, apply an additional layer of glue( for better sliding and increase the elasticity of the wallpaper) and try to make the seam invisible, slightly stretching the panel. After successful completion of the procedure, excess glue should be washed off with a damp sponge.
Types of paints for wallpaper under painting

Why is the wallpaper so popular recently for painting? First of all, because they make it possible to radically change the character of the interior in a matter of hours, without putting much effort and effort on it.
These wallpapers can withstand five to fifteen colorings. However, professionals advise to do not more than ten stains.Wallpaper for painting are represented by three main types:
- non-woven,
- paper,
- fiberglass.
Let's find out which paint for wallpaper is designed for each of their kind, and also what advantages and disadvantages it has.
Water-based paints
Most often, water-based paints that are water-dispersible( acrylic and latex) and water-based are used for painting the wallpaper for painting.
The only drawback of water-based paints is their weak water resistance, so they can only be used in dry rooms.Technical characteristics of water-dispersion paints are largely determined by the type of binder polymer used in their manufacture.
- If acrylic resins are the basis of water-based paints, this gives them increased wear resistance and moisture resistance. After staining with such paints, the wall covering acquires the qualities of washable wallpaper: it will not be afraid of water, burn out in the sun, and also give the walls the opportunity to "breathe".
- If a PVA glue is used as a binder component of water-dispersion paint, a paint with low moisture resistance is obtained, so the wallpaper treated with it will be afraid of water and high humidity.

Both these types of paints do not contain volatile( and therefore especially toxic) diluents and are environmentally friendly materials that can safely be used in any premises, including children's rooms. Among the advantages of these paints can be attributed high profitability and almost complete absence of odor.
Water-based paints can be painted all kinds of wallpaper for painting.
Alkyd paints
For painting surfaces covered with fiberglass wallpaper, alkyd paints are most often used, which create a durable glossy film that can protect them from dirt and moisture. Painted alkyd paint wallpaper can be regularly washed using a variety of detergents.
Among the shortcomings of alkyd based paints are:
- The presence of a number of toxic substances in their formulation.
Alkyd paints can not be used to decorate walls in living areas( especially in the kitchen and in the children's room), because they give off a rather sharp smell, even after a long time after staining.- Poor air permeability, preventing the natural ventilation of the walls.
How to paint the wallpaper paint?

Water-dispersion paints are mostly white, and water-emulsion paints are already painted in different colors, but not always they have the necessary shade. To obtain the desired color, they must be chained. You can do this in many ways:
- You can, by purchasing a pigment, mix it yourself with the paint and get the desired color. However, after drying on the wall, the paint gets a lighter shade, significantly different from what it was in the bucket. In addition, if you do not have one bucket of paint, you will not be able to achieve exactly the same result when manufacturing the second batch. Therefore, it is more reliable to go the other way.
- You can use the method of computer tinting .In a specialized store equipped with tinting machines, you can paint any amount of paint. The use of special equipment guarantees the obtaining of an absolutely identical shade in each separate container, even if you come for a new batch of paint after a while. The shade will be 100%.
Which wallpaper is better for painting?

Modern wallpaper for painting, designed for finishing walls and ceilings, can be divided into three categories:
- Paper wallpaper duplex.
- Flizeline wallpaper with vinyl or non-woven coating.
- Glass Fiber Wallpaper.
Let's figure out which rooms are best for using the wallpaper of each of these species.
- For the children's room they often choose paper wallpaper for painting, because this type of wall coverings is absolutely safe for children's health and has not too much resource: these wallpapers can be repainted no more than seven times. Your child will quickly grow up and start demanding a change in the situation: here and there will be an occasion to change the wallpaper.
If the new repair in the nursery is not included in your plans in the next ten years, you should give preference to the German embossed wallpaper on a non-woven base, whose original texture is created by using sawdust from natural wood. These creative wallpapers are also suitable for decorating the living room, bedroom or office.
Picking up the paint, choose a sample with high mechanical stability characteristics, hold some quantity in reserve or write down the brand( with the color ratio) in case the child decides to paint on the walls or damage their coating.
Learn more in the video about wallpaper for painting:
- The most durable wall coverings for painting are fiberglass and non-woven( with non-woven fabric) wallpaper. They can be used for finishing kitchens , dining rooms, hallways and corridors. Such coatings are not afraid of mechanical influences and are able to tolerate from 15 to 20 stains.
Vinyl non-woven wallpaper can also be used for finishing these rooms, but in this case you will have to use panels or tiles to protect places prone to mechanical abrasion or significant contamination, because vinyl is a very vulnerable material.
- For finishing the toilet or bathroom wallpaper used for painting is not often used, but if you decide to apply them, opt for fiberglass wallpaper as they are not afraid of high humidity. In this case, for painting, you should choose a special dye composition that has an antifungal effect.
- The glassfibre wallpaper is the easiest to paint: they are painted with a latex water-dispersion paint with a roller.
Paper wallpaper for painting can be painted with a brush, roller, as well as using a regular sponge and even a rag.
In addition to simple coloring, the surface of paper wallpaper allows drawing patterns with templates or by hand. To do this, use water-based or water-dispersion paints.Flizeline wallpaper for painting is not intended for painting with oil paints or paints containing a solvent: this can result in the destruction of their texture and foamy layer. The use of water-dispersion and water-based paints makes it possible for bold experiments and radical solutions.
How to paint wallpaper for painting?

- Non-woven wallpaper for painting can be painted from the outside when they are already glued to the wall, and you can do this before the gluing procedure, and from the wrong side. This method allows you to emphasize the relief of wallpaper and highlight their texture. The painted canvas is pasted onto the wall, allowing it to dry completely.
There is an interesting technique: paint the wall with bright acrylic paint, allow it to dry well, and then paste non-woven wallpaper for painting. Translucent paint through the wallpaper will give the surface a noble matte shade.No less original way of decor is the following method: evenly painting the wallpaper, spend on them with a soft cloth, erasing the paint from the relief. After a while, the relief is painted with a paint of a lighter or darker color. This is how the visual effect of volume is achieved.
- Vinyl wallpaper for painting can have either a paper or non-woven base. In the latter case, they are almost indistinguishable in appearance from non-woven wallpaper, although they are not so strong. Vinyl wall-paper under painting is painted by the same methods, as flizelinovye. In the case of painting the wallpaper from the wrong side, only the non-woven base is impregnated with paint, and the vinyl is prominently displayed on this background.
For painting the wallpaper for painting, it is best to use rollers made of velor or sheepskin, having a pile of medium length. The best results are obtained by using a spray gun.Rollers made of foam rubber provoke the formation of air bubbles, which can lead to deformation of the upper layer of wallpaper. Coloring with a brush does not always give a uniformly painted surface.
How to glue wallpapers of two kinds? Combining wallpaper in the interior

Combining wallpaper in the living room, bedroom or nursery is capable of:
- Give originality to any interior.
- Visually correct design flaws by changing the geometry of the room.
- Divide the room into functional areas.
Combination of wallpaper can be vertical, horizontal and patchwork. Some designers are very fond of using inserts, decorated with molding, which are in good harmony with the walls, decorated with two types of wallpaper.
Many manufacturers of wallpaper, responding to the trends of modern design, produce "wallpaper-companions", representing a beautiful wallpaper for the walls, made in the same color scheme and in the same style, but with different textures: smooth, rough and velvety.
Options for wallpapering
When decorating wallpaper, modern designers offer the following combinations:
- Combining two types of wallpaper in the same color, but different tones, made on one or several walls of the room.
- Use in one room wallpaper with an ornament and monophonic wallpaper, harmonizing in color or painted in the same color. This option for decorating the walls perfectly zoned the space of the room.
- A combination of wallpaper that has a completely different pattern( for example, flowers and stripes), but united by a unity of color or its hue.
- Application of color contrasting wallpaper, clearly delimiting one zone from another.
Tips designer in the video - good options for combining wallpapers:
Can you glue wallpaper on the wallpaper?
Strongly not. The only indication for such a sticker is the option that old quality wallpapers have very good grip on the walls. But in this case, one can not predict how the new wallpaper will behave and how long the fresh coating will be.
In no case can not apply new wallpaper to all kinds of heavy wallpaper, as they will soon fall off together with the old.For safety, you can carry out an uncomplicated test: using a piece of wall, pasted with old wallpaper, glue( designed for new repairs), let it dry and see if old wallpapers go away. If it's okay - you can not delete the old layer.
How to glue the wallpaper in the corners?

Bonding of internal corners :
When proceeding to pasting wallpaper, professionals use a straight line to draw a straight vertical line next to the place of perpendicular articulation of walls and paste the first strip( the first inner corner remains unglued and left for later).
Having pasted the surface of the first wall and reached the corner, the master with a sharp knife and spatula cuts the last strip, which enters the adjacent wall taking into account the necessary stock( 2-3 cm).The width of the stock depends on the thickness of the wallpaper: for thick wallpaper it should be smaller( otherwise too much overlap will be noticeable).The next strip, coming from an impeccably straight vertical, should slightly overlap the already pasted part of the wall.

Bonding of the outer corner is carried out as follows: the cornered cloth is wrapped behind it, the edge is carefully rolled with a roller, after which the verticality of the edge is controlled with a level. The next strip is glued, the width of the stock should be 10-15 mm.
Related Videos:
 7:43 Sticky wallpaper by yourself( training)
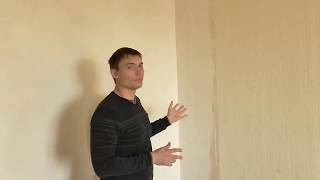 17:40 details when wallpapering
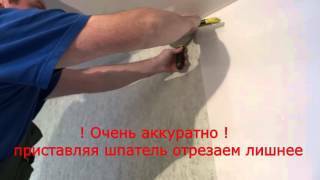 4:27 Sticky wallpaper by yourself. At the butt.