
Rug adds comfort to any room. But it will acquire a special charm if the product is made by hand. Using simple diagrams with descriptions and photos, the crochet rug is very easy to make. Although a beautiful product can be weaved without the use of a hook and spokes, using, for example, a cardboard shape, a paint net or a hula-hoop.
- Knitted
- Giraffe
- Snake
- From
- squares of knitted things
- from part
- Yin-Yang
- Popcorn
- Provence
- Multicolored
- Heart
- Wicker
- From
- pigtails From
- rope yarn and
- cords on
- grid on blasphemy-shape
Knitted
to the table of contents ^Giraffe
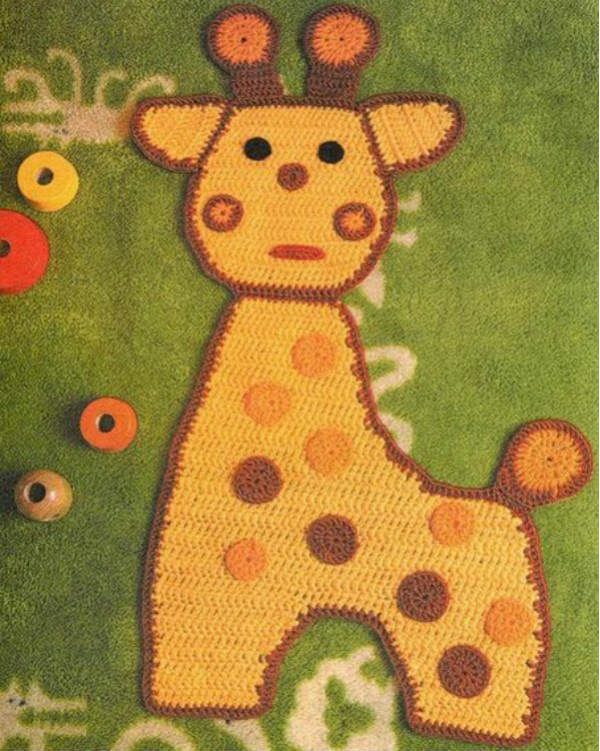
To create a rug you will need:
- 2 skein of yellow yarn "Natasha"( wool, acrylic 50/50, 100 grams 250 m);
- 1 roll of acrylic brown yarn "Carolina" - 100 grams;
- half a hank of orange yarn - 50 grams.
- hook number 6.
Important! The mat knits into two strands.
Head
After tying 20 loops, remove 2 more for lifting. Performing the next 5 series st.s / n, make an increase in the loop at the end and beginning of the series. From 6 to 10-th row do not make an increase. After 15 rows begin to reduce the number of loops in the row, removing one at the beginning and end of each. Complete the knitting of the head when there are 20 st.s./n. Left in the row. If you want, you can tie another row or two with a contraction - then the top of the head will be clearly already bottom. Then, remove the brown stitch from the st. S / n edge with the details.
Torso
Binding the lace-base of the 16th century.loops and 2 for lifting, next row knit st.sleep without additions. From 2 to 9 inclusive, increase the detail by 2 loops, adding 1 at the beginning and end of the row. In the 10th and 12th rows, add 4 in.loops and 2 for lifting, and 11 and 13 rows are tying unchanged. In the 14th you need to increase the canvas by 12 in.loops( 2 for lifting).15 knit without changes. At the end of 16 and the beginning of 17 series make an increase of one loop.18-22 inclusive range, knit without any additions.
Feet
Without tearing the thread, for the 13 cloths, bind 8 rows, subtracting each in the loop from the beginning and from the end. The second leg tie in the same way. Finish the finished part with a brown edging from st.s / n.
Ears
For the ear, tie 11 st.s / n, using the edging on the head as the base. Spray 6 rows, making the reduction along the edges of 1 loop. Make a brown thread of the edge st.s / n.
Horns
Bind the orange thread with a circle of 3 loops. In the first row, perform 9 st.s / n, in the second - 18, in the third - alternate st.s.n. with 2nd st.s / n in 1 loop. The whole fourth row is done with a brown thread according to the scheme: 2 st.s / n, 2 st.s / n in 1 loop. The "legs" of the horns are 4 rows of 9 sts / in each. Connect the horns or sew them.
Eyes, nose, spots, cheeks
Knit like horns up to the 2nd row inclusive. Sew a needle.
Tail
Knit as horns up to the 2nd row inclusive.3 rd row perform 2 st.s / n in 1 loop alternately with st.sn, but in the last 4 loops knit 2 st.s./n. The entire fourth row is bound with a brown string of 2 st.s / n in each loop. Turn the tail over, tie it to the body.
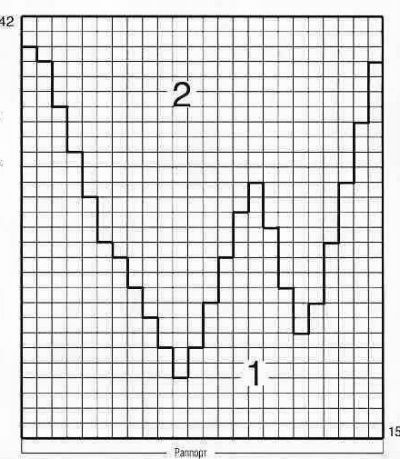
to the table of contents ^Snake
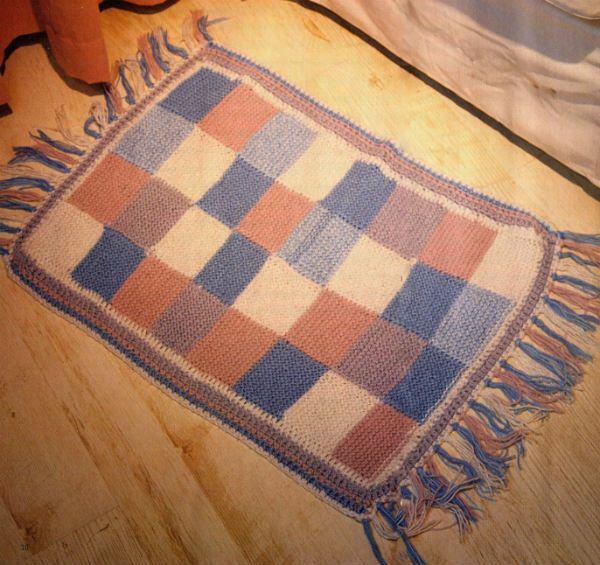
To create a rug you will need:
- blue, white, blue, gray, beige yarn of wool and acrylic( 50/50), 100 grams 250 m;
- hook number 3;
- of the spokes number 3,5.
Scheme
Legend:
- A - white;
- B - beige;
- In - blue;
- D - blue;
- D - gray.
Method of knitting: handkerchief, all rows are only facial. Density of knitting: one square - 15 loops x 26 rows. When changing the color, cross the threads from the wrong side, this will help to avoid the formation of holes.
Type the first row of 60 loops on the knitting needles with a white thread. Next, count on each square of 15 loops, determining the color according to the scheme.
For each section, allocate 32 rows, change the colors according to the scheme. Total 8 sections. After closing the hinges, tie the mat st.b / n 3 times with a white and blue thread, alternating them. Narrow edges of the product can be decorated with fringe.
to the table of contents ^From the squares of the
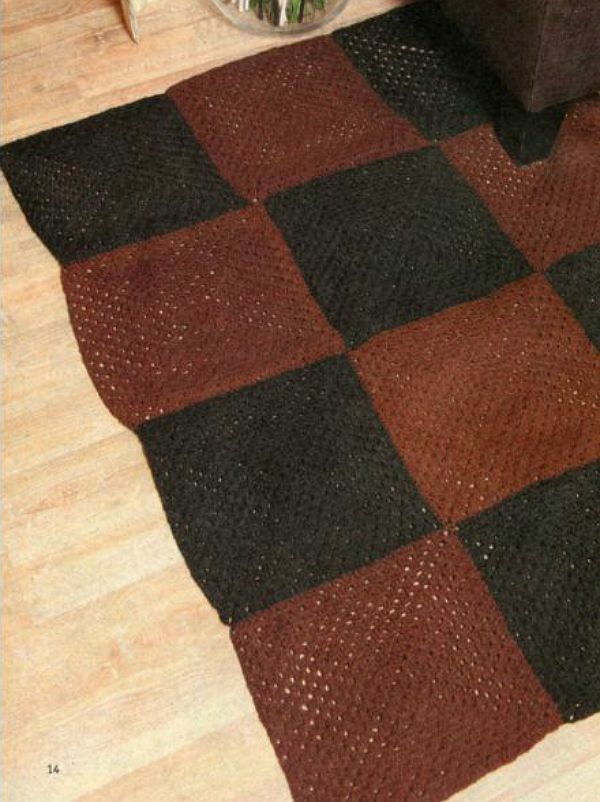
To create the rug, you will need:
- for 450 grams of brown and black acrylic yarn "Souffle"( 292 meters in 100 grams);
- hook №3.
Schematic diagram
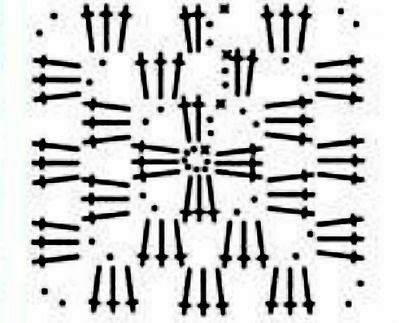
Legend:
• - air loop;
✝ - column with cassette;
✖ - a column without a crochet.
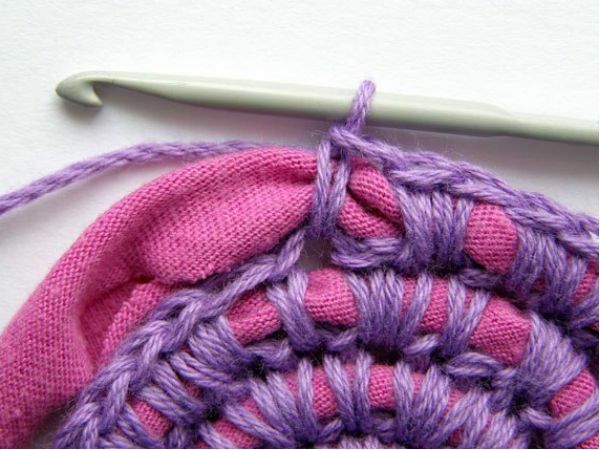
The size of each square: 20 by 20 cm.
Important! The rug is connected by a double thread. For a rug, you need 6 squares of each color. The connection of the elements on the chess principle by the pillars b / n.
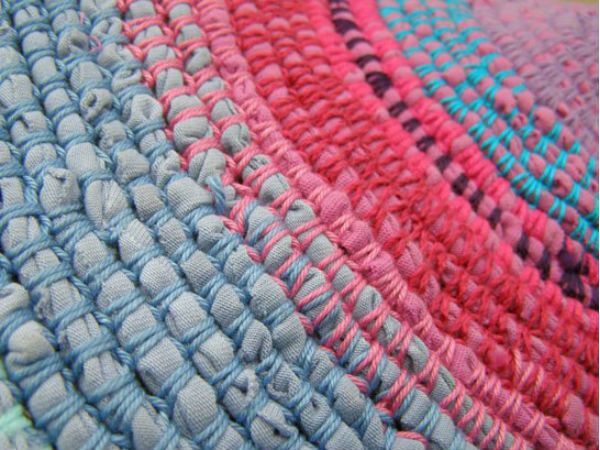
Of the knitted things
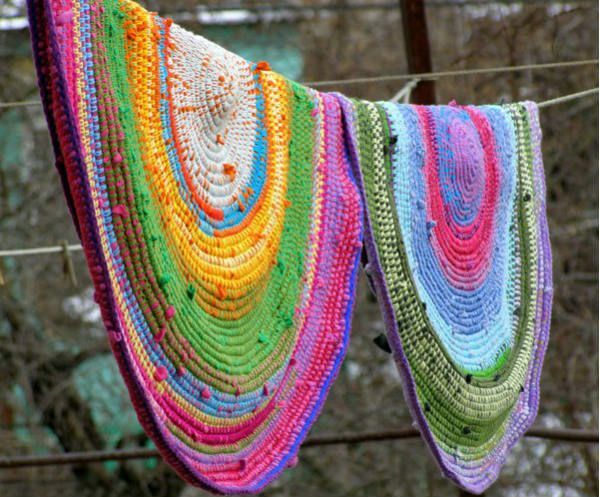
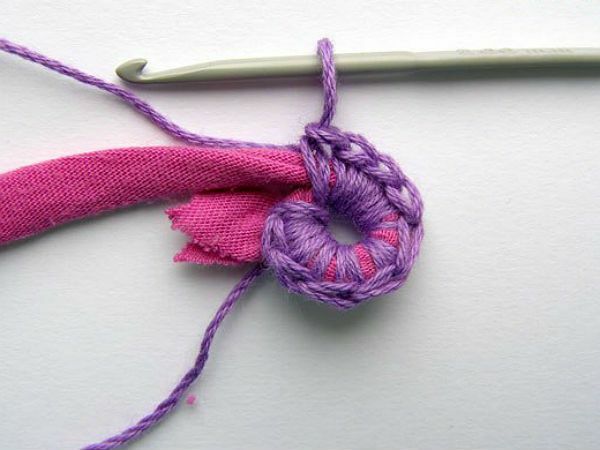
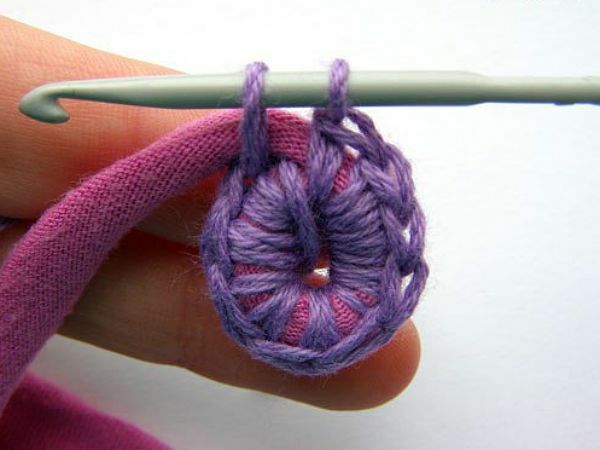
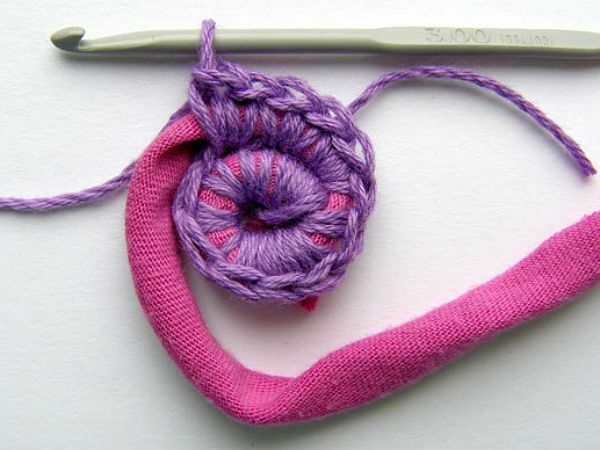
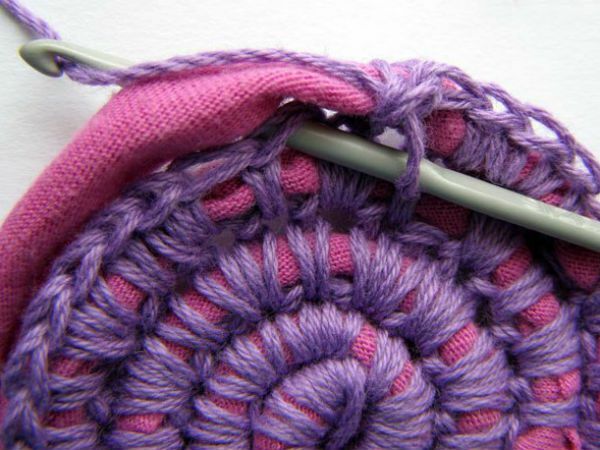
Knitwear is cut into strips 3-4 cm wide. Each little stretch, and then sew in a single "thread".
The edge of the first strip roll in a ring and start tying up spirally, st.b / n, adhering to the knitting pattern: 1st row odd number of loops, 2nd - to each loop two, 3rd - alternate 2 loops in 1,1 in 1, 1 in 1, 2 in 1, 4 in 2 loops in 1, 1 in 1x3( ie 3 loops) and so on.
From parts
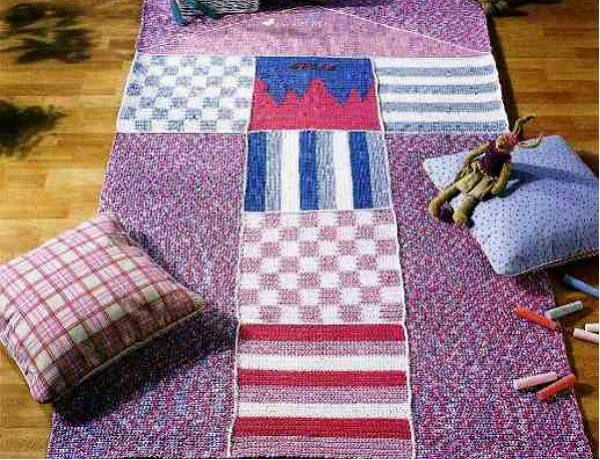
To create a carpet size of 120 by 200 cm, you will need:
- yarn "Multicot"( 160 meters in 100 grams): 1000 grams of melange pink, 350 grams white and pink, 200 gramsthe color of the sky, 150 grams of rich pink and rich blue;
- hook number 5;
- is a non-slip material with a size of 110 by 190 cm.
Main pattern: st.b / n, with each row rotating 1 extra cent.
Diagram of the rug
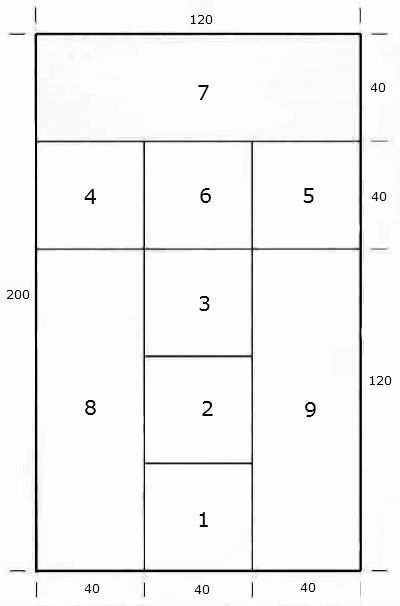
Legend:
- 1 - a square with strips A;
- 2 - a square with "squares A";
- 3 - a square with B stripes;
- 4 - a square with "squares B";
- 5 - a square with strips C;
- 6 - the square "Earth";
- 7 - triangles "Heaven";
- 8 and 9 - rectangles of pink melange.
Strips A: alternate on 7 r.pink, rich pink, white.
Strips B: alternate by 7 r.the color of the sky, rich blue, white.
Strips C: alternate by 7 r.the color of the sky, white.
In sections with threads of different colors, the one that is not occupied, tie it into the canvas in each row from the wrong side.
Scheme for the "A" square( 48 loops, 56 rows): * 6 pink and white( 1-8 rows), 6 white and pink( 9-16 rows) *, repeat.
For square "B"( 48 loops, 56 rows) use the colors of the sky and white.
Draw the "Fire" according to the following scheme:
Legend:
- 1 - pink;
- 2 - blue;
- 1 cell - 1 point and 1 p.
The size of the rectangles is 48 p. And 168 rows.
Scheme of the square "Earth": by typing 48 p. 14 pp., Tie with a rich pink thread, then to 42 r.according to the counter sample, blue to 56 rubles.
Tie two rectangles of melange yarn.
Triangle with a fragment of "Sky", use a pink thread, typing 144 p. Knitting the main pattern. Through the row add 2 knots to the knitting by strings of bright pink color( there will be 3 coils in the work).Changing the color, the last loop of the row is tied with a new thread. When all the loops are bright pink, tie another 7 rows. On the line of color change, plot a white thread from the intersection.
Elements to connect st.b / n using white yarn.
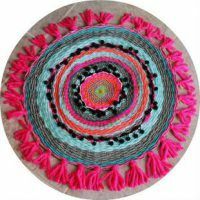
to the table of contents ^Yin-Yang
To create a rug you will need:
- acrylic yarn "Souffle"( 292 meters in 100 grams) black and white - 50 grams, green, blue, orange, red and blue - 30 grams;
- hook №3.
It is desirable to work with a pattern - a cardboard circle with a diameter of 28 cm. On the pattern, make the marking of the boundaries of the sections of the cloth of different colors.
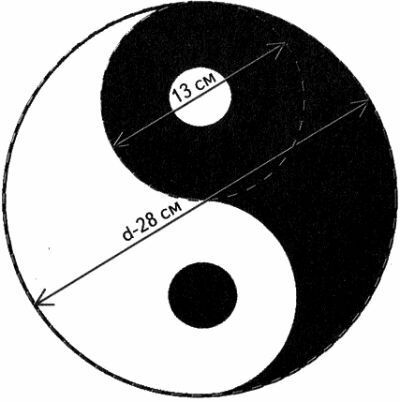
For the "Yin" section of black yarn knit st.b / n circle of 3 p, after changing the thread to white and increase the size of the circle to 13 cm in diameter. Change the shape of the element by decreasing and adding loops, by applying the part to the pattern. Element "Yan" do the same.
On the outer circle make the edge st.b / n, using the contrasting color of the plot of the thread. On top of the edge, make the harness a yellow thread - you should get 168 loops. Divide the circle into 8 sectors with 21 points each. Separate segments perform different colors, tying 2 st.s / n at the beginning and end of the segment, and the main part of it is just art.b / n. In each sector there are 11 rows.
Finished sectors sew, product tie with white edge art.c / n, tying two in one loop in the corners. Make the final binding with a black edging.
to contents ^Popcorn
Knitting pattern:
1st row - 5 in.to close one more.
2-nd row - the resulting circle tie 16 st.s / n.
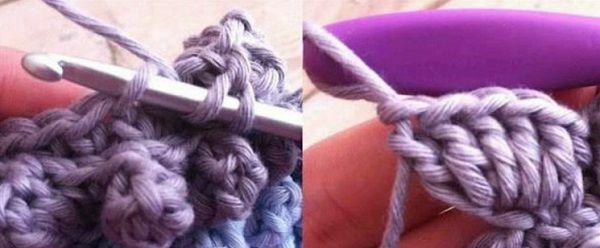
3rd row - perform 16 "grains" patterned "popcorn" st.b / n, 5 tbsp.c / n in one loop, remove the hook, enter the upper loop of the first column, grab the left loop and pull it, st.b / n.
4th row - we connect the "grains" with air loops( 3 pcs each).Next, according to the scheme.
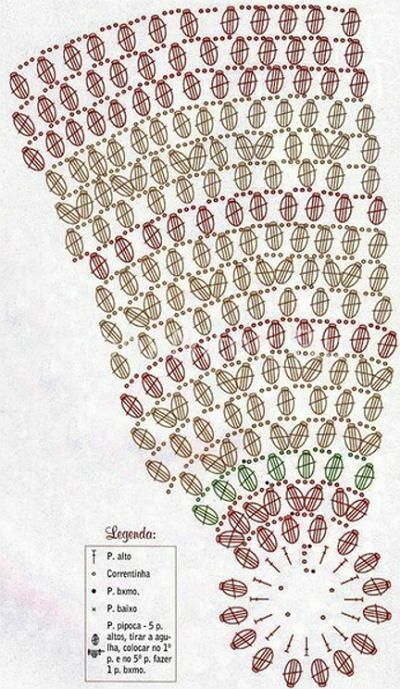
Provence
To create a carpet in the size of 100 cm in diameter, you will need:
- yarn "Multicot"( 160 meters in 100 grams) - 650 grams of vanilla color;
- a melange yarn «Multicot Print»( 160 meters in 100 grams) - 350 grams of apricot;
- set of spokes, hook, short, long circular needles No. 5.
Diagram of the rug
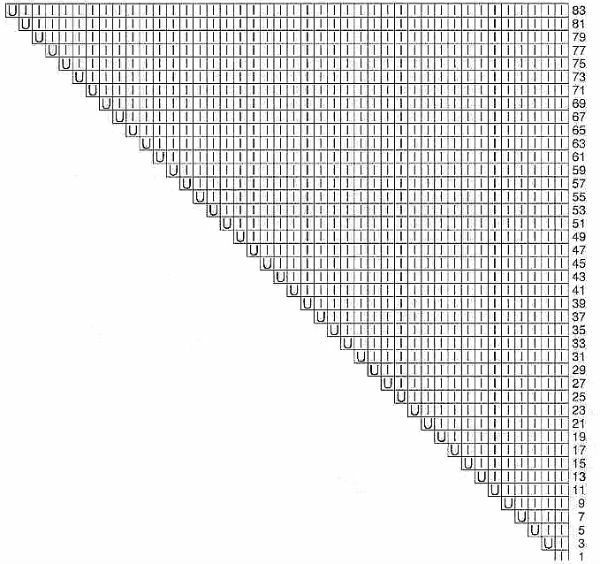
Legend:
- │ - 1 face loop;
- U - 1 cap.
The diagram is for odd circles. All hinges, nakidy in even circles face. Scheme to copy in each circle 8 times.
Using a set of spokes, dial 8 loops with a combined thread( apricot and vanilla).Circle closed, evenly distribute the hinges to 4 spokes. Continue to work on the scheme.
84 row last. Close the hinge, fold the mat 6 times st.b / n with a vanilla thread in two additions, adding one circle at the beginning of each segment of the circle. If desired, the product can be decorated with fringe.
to contents ^Multicolored
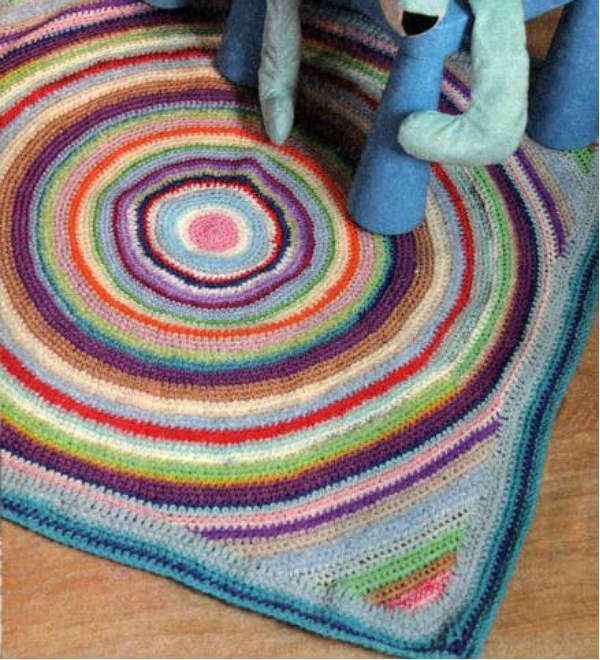
To create a rug you will need:
- yarn of different colors( you can have leftovers);
- hook №2,5.
Scheme
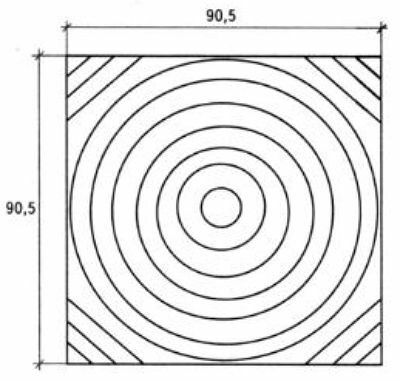
Tie a circle of 5 loops. Item knit st.b / n, tying on 2 tbsp.in every 8. How to make the product square: visually divide the circle with 64 rows into four sectors. From each imaginary line, count 25 points in both directions. On the resulting segment, tie 19 rows, making a reduction of 2 points at the beginning and at the end of the row. Similarly, treat the remaining 3 sides of the product.
The final stage: tying the square of st.b / n( 6 rubles of yarn of any color).
to the table of contents ^Heart
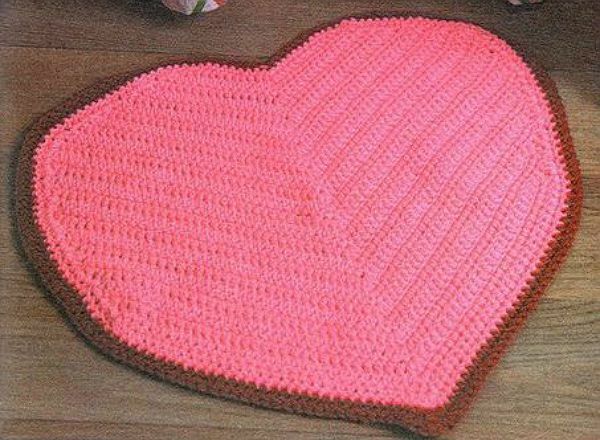
To create a rug, you will need:
- pink acrylic-wool yarn "Natasha"( composition 50/50, in 100 grams 250 meters) - 200 grams;
- little red yarn;
- hook number 6.
Important! The rug is knit with a double thread.
Tie the 23rd century.item( 2 for lifting).Make a mark on the middle of the segment. St.b / n perform 15 rows, making 1 additional loop on each side in all rows. In this case, the center is in place.etc., sew 5 p. From the 16th to the 25th row, cut 1 pt in the places where you added. The central 3 points should be tied as one.
Make st.b / n edge on the finished product with a pink and red thread. On the hinges of the center make an increase of 5 loops.
to contents ^Wicker
to contents ^From pigtail
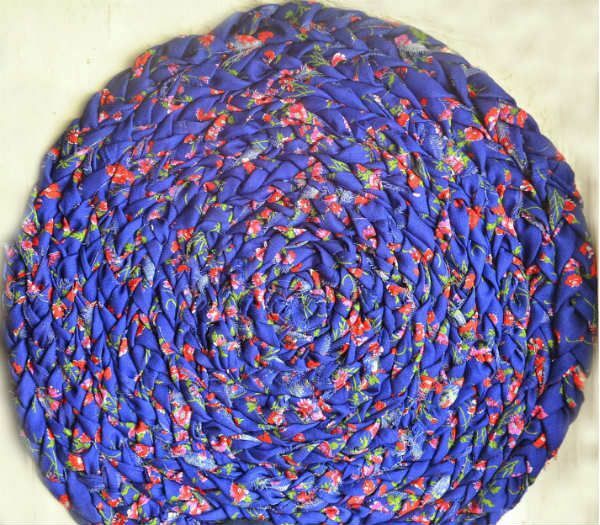
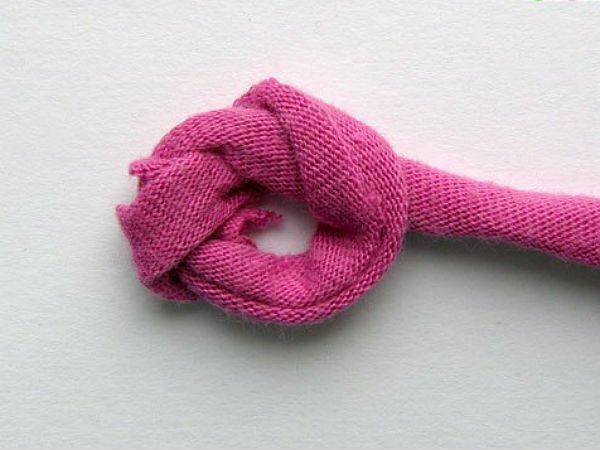
The product is a fabric of a sewn long braid. It is made of cloth strips cut from old things having similar density and thickness. Strips sew together, and then weave into a braid.
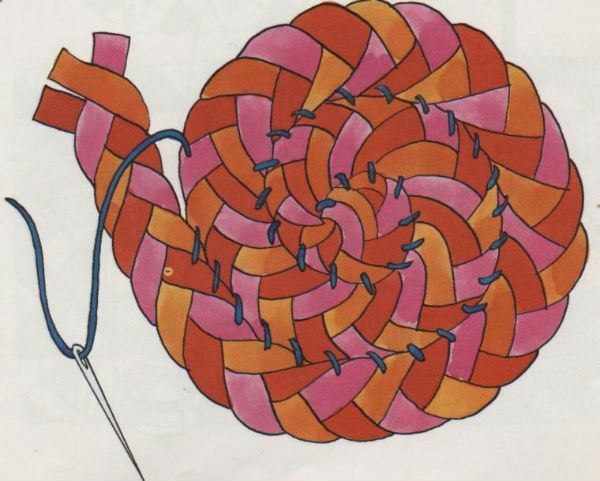
Nuances:
- seams in ribbon strips must be in different places, rather than on the same line - to avoid rough areas in the finished fabric;
- drawings on the products are formed by selecting ribbons of different colors;
- stitching should be done on a flat surface to make the product flat.
From the rope
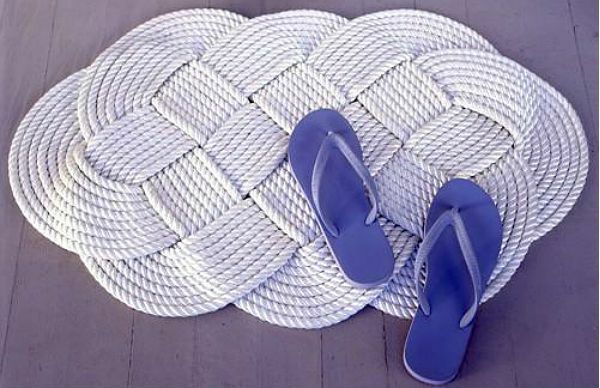
The design of the product is quite simple, you only need a little time to sort out the direction of the thread. To create a rug measuring 83 by 40 cm, you need 50 meters of nylon rope, 1.5 cm thick.

For ease of use, use a large paper sheet with a painted cross, the size of which should match the size of the future product.
At the end of the rope, make a large knot, making sure the size matches the desired boundaries of the created mat. About 80 cm coil and set it on the right side of the loop."Ears" pull it down.
Referring to the drawing, move the elongated loops first to the left, and after the left, place it on the right.
Tangle and stretch under the first crossed cord, after under the left double loop, and then under the last cord.
Pull the second part of the rope along the outlined base, placing the cord on the bottom or on top of the formed figure.
After finishing work, make the ends on the wrong side, secure. On the same side, lightly brush the rope in places of weaving together.
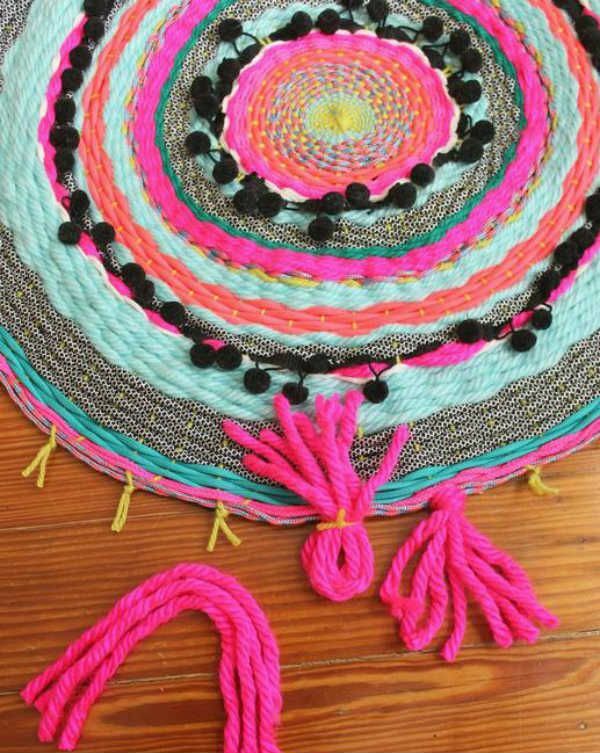
to contents ^From yarn and cords
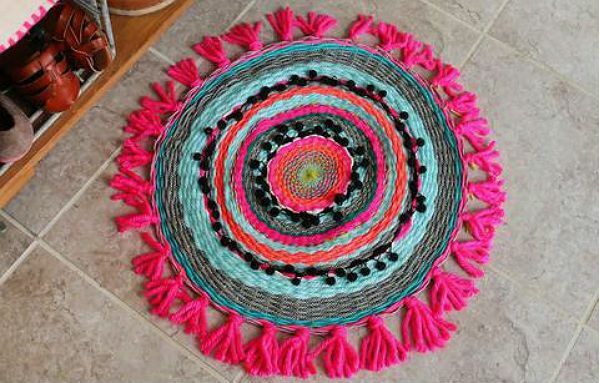
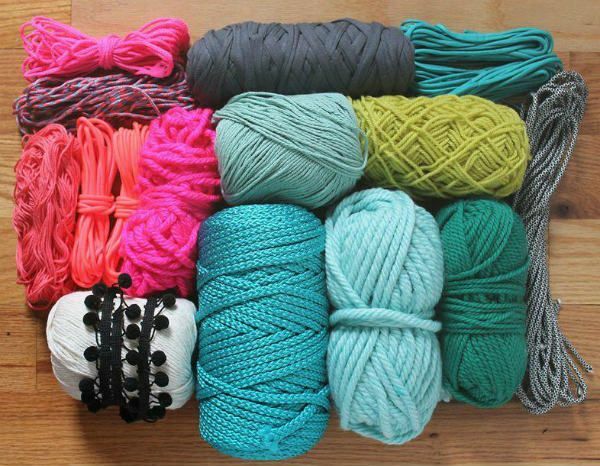
To create a rug you will need:
- yarn of different thickness and color;
- decorative braid;
- paracord;
- cardboard, from which it will be necessary to make a workpiece - a circle not less than half a meter in diameter;
- scissors;
- pencil;
- ruler.
To make a cardboard basis for weaving the rug, you need to tie the pencil to the braid. Press the edge to the center of the cardboard blank so that when pulling, the pencil does not reach the edge of the cardboard 2 cm. Draw a circle and cut it.
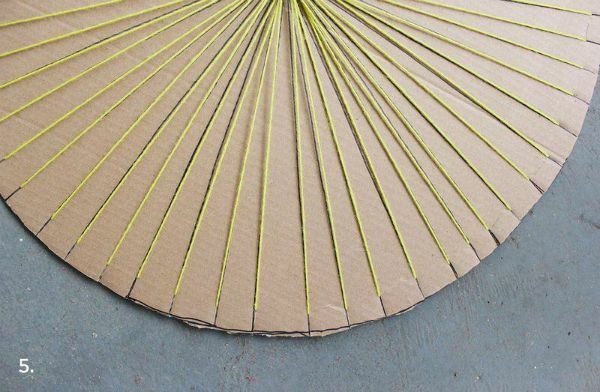
Draw the cardboard circle as shown in the photo. Ideally, you should get 60 lines passing through the center. Then, by moving the scissors along the perimeter of the workpiece, make shallow incisions to the center on each line.
Fasten the frame thread to the circle with adhesive tape, pressing its tip with adhesive tape on the underside of the cardboard blank. Wrap the workpiece as in the photo.
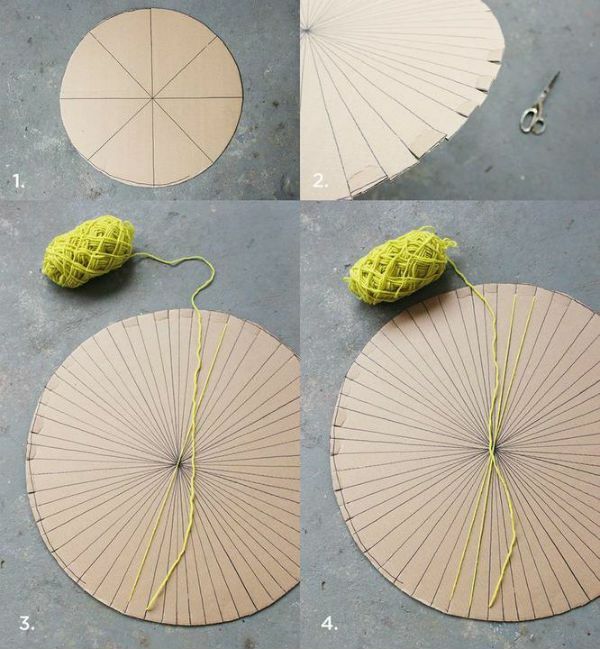
To begin weaving the rug is better with fine yarn, since in the center the frame threads are very tight. Having fastened its edge on one of the filamentary beams of the base, hide the tail, and pass the rest of the thread under and above the diagonal cords. You can do this through one or two frame threads.
When the end of the yarn is 10 cm, hide this tail under the wireframe, and instead take the next thread.
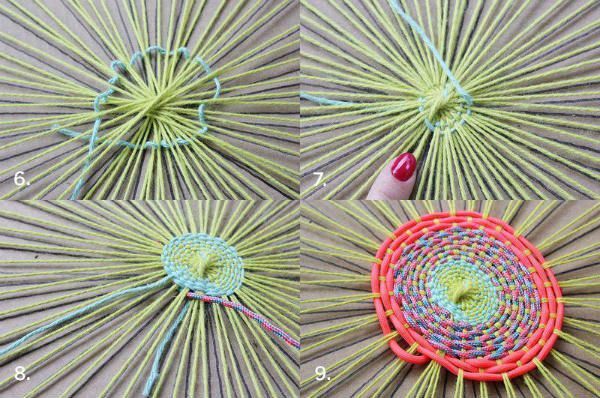
Tighten the braid, achieving even numbers and no holes. Filling yarn about 10 cm of a rug in diameter, you can start the interlacing of the yarn thicker and stretch according to the pattern: above the two strands, under one.
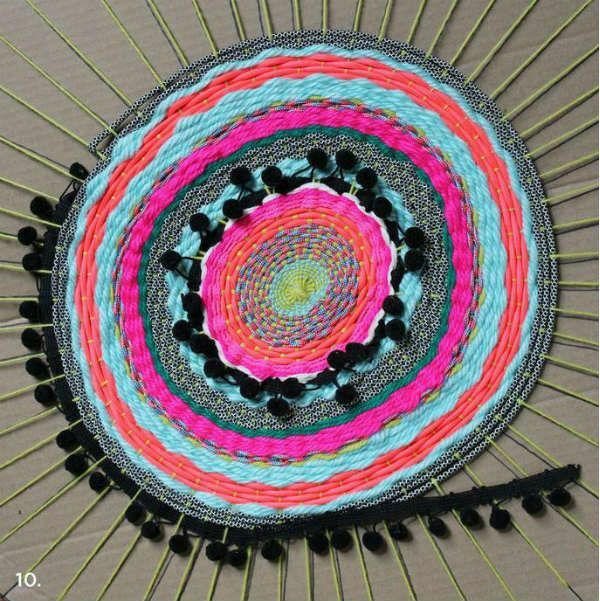
Continue working until you achieve the desired size of the rug. If desired, you can go to the weaving scheme 1 through 1.

After finishing the area of the rug, cut the warp threads and bind them in pairs. The wrong side of the rug may be slightly untidy, but the protruding tails can always be pruned.

To disguise nodules from wireframes, you can tie brushes from the remaining threads to each loop.
On the
grid This is a very simple scheme for making a long pile mat.
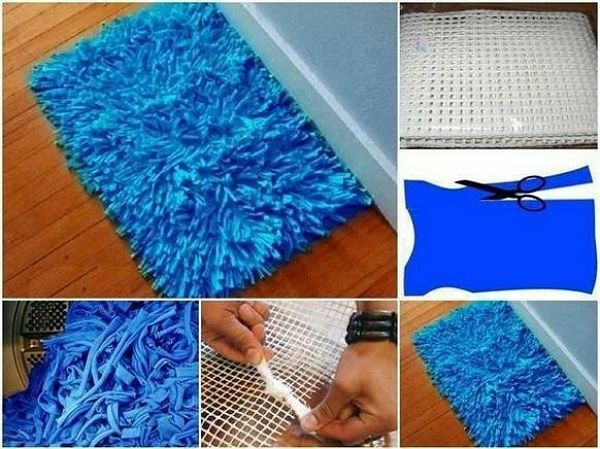
To create a rug, you will need:
- plastic or fabric mesh with cells of arbitrary size( the grid can be crocheted or purchased at a construction store);
- old terry towels or knitted things.
Cut a piece of the desired size and shape from the mesh and sweep the edges so that the mesh does not dissolve.
The desired fabric is cut into strips 2-2.5 cm thick, 10-12 cm long. Each strip is folded in half and tightened with a loop on the guide of one of the cells or simply tied with a knot so that the free edges of the strip look up.
Thus, fill the entire grid space. Cells can be filled through one or each, all depending on the thickness of the cut strips.
to contents ^On hula-hoop
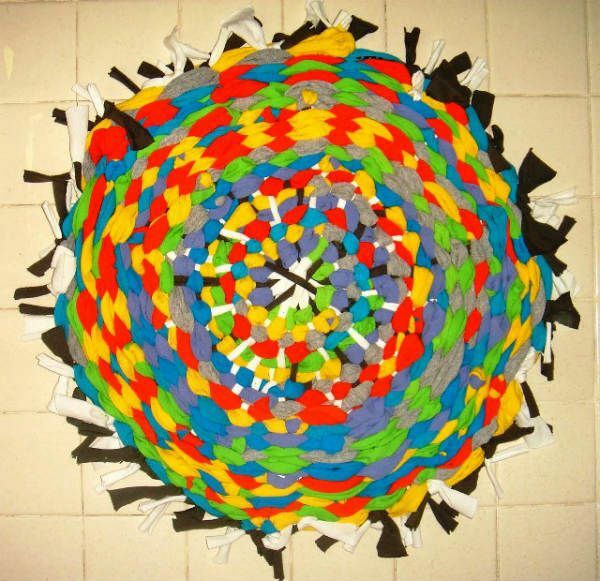
To create a rug you will need:
- old T-shirts and fabric strips;
- hula-hoop.
Important! Avoid sagging ribbons and loosely fitting the rows.
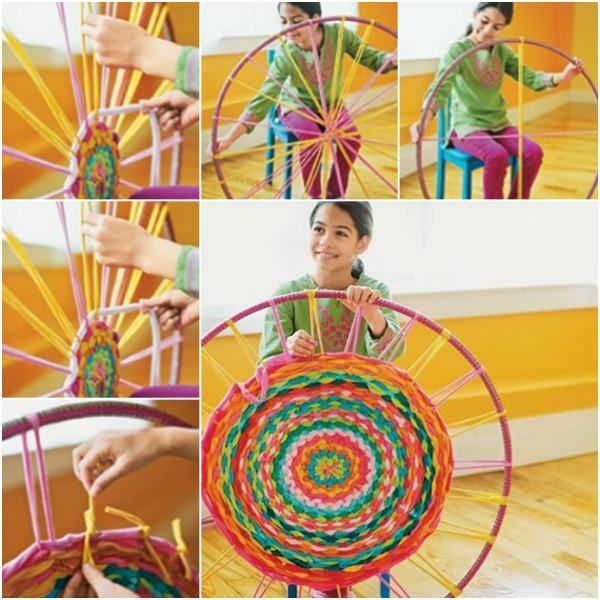
Fabric strips sewn into rings so that their length is equal to the diameter of the hula-hoop. It will be enough for 12 rings. Each tissue ring is stretched to hula-hoop, thereby dividing it into equal segments. If done correctly, all the strips will intersect in the center of the projectile. It is very important that they are well stretched.
We begin the weaving from the center. The cloth strip should be fixed for any diagonal of the base on the hula-hoop, after which it is necessary to stretch the ribbon between the strings according to the principle: above and below the base. To the finished tape, tie or sew the next.
After completing the weaving, cut the strips on the projectile, after pairing, tie them neatly with knots.