
French manicure( French) is one of the most popular speciesnail arton. Its classical version is performed as follows: on the nail plates apply a varnish of light beige or soft pink color, and the very edges of the marigolds are lacquered white, forming the so-called "smile line".
French manicure appeared thanks to curiosity. Jeff Pink was invited to the Hollywood film as a makeup specialist. His task was to do a manicure for all the actresses who took part in the shooting, which would harmonize with the outfits of every movie heroine, because at that time the lacquer had to match the color of the clothes.

As a supporter of everything natural, Pink performed a discreet manicure, covering the marigolds of all actresses with the lacquer of natural shades, highlighting only their tips with white color. This decision suited everyone and saved the stylists of the studio from having to spend many hours on manicure. French he was named in France during Pink's visit to this country, in which he was engaged in nail design for models.
Nail design: white French jacket( step by step)
For classic French manicure you will need:
- Basis for lacquer.
- White color varnish or special white pencil designed for a jacket.
- Semi-translucent lacquer of soft pink or fleshy tones.
- Finish( varnish fixer).
Step-by-step instruction:
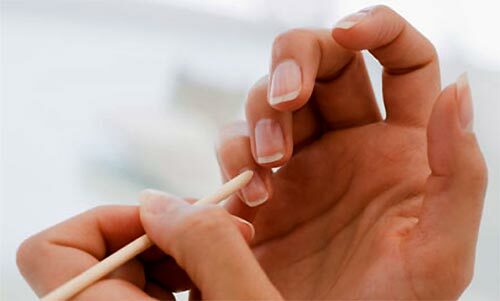
- Briefly file and slightly round the marigold using a high-quality nail file with a natural abrasive coating.
 Good manufacturers use garnet, rhinestone, marble and granite for this. Metal saws provoke the exfoliation of marigolds, therefore, it is best to refuse them.
 - To soften the cuticle, you can make a bath for hands by adding to the water 5-6 drops of any essential oil or lime juice. At this point, you can clean the marigold, using a special brush.
- After discussing the hands with a napkin, we apply a special cream on the base of the marigold, which helps soften the cuticle. Slightly massage the fingers so that the cream quickly absorbed and came into contact with the cuticle.
 We polish the marigolds, after which we move the processed cuticle with a stick of boxwood.
 - We cover the marigold with a layer of base varnish, due to which the surface of the nail plate will become flat and smooth. The drying of the substrate usually takes five to ten minutes.

- With qualitative pencil for the French manicure we distinguish the grown part of our marigolds, applying lines to the inner surfaces of the nail plates. If there is no such pencil, you can use a white lacquer.
 In this case, we apply it to the tips of marigolds, and it is not at all necessary to draw a traditional brace or "smile".You can show imagination and draw a diagonal line, draw a square or a combination of intersecting lines. If you absolutely want to make a classic manicure, it is enough to make even stripes on the tips of the nail plates.
 - After waiting for the complete drying of the white lacquer, we cover the nails with a layer of translucent lacquer natural pink or fleshy hues. If desired, you can apply another layer of varnish: in this case, you will get a slightly darker shade.

- We finish the manicure by applying a fixative varnish, which not only gives the nails a particularly well-groomed appearance, but also greatly accelerates the drying of the previous coating.
The advantage of white jacket is that the marigolds with this manicure look very attractive and natural. White jacket fits well with any outfit, it is appropriate in any situation, it is decorated with a variety of designs, glitters and stickers. A white jacket with rhinestones is ideal for weddings and any solemn event.
Nails design: French coat with a pattern( step by step)
To make beautiful coat nails with a pattern, you need to purchase:
- Lacquer is a foundation of gently pink color.
- Thick white lacquer.
- Lacquer in black.
- Manicure Strasses.
- Fixing varnish.

Step-by-step design of nails:
- We perform classic French-manicure, we give pink nails to nails.
- After drying the varnish and the white lacquer on the tips of the marigolds, we carefully apply the varnish of black color, using stencil-delimiters.
- After drying black lacquer we paint patterns with a thin brush.
- Take a thin brush, dipped in white lacquer and apply to the marigold pattern in the form of dots and colors.
- Decorate the middle of the patterns with a tiny strass, attaching it with a fixing varnish. If such a manicure is designed for everyday demonstration, you can do without rhinestones or attach them to every nail.
- Apply to the manicure a layer of fixing varnish.
Fingernails with a pattern look very attractive. With this manicure you can flaunt both on holiday and everyday: it all depends on the brightness of the varnish used and the intensity of the pattern applied. For solemn occasions, you can make the drawing larger and brighter, and for everyday manicure, drawings suitable for lacquer tones are suitable.
Nail design: jacket with sequins( step by step)
Nails design with sparkles is an ideal variant of celebratory nail art. A French manicure using glitterers is called a "millennial jacket".It is based on the classical scheme of an ordinary jacket: the nail is covered with a natural-tone varnish, and the tip that grows off is highlighted with a varnish of either white or any other color.
A line of a smile or a fragment of the nail can also be decorated with sparkles. Carry out a jacket at home on the strength of everyone who wants.

For manicure with sparkles, we will need:
- Lacquer base( in this case, you can take a varnish of not only natural shades, but also radically-dark colors: black or blue).
- Varnish with sparkles or perfectly clear varnish and sparkles for nails.
- White lacquer( optional, for "peas")
- Stencils for applying a smile line.
- Lacquer hardener.
Sequence of actions:
- We apply a varnish-base( its color in this case depends on the chosen image).
- After complete drying of the substrate, we take out auxiliary stencils( with which you can make an ideal smile line) and attach them to each nail plate.
- On the tips of the marigolds we apply a layer of varnish with sparkles. If there is no such varnish, we use a colorless varnish and immediately splash the cooked sparkles on it. Excess glitters can simply be blown off, directing a jet of air from the cuticle to the tips of the marigold. If desired, you can add small "peas" with white lacquer.
- To make the manicure complete we fix it with a layer of varnish-fixer.
The scheme for creating an inverted jacket with sparkles is no different from the just described manicure. The only difference is that the glitter should be applied not on the overgrown tips of the marigolds, but on the area around the cuticle.
Nail design: jacket with crystals( step by step)

Nail design with rhinestones is often used to perform a wedding manicure: made by a good specialist, it helps the bride to create a complete and unique image. So, what do we need for this?
- Lacquer base for manicure.
- White and pink color varnish.
- Manicure rhinestones.
- Varnish for the finish coat.
Stages of creating a manicure:
- We make a French manicure according to the classical scheme, leaving a base pink background for the flower on the part of the free end of the nail.
- We depict flowers on the surface of marigolds. Taking a thin brush, we complement the picture with elegant curls.
- We glue the rhinestones to the drop of the fixer - the middle of the flowers.
- Apply to the manicure a layer of fixative varnish.
Nails design: color jacket( step by step)
For forty years that have passed since the creation of the French manicure, it has acquired many variants and modifications. One of them is a multi-colored jacket, which provides for the creation of a manicure on both a color uniform background in the center of the nail plates, and the decoration of only the tips of the nails with varnishes of various colors.
Materials needed:
- The basis for the French manicure.
- Several flacon varnishes of different pastel shades.
- Decorative silver lacquer.
- Strasiges for manicure( optional).
- Varnish-fixer.

Step-by-step instruction:
- Before creating a colored French jacket, it is necessary to thoroughly wash and degrease( using a cotton ball soaked in lacquer or alcohol).
- We cover the marigold with a layer of varnish-base.
- Take a brush, dipped it in a light yellow varnish and draw a line of a smile on each nail.
- Alternately dipping the paintbrush in varnish of different colors or only in white, we draw on the outgrown edges of the marigold stripes patterns of any shape.
- We emphasize the line of a smile with a decorative varnish of silver color.
- Fix the finished manicure with a layer of lacquer-fixer: this will give the nails extra gloss and make the pattern more resistant.
- If desired, the ring finger can be decorated with a pair of large strasics.
Other kinds of colored jacket
The black jacket can be made a little differently than white. For him it is necessary to purchase the following materials:- Traditional basis( base).
- Black lacquer with glossy gloss. Ten nail polish strips.
- Matting agent.

Sequence:
- We cover the marigolds with the base for the jacket.
- After letting the varnish dry well, apply a black varnish with a glossy sheen to the marigold( in two layers).
- After a quarter of an hour, we paste the manicure strips to the tips of the nails and apply a matting coating to the nail plates. As a result, the tips of the marigolds will attract attention with a beautiful glossy gloss, and the marigolds themselves will turn out to be matte.
- Transparent base.
- Red lacquer( the shade can be any).
- Top( fixing) coating.

Step by step instruction:
- We perform the usual classic manicure.
- We apply the base coat.
- Otrostshie tips of marigolds paint over with varnish of red color.
- We cover the decorated nails with a protective layer of top coating.
The color solution of the traditional French jacket has also changed: today's beauties love bold experiments, during which it became clear that it is not necessary to make the brighter ends of the nails.
No less spectacular is the manicure, in which the main part of the nail is painted with a light pink varnish, and the tip attracts attention with a richer and darker varnish of crimson or ruby colors.
Blue jacket is often associated with the winter due to the rich palette of all kinds of cold shades, which is why it is often used as a festive New Year's manicure, helping to complete a charming fairy-tale image. Using glitters, rhinestones and lacquer with sparkles creates a feeling of cold and shimmering snow. 
Here is one of the variants of a festive winter manicure. The following materials are required for him:
- Turquoise glossy lacquer liner.
- Metallic lacquer is a dark blue color.
- Varnish-decorator of white color.
- Colorless lacquer.
- Basis base.
Sequence:
- At the base of the overgrown tips, we apply lines forming a wedge and fill the space with blue metallic.
- With a silver decorator, draw three narrow leaves that go over the blue background. Draw starting from the left corner of the nail.
- Let the contours dry, fill them with a turquoise varnish.
- We circle the leaves with a white decorator, creating a contrast effect.
- Finished manicure covered with a layer of clear lacquer.
Nail design: lunar jacket( step by step)
Beautiful nail design, called the lunar( or Hollywood) manicure, appeared in the forties of the last century. Fashion women of those years, doing a manicure, did not paint the nail of the nail and did not cover it with varnish.

In our time, the moon manicure is done by combining it with a classic French jacket: draw two semicircles, having one on the outgrown tip of the nail, and the other at its very base.
Despite the apparent complexity, even novices will be able to cope with the design. In departments specializing in the sale of goods for nail art, already sold ready-made golden patterns, which are supposed to be glued to the base of the nail, already painted with black lacquer. However, the lack of ready-made templates is not an excuse to refuse to perform a lunar manicure, since it is easy to do without them.
So, we want to do a moon manicure. What do we need for this?
- Transparent base.
- Tear-off foil.
- Tight lacquer in black.
- Adhesive for nails.
- Pencil for lips.
- Matte or glossy finish.

Sequence:
- Degreasing marigold, apply a transparent base on them.
- By circling the cuticle with a thin brush around the perimeter, we apply special glue for the nails and draw a "smile" on it
- Apply a piece of gold tear-off foil to the glue and, carefully pressing, gently tear off the free edge. At the very bottom of the nail is a spectacular golden semicircle.
- After stepping away from the cuticle for a couple of millimeters, we draw a flat line along the foil, using a lip liner.
- With a fine brush with a black lacquer applied on it, we sketch the outline of the sketch, after which we cover the remaining part of the nail( with one or two layers).
- Apply a frosted or glossy coating, fixing the result.
Very often it is advised to use ready-made stencils for making a lunar jacket, but we recommend refraining from this, because the contour of the applied lines is uneven due to the varnish leaking under them. You can not fix it. In addition, because of the opacity of the stencils, you will not be able to determine how identical the semicircles you put out will be. As a result, you probably will not be able to make the drawings on the nails the same.
Nails design: jacket double( step by step)

A beautiful jacket is obtained if you make the smile line not single, but double. Doing a double jacket is not at all more difficult than usual. Required Materials:
- Basic coverage.
- Varnish of two contrasting( or complementary) colors.
- Finish.
Step-by-step instruction:
- Prepared marigolds are covered with base lacquer.
- Using a fine brush, we apply the smile line with a suitable lacquer in color. After letting it dry, dipped the paintbrush in a varnish of contrasting color and in parallel draw another "smile".
- We dry the dried out design with the finishing varnish.
Double jacket, as a rule, do not decorate any additional drawings. Recently there has appeared a fashionable tendency to make a double jacket, combining classic and reverse French manicure. With this option, one line of a smile is drawn along the very edge of the overgrown tip, and the second fringes the base of the nail plate.
Nail design: leopard jacket( step by step)

Animals prints are periodically relevant both in clothes and in manicure. Not the exception was the current spring season. A leopard jacket is a rather complicated design of nails. It perfectly harmonizes with clothes, jewelry and some accessories of leopard coloring. For a leopard jacket it is necessary to take:
- Base base.
- Decorative varnish of two shades of sandy or soft brown colors.
- Black lacquer.
- Finish.
It is made as follows:
- We make a classic European manicure and perform a basic covering.
- We allocate a zone of the future leopard jacket with the help of light brown decorative varnish.
- Armed with a thin brush and apply a smile line( beginners can use the auxiliary stripes for the French manicure).
- We simulate leopard spots on the nails with the help of lacquer, the tone of which is somewhat darker than the color of our base. The spots must have a different configuration and value. They should be chaotic, showing a sense of proportion.
- Lightly duplicating the spots with droplets of black lacquer, we give our design depth and additional volume.
- After letting the stains dry, cover the leopard jacket with the finishing varnish.
For leopard jackets, you can use varnish not only those shades that are inherent in the natural color of leopard skin.  It is perfectly permissible to create fantasy compositions of the most unexpected colors, combining:
- Pink, purple and black.
- Contrast shades of purple.
- Turquoise, pink, yellow and black.
The drawing itself can be located both in the zone of overgrown tips, and on the entire surface of the nail plate. To give the design special decorativeness, you can duplicate the smile line with a silvery varnish and sequins.
3 ways how to make a French manicure at home, video
Video:
 13:19
13:19 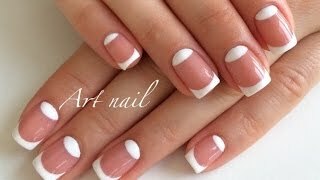 14:21
14:21  8:46
8:46