
Wall panels made of natural material are widely used for decorating walls. These can be grains of coffee, cereals, dried flowers, slices of fruit or vegetables, autumn leaves.
Making a panel is very convenient with children: creative activity develops fantasy, the ability to think creatively. Work with small materials contributes to the development of fine motor skills, which is useful for young children. And most importantly - for this lesson there are many ideas that I want to realize.
Coffee grounds panel

Coffee table is ideal for a kitchen or a room where you are used to relaxing. It is believed that the smell of coffee, like the beverage itself, tones up the body and gives a charge of vivacity.
Scientists have proved that together with this, the smell of coffee beans has an anti-stress effect. The more often you breathe in their fragrance, the less you will be exposed to external stimuli.
View varieties of coffee beans - video:
To make a simple wall panel made from coffee beans, you will need the following materials:
- Coffee grains of one or more varieties, differing in color, size and smell.
- Basis for the panel. It can be made from improvised materials: sackcloth, other durable fabric, cardboard, paper, wood.
- Glue PVA, and better - "Titan".
- Figure.
- Copier paper.
- Pencil.
- Frame.
This is the minimum list of materials that you will need. But you can make a picture of beans and coffee.  The panel of cereals, diluted with coffee beans, looks like a real picture, as here you can collect the entire palette of colors:
- Coffee - green, brown, other shades of brown.
- Peas - orange. Beans - red, white.
- The mantlet is white. It is great for a panel on the theme of winter.
- Fig - brown, white.
- Corn - yellow.
- Wheat is beige.
- Perlovka is a beige.
- Oatmeal is creamy.
- Rye - light brown, dark beige.
- Poppy seeds are black.
- Buckwheat - brown shades. Lentils - yellow, orange, green. Millet - yellow.
How to make a panel of grains:
- Use a pencil and a copy paper to transfer the picture to the base.
- Then apply a small area of glue and immediately glue the grains so that a monochrome or multicolored pattern is formed. You can create applications from coffee:

- Decorate the panel with a frame, dried fruit slices. Separate effects can be created with the help of multi-colored fragrant spices or instant coffee.
To paste crumbly cereals such as corn or semolina, ground spices and instant coffee, it is necessary to spread the detail of the picture with glue, fill it up with plenty of necessary groats or spices. After a while, the excess residue is blown off.
Panel made of seashells with their own hands
Large shells are an independent decoration. And small ones become excellent materials for the creation of wall paintings in the form of panels.

The simplest version of the panel with shells is the gluing of shells of various shapes and sizes in chaotic order or in the form of a certain pattern.
In addition to shells, stones and dried starfish are excellent. The panels created with them are great for a bathroom: they help to imagine that you are on the seabed and are looking at the sea relief. 
If you make a picture of seashells, sea stars and stones, and then cover it with golden paint or silver, you can achieve such a dazzling effect.
Panel on burlap of seashells
This is a master class on creating panels from shells on a fabric basis - on sacking. It is very simple to manufacture: to make it, it will take no more than a couple of hours.
You need the following materials:
- Smooth and thin twigs from the trees for the frame.
- Sacking.
- Strong twine.
- Cardboard.
- Brown wrapping paper.
- The needle is gypsy.
- One large bead for a fish eye.
- Glue PVA; .
- Glue gun. Pebbles, shells.
- Seahorse or starfish.
- "The Chicken God".

First, cut out the shape of the fish from the cardboard and cover it gently with sacking. The body of the fish, with the exception of the head and tail, wind tightly with twine. Then prepare the base:
- Sew a sack from the edges, forming an even square.
- Make a square frame of twigs, tie them at the ends with a twine.
- By twine, using the seam technique over the edge, reinforce the burlap to the frame.
Now tear off the wrapping paper so that the edges are uneven. This will achieve a greater effect. Using a glue gun, glue a piece of fish, a large pebble and a starfish to the paper.
Then glue pebbles and small seashells. As a result, you will get the same wonderful panel as in the photo.
Panel made of stone
A lot of construction companies offer such a service as making a panel made of stone. Usually, experts add a mosaic made of natural stone by cutting it, creating a variety of patterns and even pictures.

As natural stones are painted in various colors, the panel can be made both on a theme of summer, and on a theme of spring. If you use white stones, you will get an excellent winter panel. In the photos you can see what beautiful mosaic panels are in stores.

But you can make a stone from your own hands. For this purpose, pebbles collected from the bottom of the river or from the sea shore will do. The more diverse the shape of the stones, the more interesting the picture will be. Examples of panels made of stone made by own hands:

Stones can be laid in a mosaic way, making out a picture.
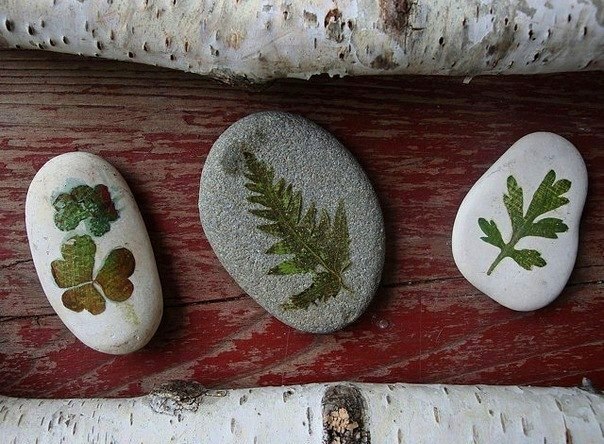
This will require colored stones. They can be placed in a pattern. You can do with them everything, what your imagination is ready for!
Wooden panel
For creative people, wood is one of the best materials. It would seem, how can I make a wooden panel? For this you need to know at least the basics of wood carving? Not at all: the panel is not necessarily decorated with carvings.
We will make a similar wooden panel:

The following materials are required:
- A sheet of dimensions 170 by 80 cm made of very strong and multilayered plywood.
- Wood rails for frame frames. To emphasize the rough branches, the slats should be large. For this purpose, even brusks with a width of 10 centimeters, and a thickness of 6. The two bars should be 150 cm long, the other pair of bars - 80 cm. The outer side of the bars should be rough, as if cut down. They need a light treatment, so that when they come into contact with the skin there is not a splinter. Sawed branches of three kinds. Each "stump" should have a diameter of 4 to 5 cm. Several dozen stems should be distinguished by a large diameter( from 6 to 7 cm).Several units can be made with a diameter of even 7-8 cm.
- Wood coloring stain.
- Varnish for work on wood. Stop the choice on a matte varnish that does not clog the natural texture of the tree. It is absorbed into the structure of the hemp and remains invisible. But he protects splinters, dirt and dust perfectly.
- Hot glue gun with pencils.
- Brushes for painting wood with varnish and stain.

Master class for making a wooden panel on the wall:
- Nail the frame and glue it to the base. Better place the case on the man.
- Lay on the finished frame hemp, piled from branches, for fitting.
- Clean the hemp, the basis for the panel of plywood from sawdust and dust with a vacuum cleaner.
- Paint the base with the frame stained using a brush. It takes 2-3 layers.
- Leave the substrate dry.
- Use a hot gun to glue the stumps as they were laid out during fitting.
- Allow to dry the panels whole day.
- Coat the decoration obtained.
 Then allow the product to dry for another two days. Now the panel can be hung on the wall. If desired, you can decorate it with other materials.
Panel from leaves
Panel from autumn leaves suitable for working with children. For babies it is real happiness to spend time with parents and engage in a common cause.
First you can walk with your child in the park or along the autumn alley, through the forest, to collect bouquets of different leaves, as in the photo below.

In the case go and dried flowers in the summer. If a panel of leaves is suitable for decoration on the theme of autumn, the panel of flowers reminds of summer.
On the theme of summer, the panel can be made with the help of leaves, decorated in the form of flowers. Flowers can be made applique, as in the photo below:

And you can add three-dimensional leaves from several leaves, as here:

For fantasy here expanse. Each sheet can be associated with something. So, maple leafs of yellow color resemble cartoon fox faces.  It remains to supplement them with some elements to get the full picture. From a variety of leaflets you can make an original dragonfly.

How to make a rose from autumn leaves?
One of the most original elements for a wall panel can be a rose, made from a maple leaf. It can be made without a leg, attaching a base to a canvas or cardboard on sepals from dried leaves of green color. But we will consider an example of how to make a rose on a leg. From such roses you can make a whole bouquet and strengthen it on the basis of a panel.
For the production of one rose, you will need:

- Several maple leaves for petals.
- Fine branches for stems.
- Green electrical insulating tape.
- Scissors.
You do not need to describe the entire process of making a flower, as everything becomes clear if you look at the master class of making roses from the leaves below.
1. 
2. 
3. 
4. 
5. 
6. 
7.  The latest photo is the result of the finished work. It is unlikely that you will succeed the first time. It will take some time to practice, so stock up a whole bunch of leaves.
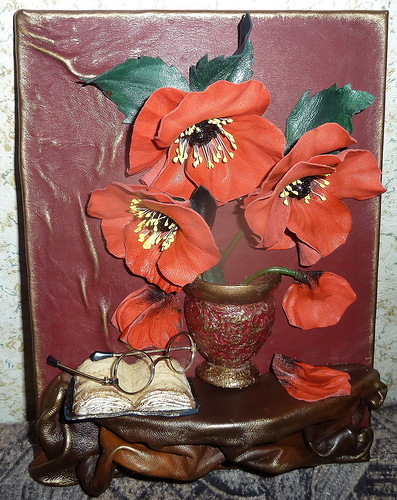
Leather panel
Leather is a noble material. The panel made of leather is ideal as a solid decoration for the wall. Such a decor can decorate a study, a hall, a drawing room or an anteroom. And you can make a leather panel with your own hands.

Let's consider a master-class on manufacturing panels from a skin on an example, a photo which is located above. In exactly the same way, you can make a decoration for the wall using any other drawing. For work you will need the following materials:
- Leather of different colors.
- Glue PVA, but better Moment.
- Cardboard.
- Calculator.
- Pencil;
- Basis for the panel.
- Acrylic paint.
- Brush for paint.
- Scissors.
- Brush for applying glue.
Step-by-step instruction:
- Draw a large picture.

- All the details are transferred to the tracing paper, numbered them, in order to quickly find what you need.

- Transfer the parts to the cardboard and cut them out.

- Brush each part with glue.

- Glue the cardboard to the skin.

- Trim the skin leaving allowances that need to be bent so that the front side of the part is covered with leather.

- Glue the allowances on the wrong side of the cardboard.

- Cover the entire base with a large piece of leather.
- Recreate the pattern on the basis with the help of leather parts.

- Cut strips of leather - flagella to form roof houses.

- Glue the roofs to the houses.

- Dampen pieces of leather, spread glue and glue, forming a "road".


- You can decorate the frame in the same way( moisten and glue).

- Paint the picture from the skin with acrylic paint on your own.

Here are some more ideas for a leather panel:


So, decorating your house is easy enough. This can be done with natural materials that provide harmony with nature.
Spend time with your family for a common cause, which can result in an original panel!
Video on topic:
 3:31
3:31  2:32
2:32 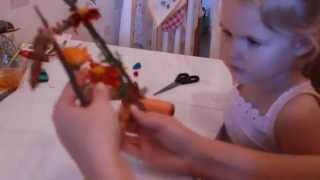 5:58
5:58