
Secrets and techniques for making a handkerchief. Knitted models of women's hats.
Contents
- How to knit a dress knit simple and double circular and two knitting needles for beginners: a diagram with the description of
- Secrets of garter knitting
- How to lower the loop and finish the cap with garter stitch?
- How to match the bottom for the cap?
- Simple female headdress with vertical garter stitch for beginners: diagram with description, photo
- Female cap with knitting needles across: diagram with description, photo
- How to tie a female hat with knitting needles diagonally?
- How to tie a female hat with knitting needles with shortened rows: a diagram with the description of
- How to tie a female beanie cap, a stocking with knitting needles?
- How to connect a fashionable voluminous female hat with knitting needles from thick yarn?
- Ladies' hat with knitted needles with lapel: outline, description
- Double female hat with knitting needles: a diagram with description of
- How to tie a fashionable female hat with knitting needles with a scythe: diagram with description, photo
- Female cap with knitting needles with ear flapswith description, photo
- Video: how to tie a woman's cap with a handkerchief pattern?
We need caps for warmth, beauty, style, not only in the cold season. Although the beauty and sales industry offer their ready-made models, you can also repeat them or create original caps yourself. Beginners in needlework are provided with simple patterns and tips of experienced craftsmen. The main thing is to find information and implement your idea. Continuing the theme of knitting with knitting needles of female headdresses, we will dwell in detail on the models made by garter stitching.
How to knit a dress knit simple and double circular and two knitting needles for beginners: the diagram with the description of
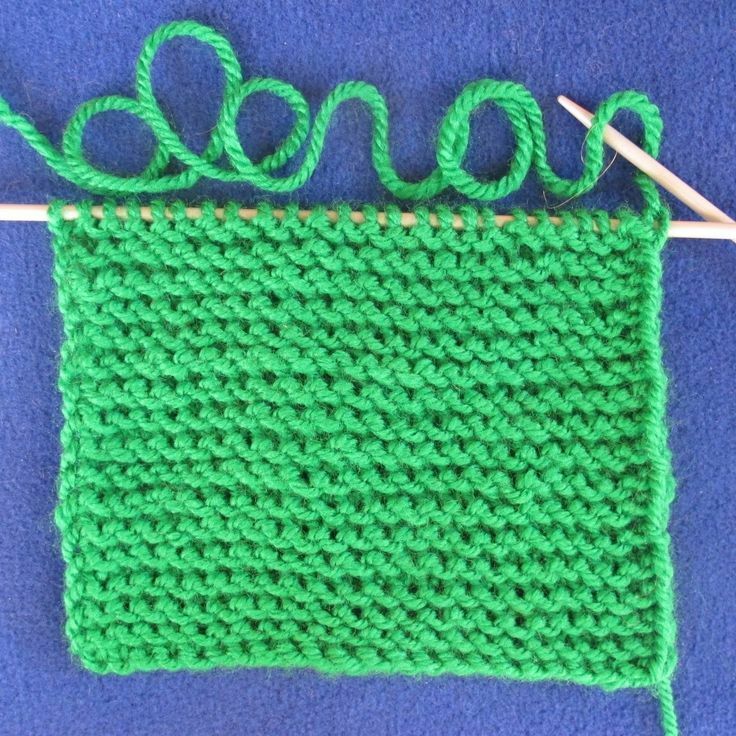 part of the blade on the knitting needle
 The knitting is most understandable to beginner needlewomen in terms of technique.
If you plan to knit on 2 spokes, then:
- 1 row - remove the first loop, then all the front loops, and the latter - the wrong one,
- 2 row - the first remove, again all the front ones, and the latter - the wrong one,
- 3rd andall the odd numbers - like the 1st
- 4th and all the black rows - as the 2nd
Or instead of the front ones, knit the canvas on both sides.
Below pattern scheme:
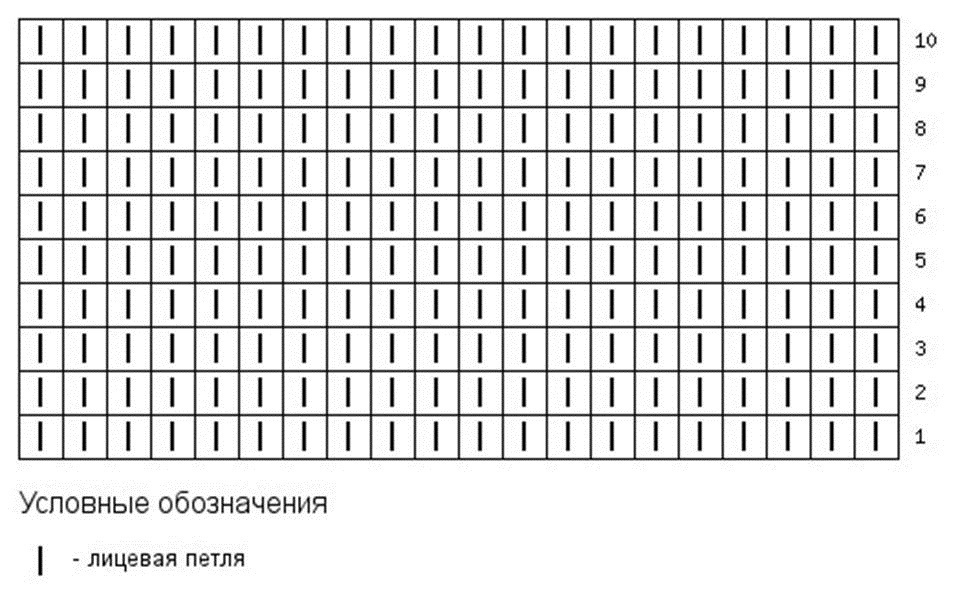 2-spoke pattern design scheme
 For carrying out garter stitching in a circle, remember that the underside of the product is not available to you. You work only with the front part of it.
Therefore, the alternation of rows is as follows:
- without edge and last, which on two spokes are knitted differently from the base fabric,
- all the hinges of the series are first facial, and then in the next pass and purl. Or vice versa - first purl, then facial.
Pattern pattern is as follows:
 appearance and scheme of a handkerchief pattern for knitting in a circle
 Secrets of garter knitting
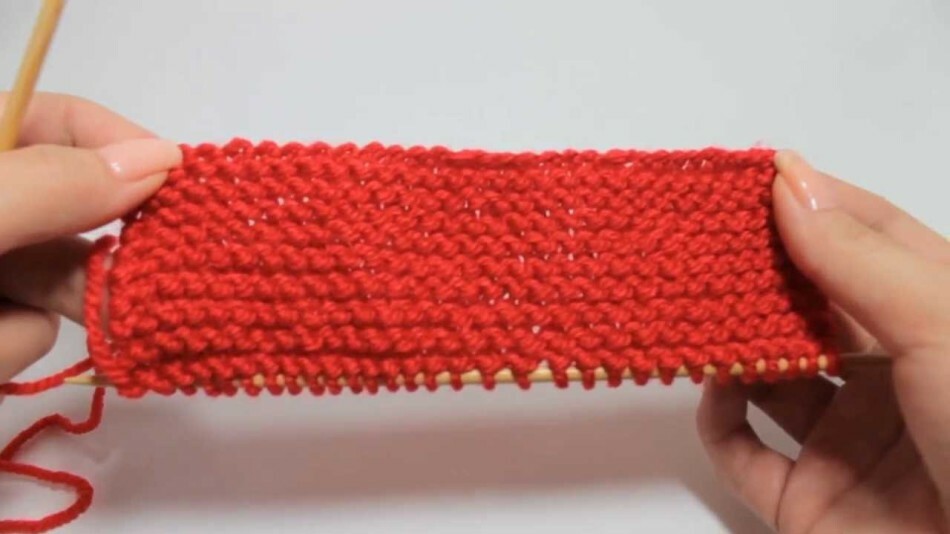 in the hands of a girl a piece of cloth.knitted with a handkerchief
 your product or its element will look more magnificent, if you have to make a lapel vest on him / them with the back loops. The ideal solution for this method is work on the lapels, the edges of the pockets, the fields on the blouses.
To make the product look neater, use the reverse set of loops, that is, as if from the wrong side. And on the same principle, close them in the last row.
Below photo-instruction:
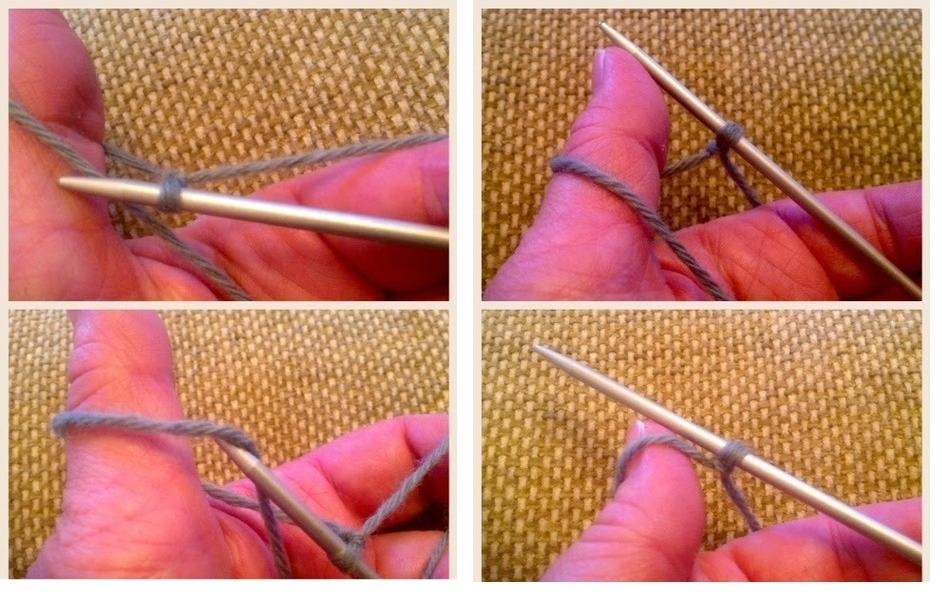 step-by-step way to set the loops for a beautiful edge, the first 4 steps of the
 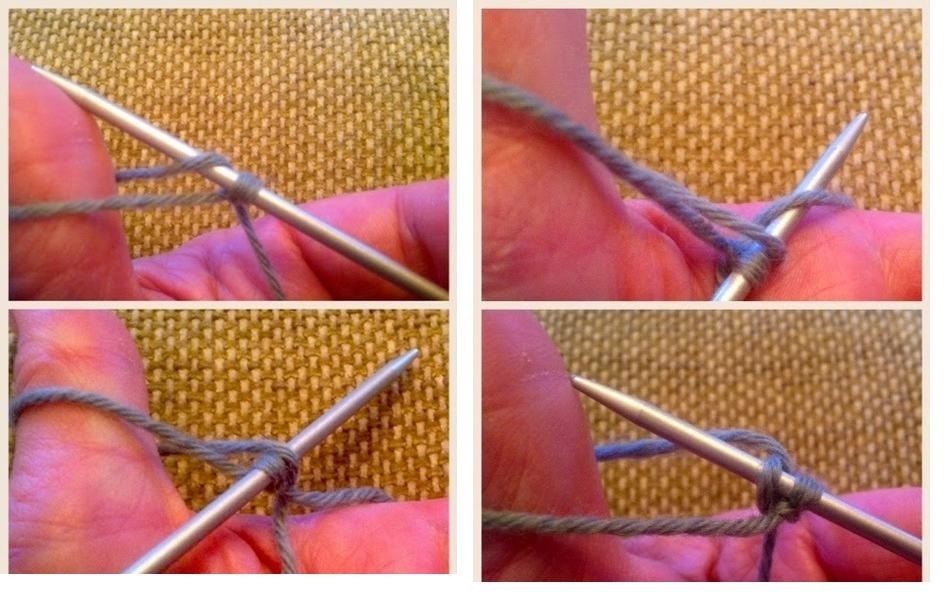 step-by-step method of tying the loops for a beautiful edge, the next 4 steps of the
 - Another nice feature of the plaque pattern is that there is no need to knit the elastic band either at the beginning of the article or beforeclosing of loops.
The edges of the bound thing retain their dimensions, do not stretch and do not "go."
- Add a twist to the pattern of a plaque, tie one row on spokes of a larger diameter than the main ones. Such a procedure alternate at your own discretion when working on the product.
How do I loosen loops and finish the cap with garter stitch?
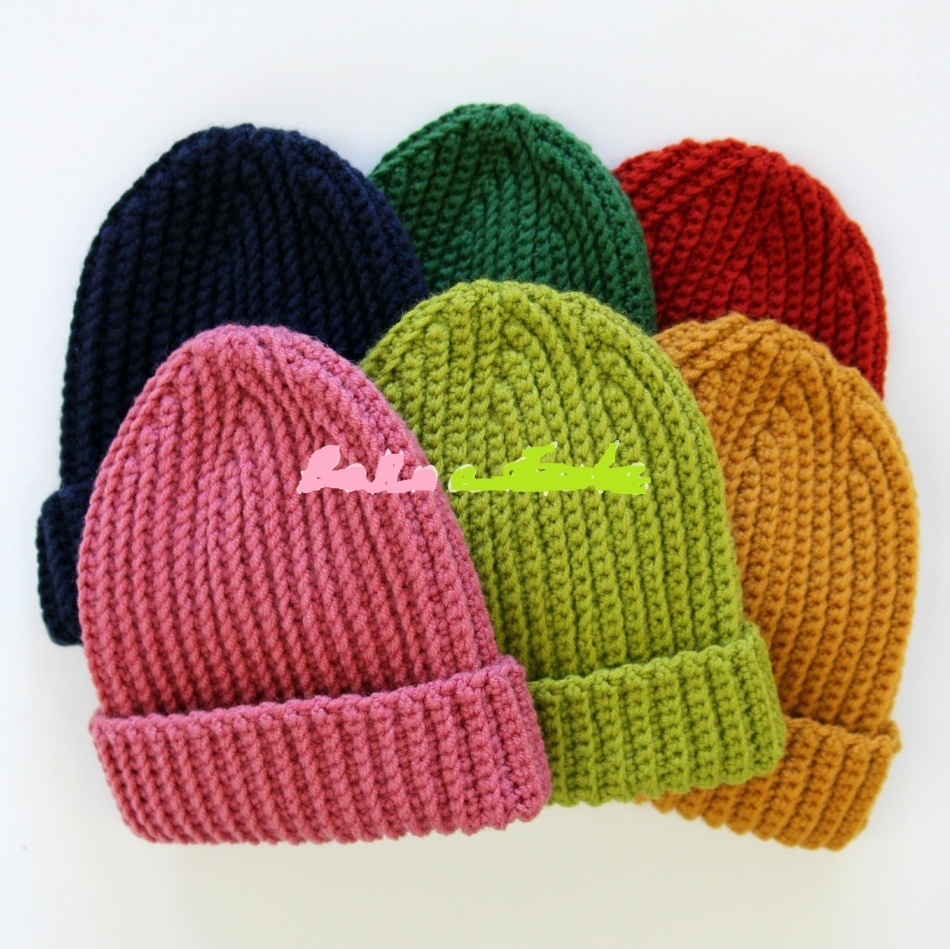 multi-colored knitted hats with a plain pattern
 Depending on the number of spokes involved in the work and the technique of knitting a handkerchief pattern, the answer will be different.
If you knit the cap in a circle without a seam, then loosen the hinges:
- only in the face series
- tie them two together
- alternate 1 face, 2 together face up to the end of the
- row final 8-10 loops tighten and fix it from the wrong side
To work on 2 spokes with only the wrong laces, reduce them as follows:
- go to the front
- repeat all the steps discussed above
How does the bottom of the cap fit the spokes?
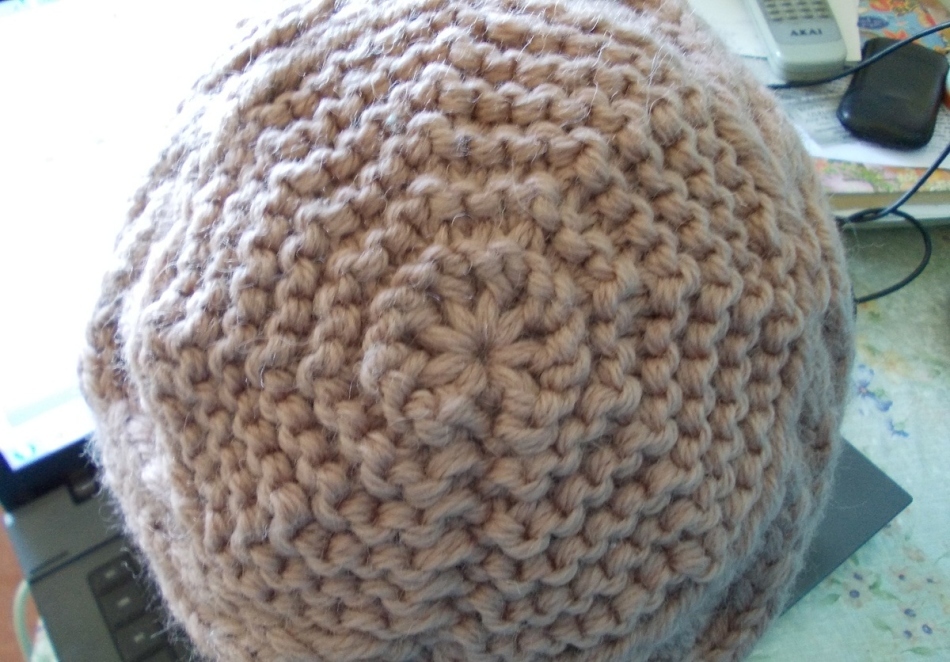 the bottom of a woman's hat made with a handkerchief pattern
 Depending on your preferences and the skill of owning knitting needles, the bottom for the cap is performed in a number of ways:
- with decrements in 1 or more rows of
- forming wedges
For the first option, a few tips:
- so that the canvas is rounded softly,calculate on the sheet of paper the number of rows for reduction, loops and determine the scheme. For example, 6 times 5 loops, 3 times 7, 2 times 11. Remain the remaining threads by stretching it twice,
- perform the reduction through a specific number of rows, for example, 2 or 4,
- if there is a pattern, consider its rapport. Think about the reduction so that it is kept as much as possible.
In the second variant:
- take the number of wedges. Often needlewomen use a 6 or 8 wedge reduction. Although there are 10 wedge hats,
- close the hinges either at the beginning or at the end of the wedge,
- for a softer rounding of the hood knit the loops along the 2 together through the row.
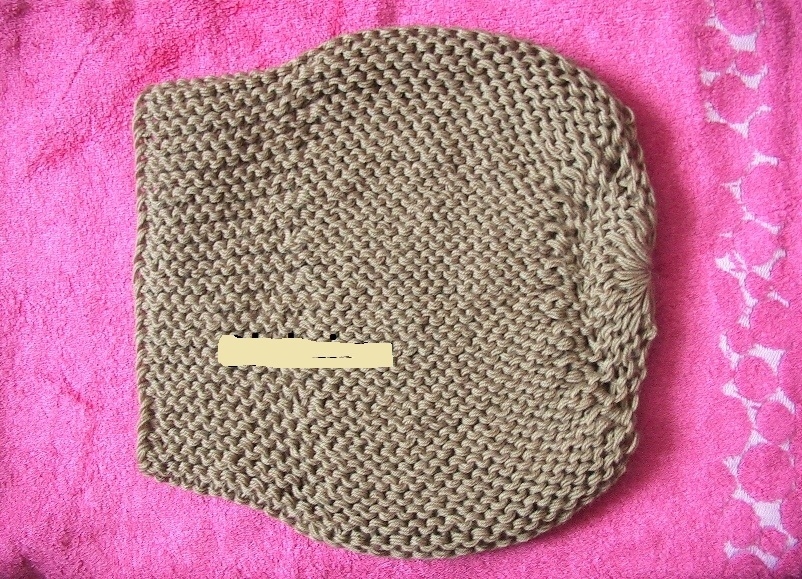
A simple female hat with knitting needles for beginners: a diagram with a description, a photo
 a simple model of a female knitted needle-patterned hats on a girl
 Vertical garter stitching means that you should work not from the bottom up, but from the left to the right.
In other words, use the technique of shortened rows.
Prepare:
- pick up the yarn and spokes of equal diameter
- remove the head measurements and determine the depth / height of the
- cap, draw a diagram, perform a garter stitch test, measure the work density
- , convert centimeters to the loops
Procedure:
- , type the number of loops equal to the heighthats, for example, 56 yarns of medium thickness or in 2 additions. Such a cap will have a hanging head,
- for sewing it was more convenient, perform a set of contrasting threads,
- knit a handkerchief in any convenient way for you - either front or back,
- , work on a wedge that repeats from 6 to 12 timesdepending on the head circumference,
- try on the semi-finished product during knitting.
The repeating wedge consists of unconnected rows:
- 1 row - leave 12 loops at the end of the row. Wrap the work thread around the first loop, which remains on the left spoke,
- 3 row - leave 11 loops,
- 5 row - 10 and so on until left alone. Do not tie it, but keep it to the end of the work on the hat.
Having reached the desired size all the loops located on the left spoke, pull off the thread and fix its tail from the wrong side.
- Do not close the last row of the fabric, but sew it with the first. Pre-dissolve the typing thread.
- Stitch the loop into the loop without using a working thread.
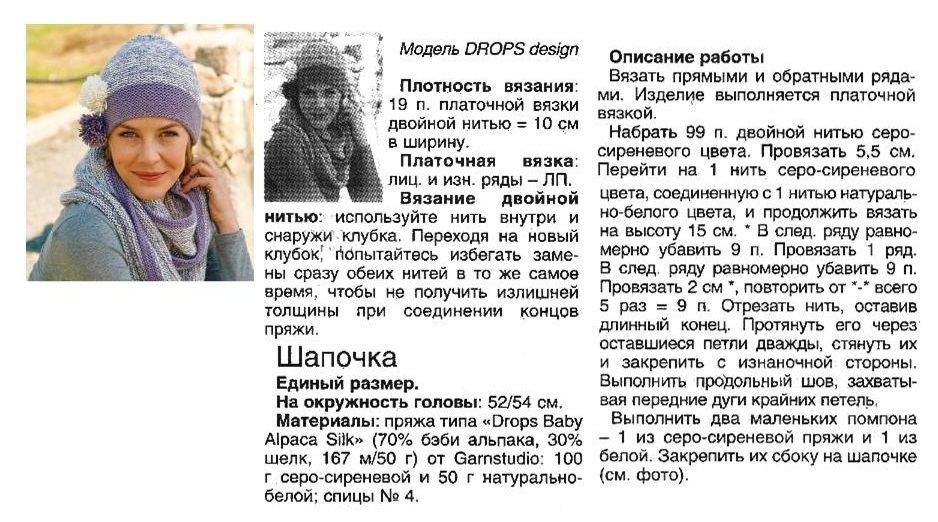
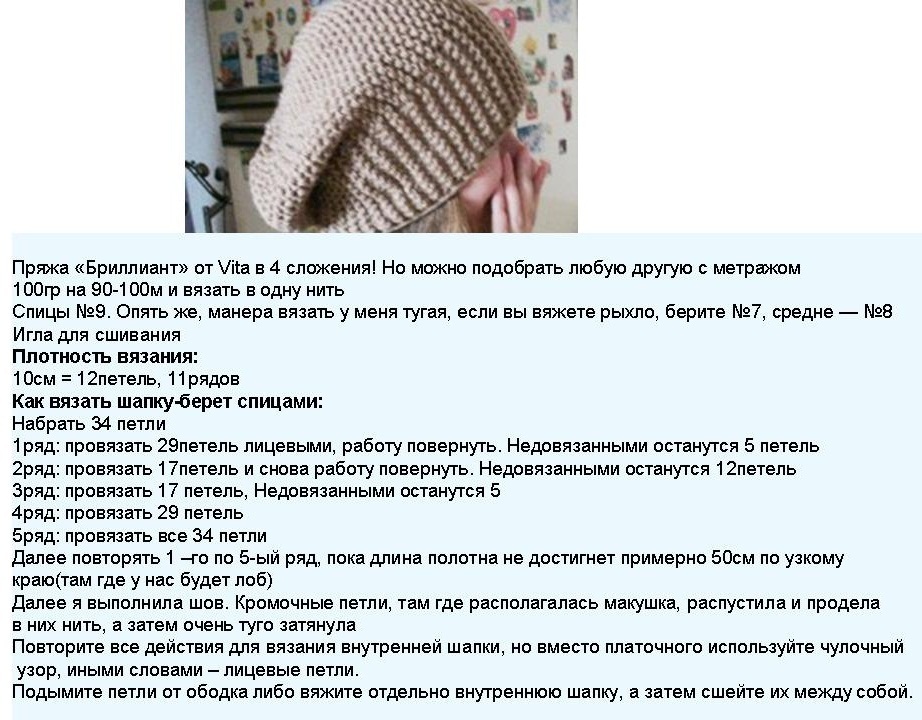
Below is a detailed diagram and description of a specific model of a female hat made by vertical garter stitch.
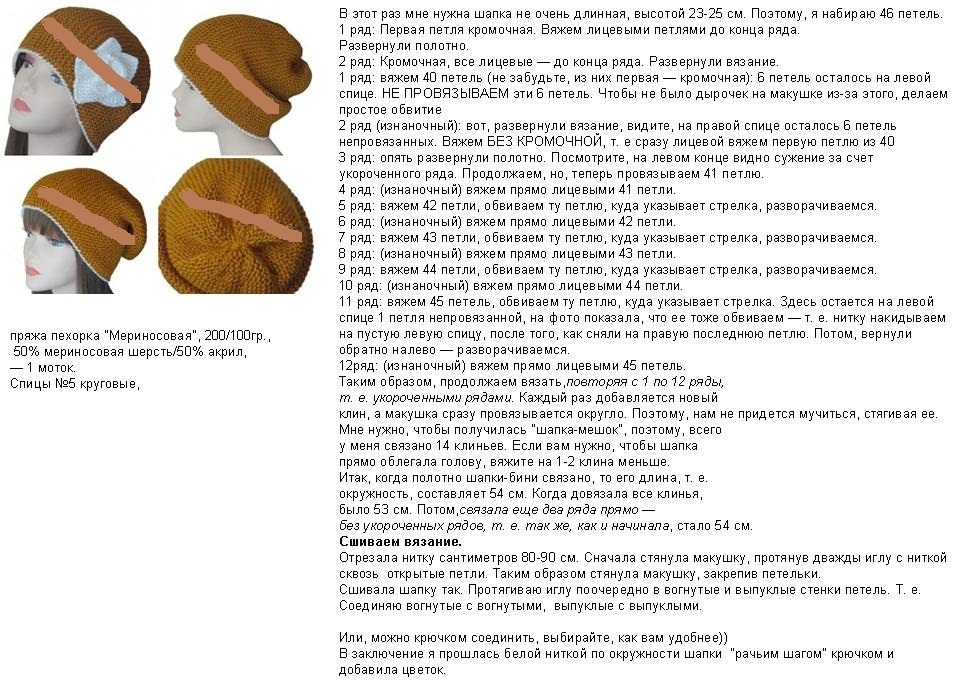 photo and detailed description of knitting a woman's cap with a hand-painted pattern vertically
 And also several photos of ready-made models of hats.
 simple feminine moyle caps connected vertically with a handkerchief pattern, example 1
 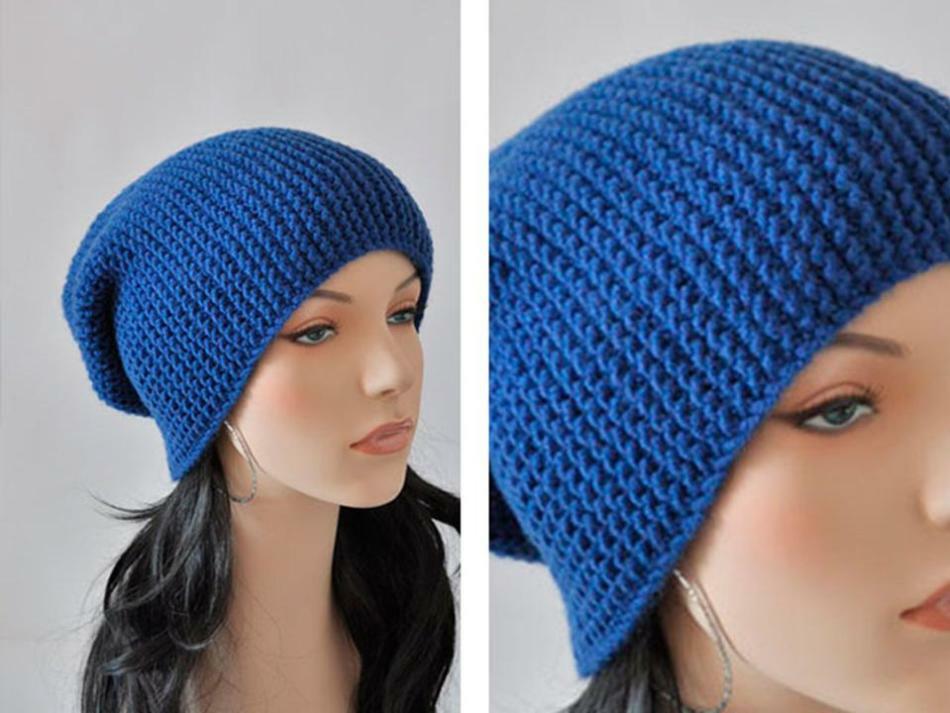 simple women's hats for moths, connected vertically with a handkerchief pattern, example 2
 Women's hat with knitting needles across: description chart, photo
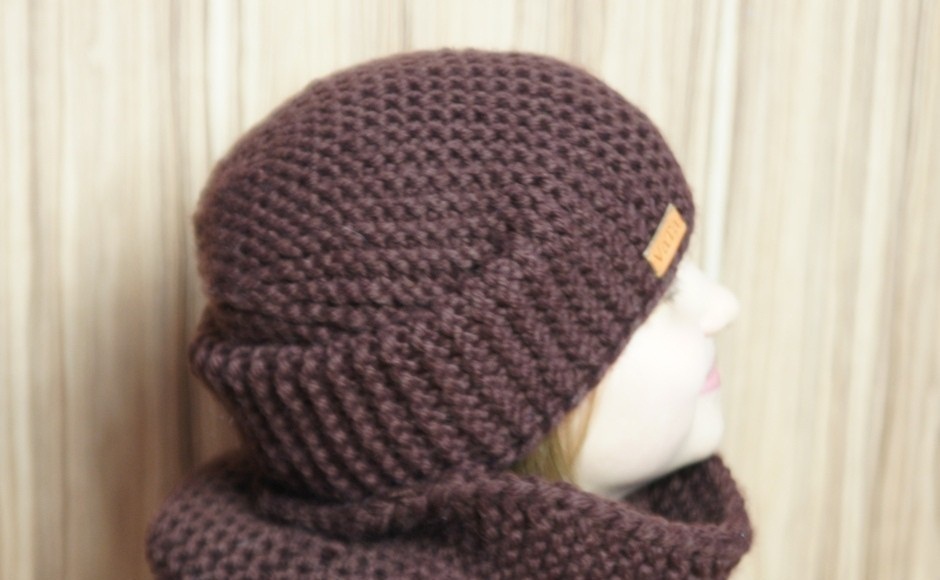
 dark gray hat, knitted with a handkerchief pattern across
The transverse way of knitting hats is a work not by the usual vertical method, but by a horizontal one. That is, you type the loops of the height / depth of the product and knit its width, taking into account the difference at the crown and around the forehead-ear at the same time.
In other words, implement the hat of the beanies on their knitting needles.
One of the examples of work on the female model of the cap by a handkerchief pattern was considered in the section above.
Add a number of descriptions and diagrams in the pictures.
 description of the work on the hat with a hand-painted pattern across, example 1
 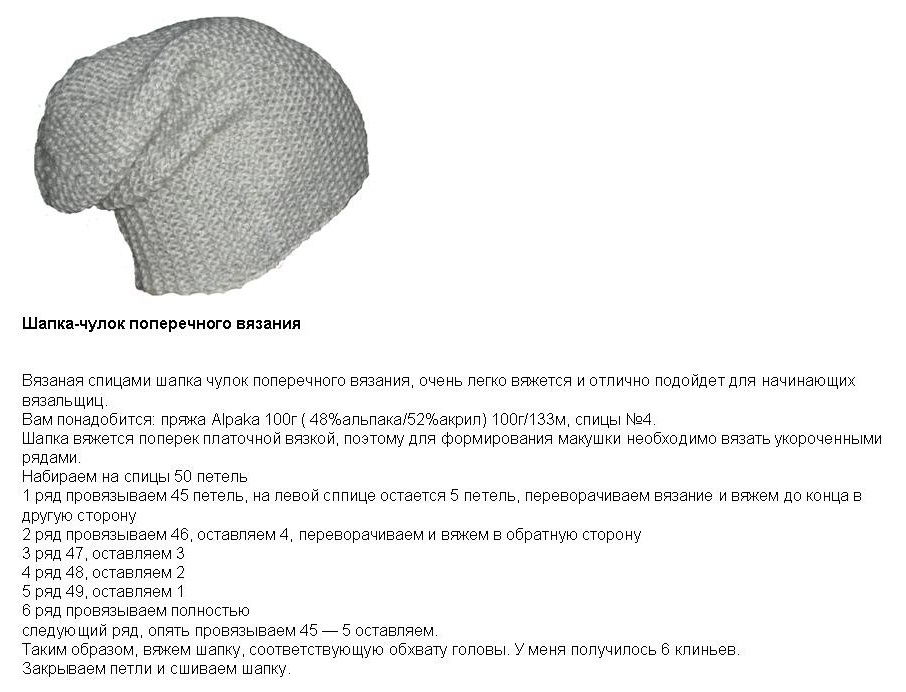 description of the work on the hat with a handkerchief pattern across, example 2
 And more photos of the finished products.
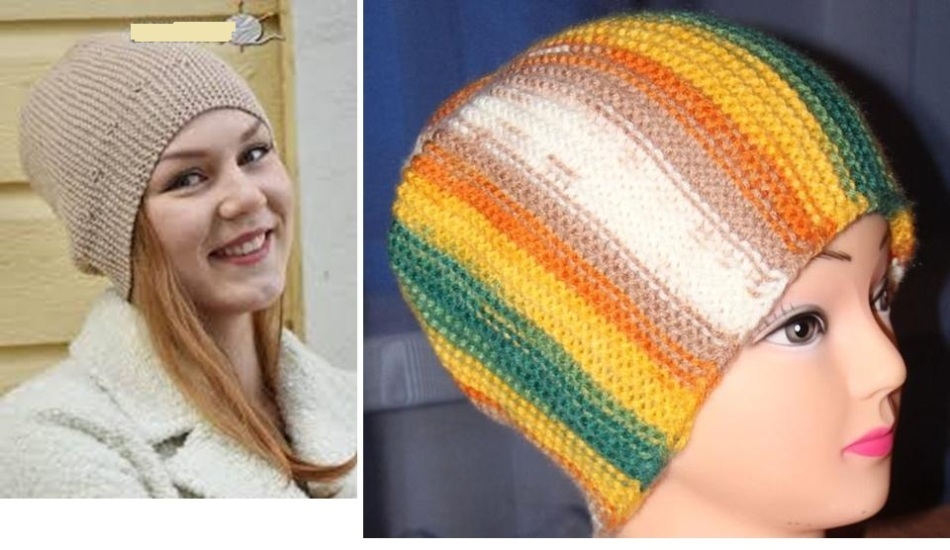 ready-made female hats with garter stitching across
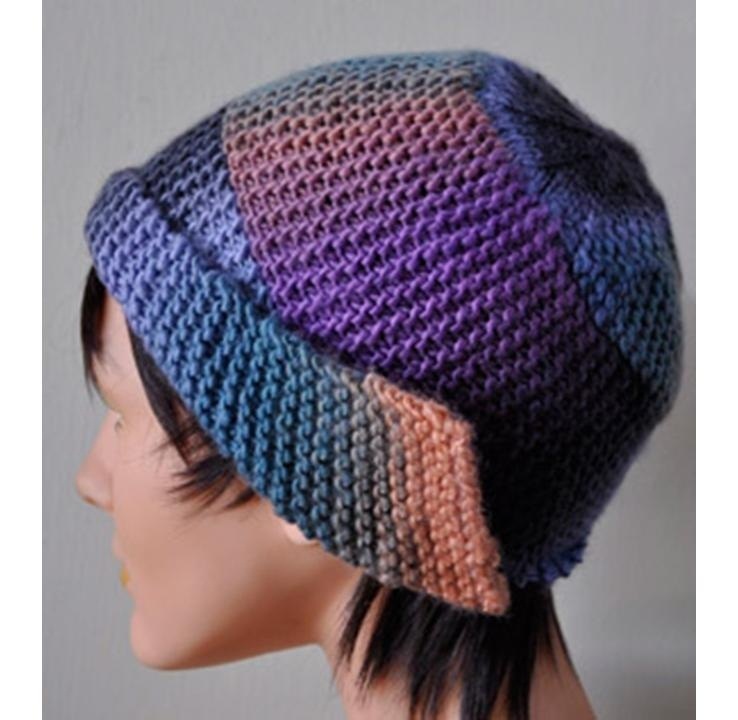
 How to tie a female hat with knitting needles diagonally?
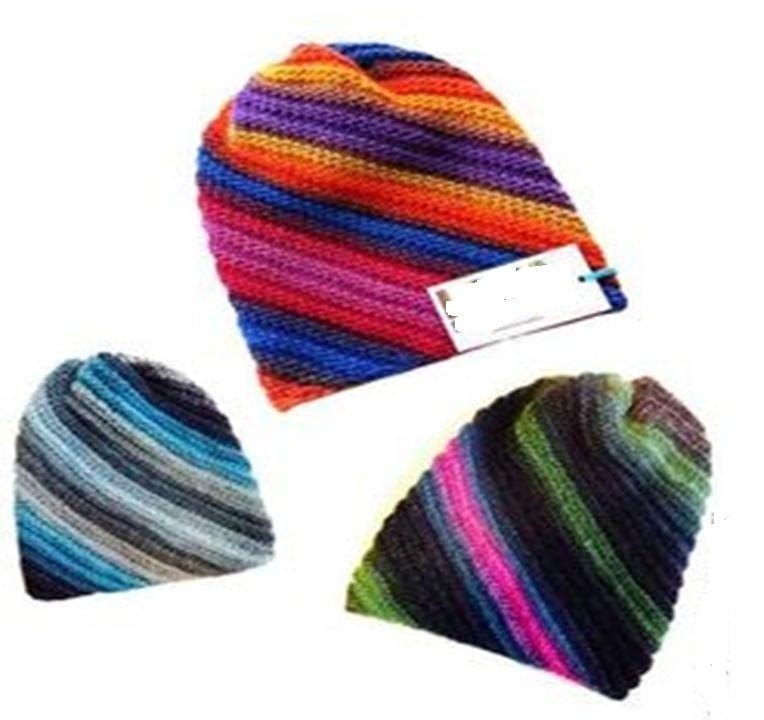 three bright caps connected by knitting needles diagonally
 The diagonal, or spiral knitting of hats is interesting with the unusual arrangement of the pattern on the product.
As the garter sticks well and at the same time retains the shape of the cap, stop the selection on it to create the product in a diagonal way.
Pay attention to a number of points:
- draw the outline of the future cap in the decomposed form. This will be a rectangle. So visually easier for you to orientate during her knitting,
- perform head measurements, translate them into loops and rows, designate accordingly on the diagram,
- decide the moment with the lapel - either immediately knit it, or lift the loops along the edge of the finished cap and add.
In the first variant, add the number of loops for a lapel equal to its height, and crochet vertically with alternating loops for the pattern. For example, if it is an elastic band 2x2, then perform 2 rows of facial and the same purl. Landmark - the front part of the cap, adjusted for the alternation of rows on working spokes.
Highlights in working on such a cap:
- start knitting with a small number of loops, for example, 4,
- increase their number by adding in each odd or even row,
- apply work to the head to see when you need to loosen loops from oneside. It will come after you reach the depth / width of the future cap,
- continue to work with the extension of the hinges on the right and the shortening on the left,
- reaching the head girth, perform cuts on both sides of the fabric,
- stitch the finished product also in a spiral.
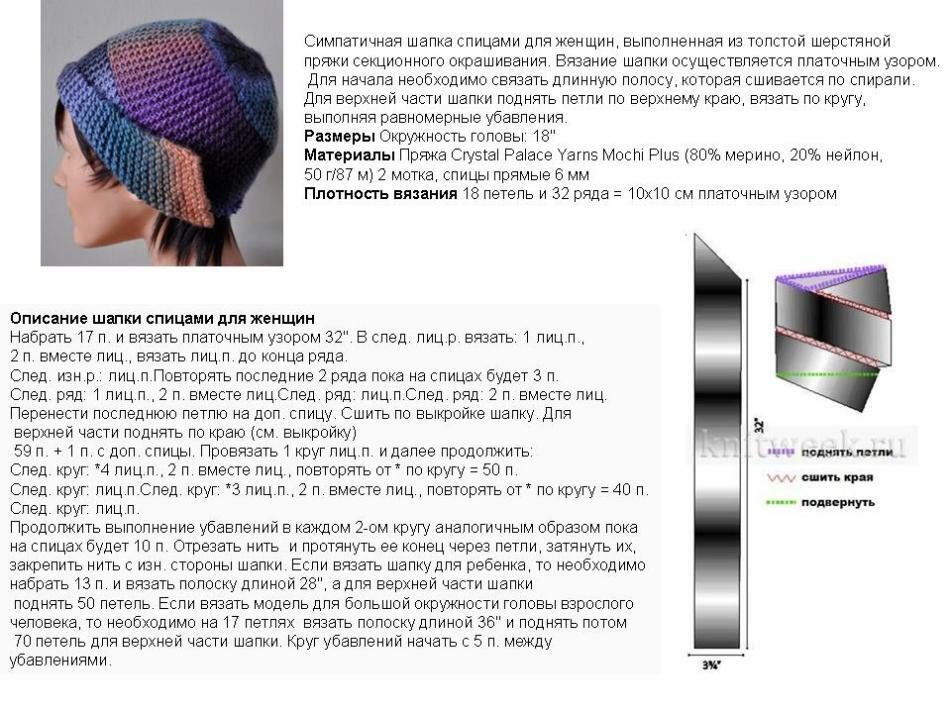
How to tie the female cap with knitting needles with shortened rows: the diagram with the description of
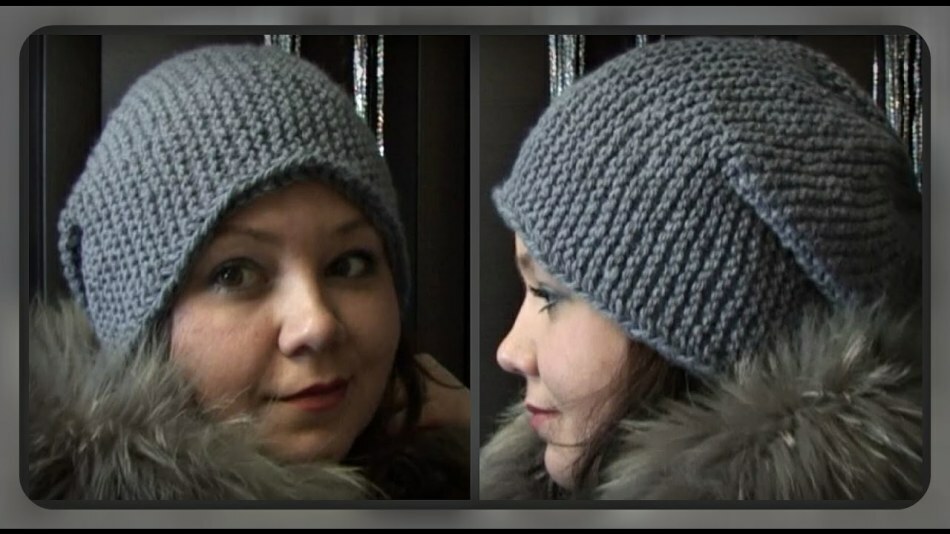
 is originally dressed on the head of the girl's cap, knitted with a card-shaped pattern in truncated rows
 The shortened rows in knitting with knitting needles save your time to work on the crown.
In the sections above, we considered models of women's hats, made with a handkerchief pattern in a similar way.
Let's add some descriptions of work from pages of magazines / sites on needlework.
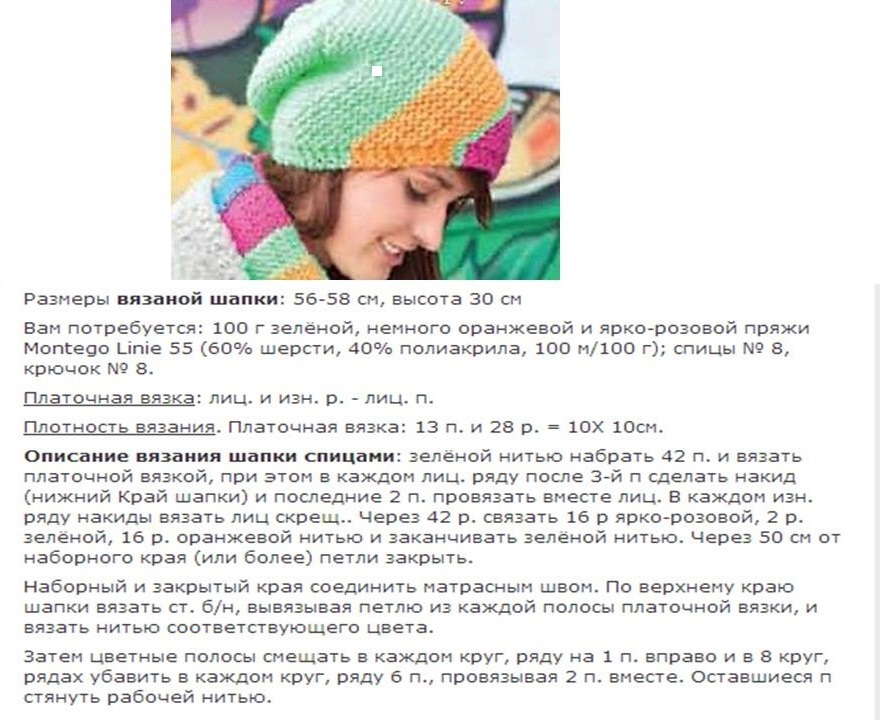 description of work on the original bright female hat with garter stitch
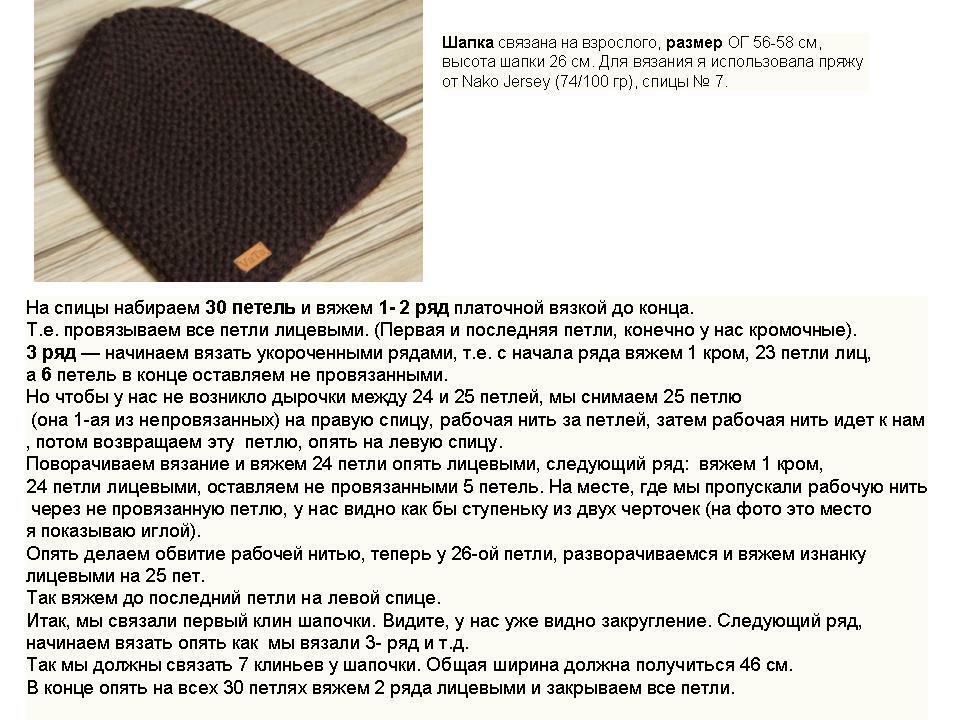
description of knitting of women's hats-beanies with garter stitch
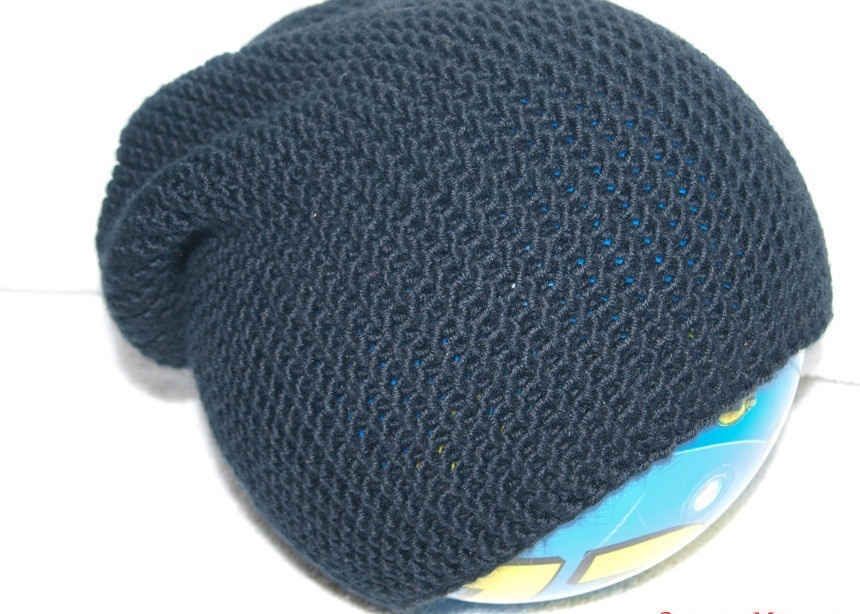
How to tie a female beanie cap, stocking with knitting needles?
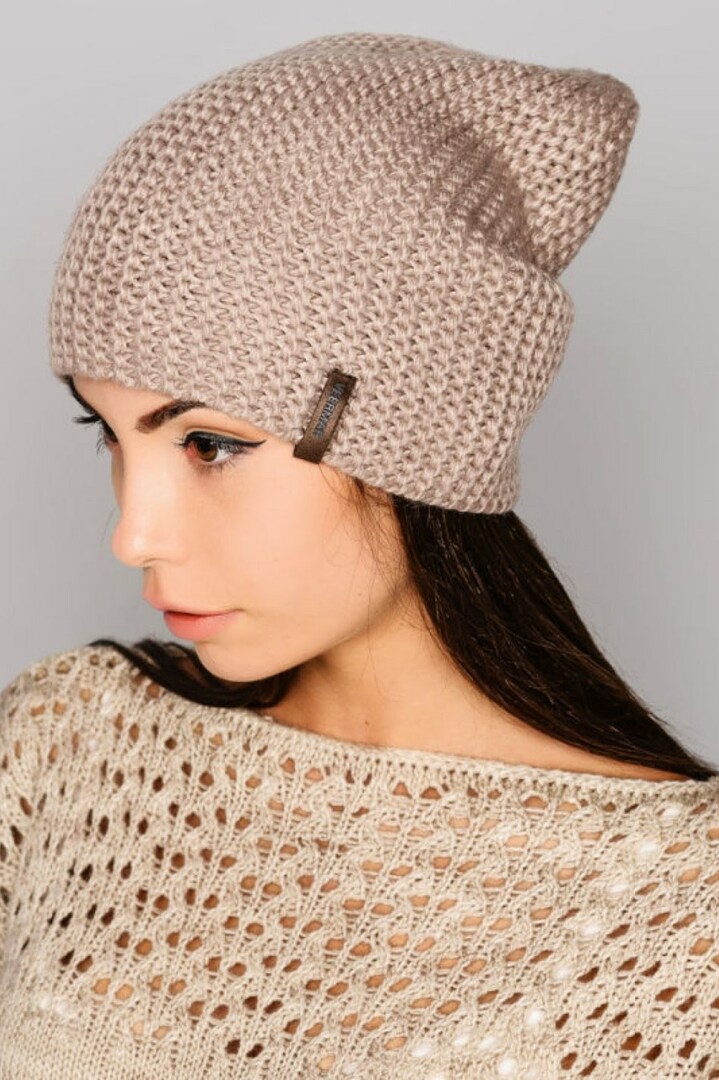
 ready-made gray beanie cap on the girl, bound by the treacherous pattern
 The hat of the Bini is called any that does not have strings. Bini are also:
- short, tight-fitting head
- elongated, hanging down from the stocking
The total moment when knitting both types of plaque pattern - work in a vertical plane.
And the difference is in the number of initially typed loops. Because they are an indicator of the width of the future product.
The second important point is the number of loops left to form a wedge. The more of them, the more flat the bottom will come out on your hat.
For the hat-stocking, leave 5-6 loops. Then the bottom will be elongated and convex.
By the way, the stocking cap easily turns into a shorter line, if you make a lapel on it.
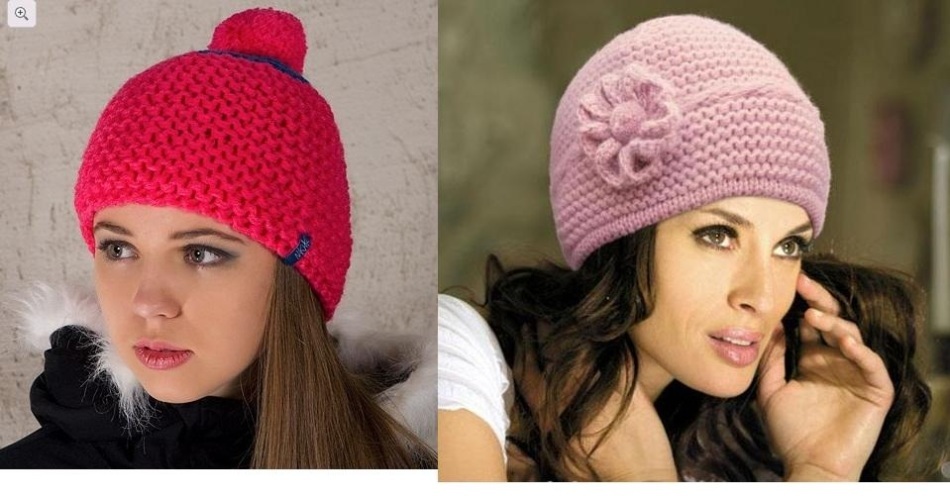
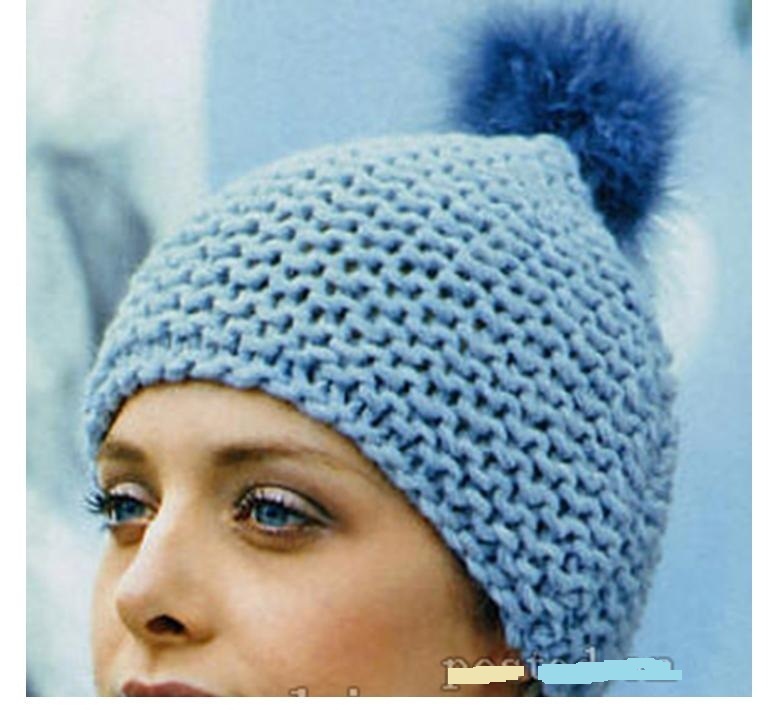
How to connect a fashionable voluminous female hat with knitting needles from thick yarn?
 original hat-cap of thick yarn with a handkerchief pattern on the girl
 Please note that the garter stitch on the hat looks good on the small head. It gives the volume to the product and, accordingly, the head of the owner.
If you take a thick thread, then the visual volume of your caps will increase significantly.
An interesting fashionable model of the garter-haired headwear below in the picture.
 original model of the cap of thick yarn with garter stitching
 Female cap with knitting needles with garter stitch with a lapel: diagram, description
 interesting model knitted with a knitted woman's knitted hats
 To tie a hat with a handkerchief pattern that will have a lapel, you either:
- perform work on an elongatedlinen caps. Then it is easy to turn as you need,
- create an exclusive model, where this part of the product has an asymmetric shape with obligatory decoration.
For the implementation of the first type of women's hats, most of the job descriptions from the sections above will suit you.
To please yourself with an interesting model, use one of the ready-made ideas below.
 description of knitting over the lapel lapel lapel, example 1
  model 2 - knitted woman's knitted cap with lapel woven pattern
 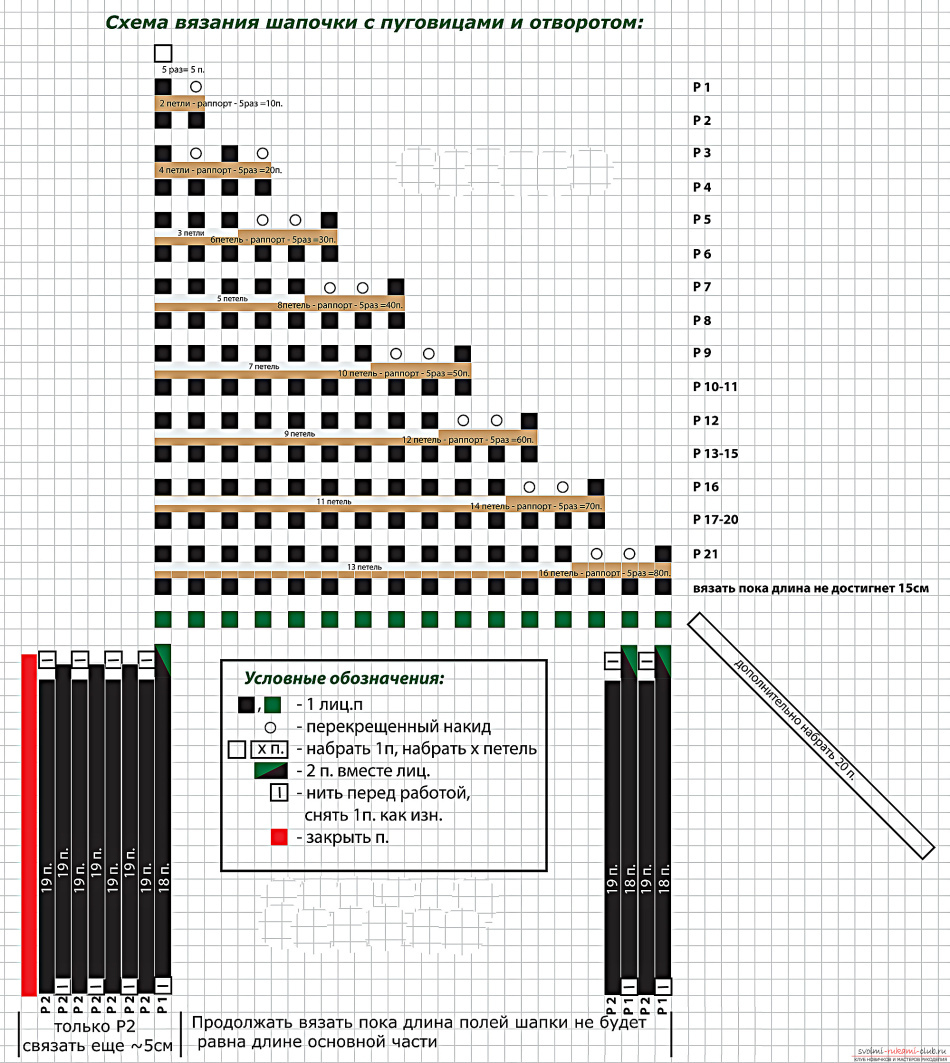 description for model 2
 double female hat with knitting needles: the diagram with the description
 original double cap garter stitch for the cold season
Warm hats for the cold season are needed for women of any age. A good solution is the double model.
The peculiarity of them is that you knit first the outer part of the cap, increasing it by a couple of centimeters, and then the inner one, which has the size of the girth of your head.
To neutralize discomfort while wearing such a cap, choose soft yarn for the inside. For example, threads for knitting for children.
For the convenience of work and avoiding excessive splendor, the inner part of the cap is done with the facial smoothness. She must "look" at your head.
For a detailed description of the knitting of a female double cap, see below.
 description of the work on the female double hat with a handkerchief pattern
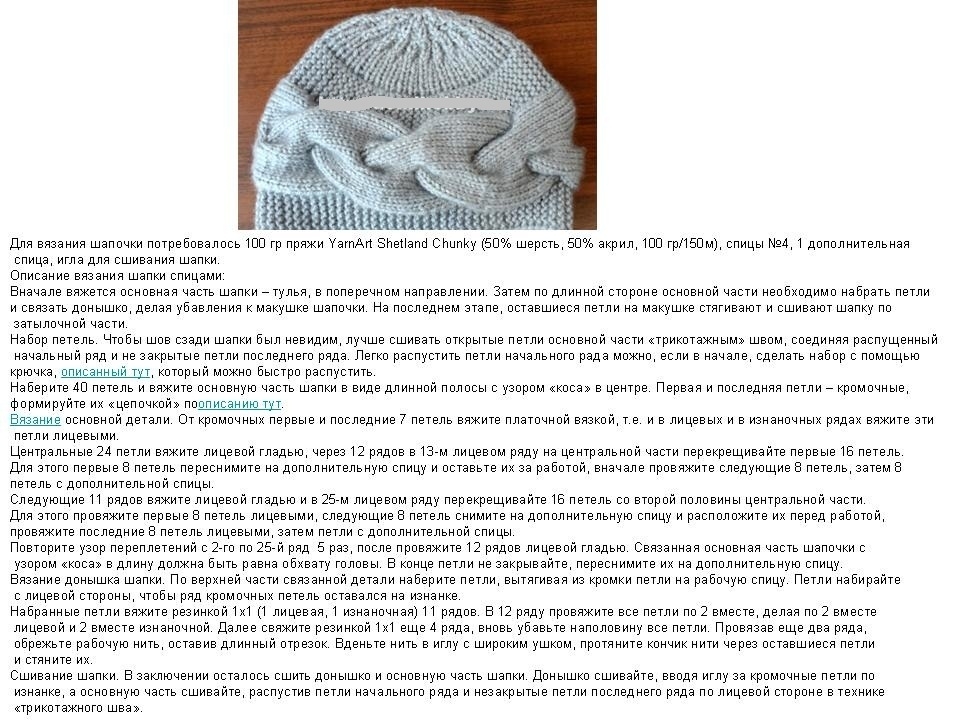
 How to tie a fashionable female hat with knitting needles with a scythe: a diagram with a description, photo
 interesting model of a woman's cap dressing with a scythe
 Having mastered the knitting of knitting needles with a handkerchief pattern, add complexity and originality to your future models. Insert the braids in the middle of the fabric or alternate both patterns.
Let's consider a detailed description for a woman's hat with knitted needles and braids:
 description of knitting hats with a plaque pattern with oblique
 And another interesting model with a different spit arrangement:
 description of knitting a woman's cap with a plaque pattern with oblique
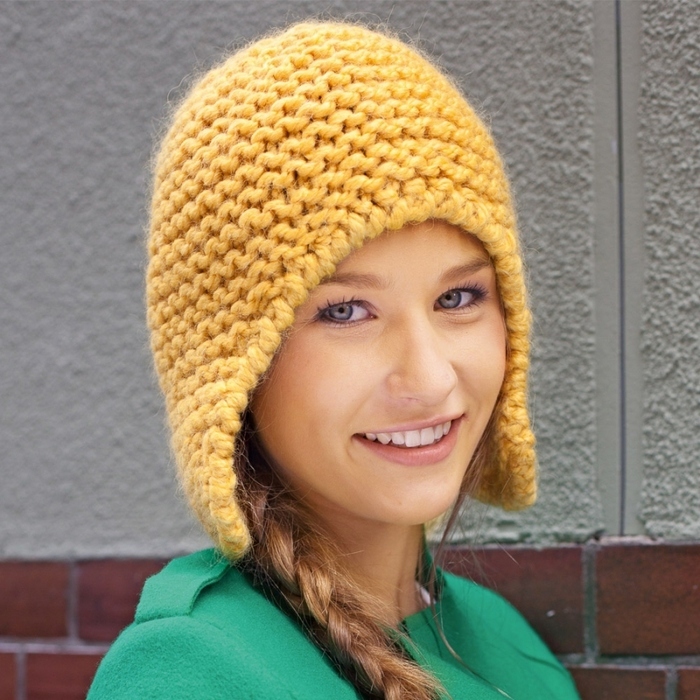
 Female cap with knitting needlesears: diagram with description, photo
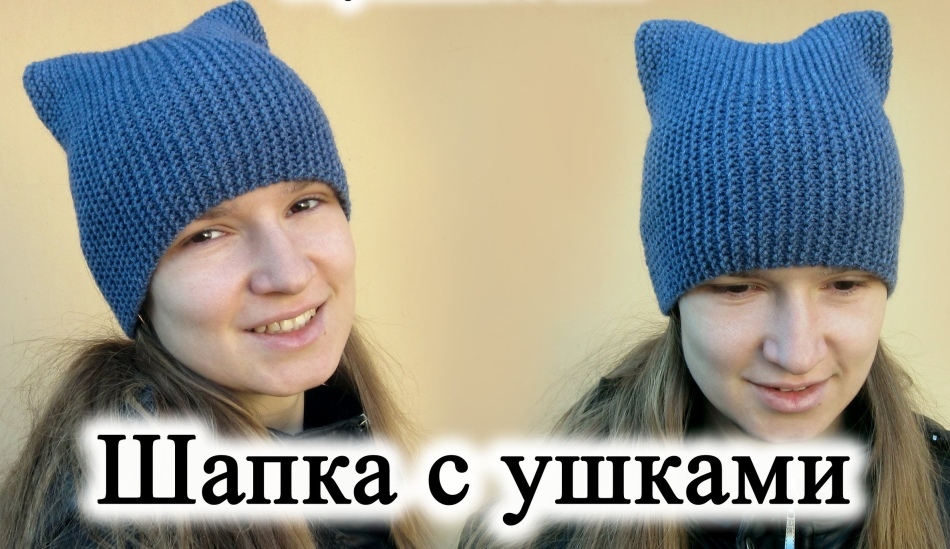 cheerful blue hat with ears, knitted needles
 Caps with ears look original on the female head. Note that they are with:
- ears, simulating the cat's
- with elongated details above the ears, passing into the strings. Easier - with ear flaps
For the first is characterized by simplicity of execution with the subsequent formation or loosening of the details of the ears.
For the second - the originality and warmth in the ears, occiput.
Several schemes for describing work on women's hats with ears made with garter stitch.
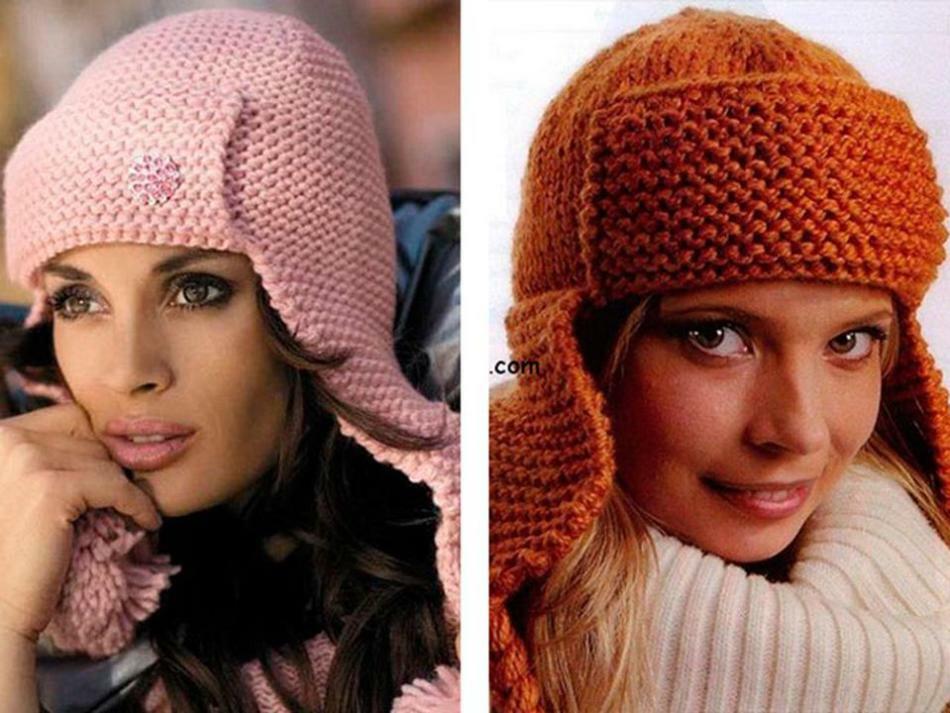 photo of original hats with ears made with a handkerchief pattern
 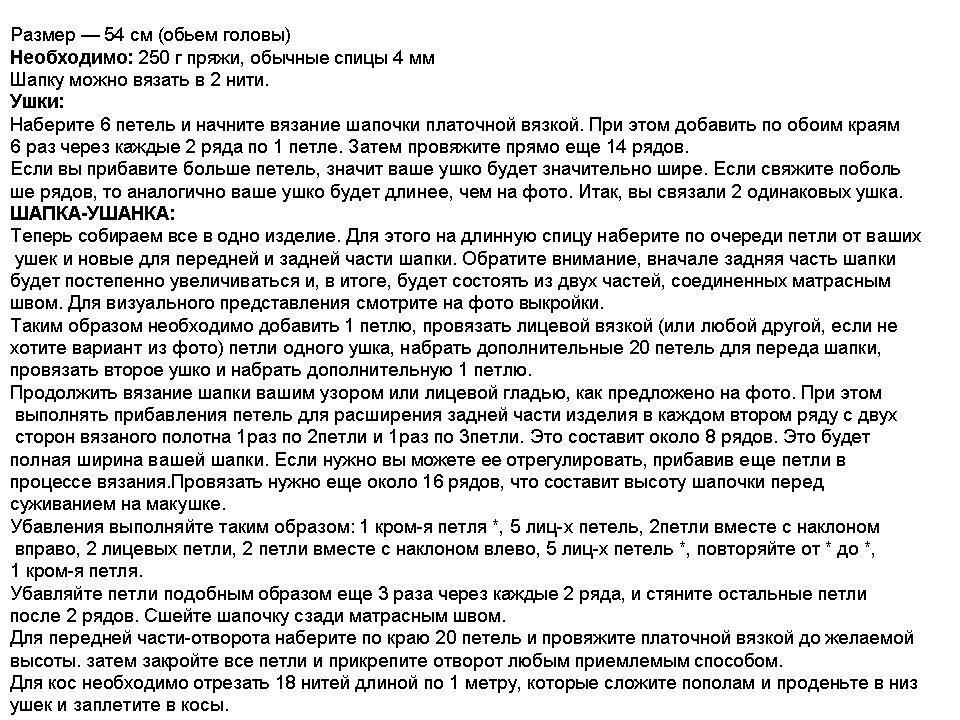 description for creating original hats with ears made with a handkerchief pattern
 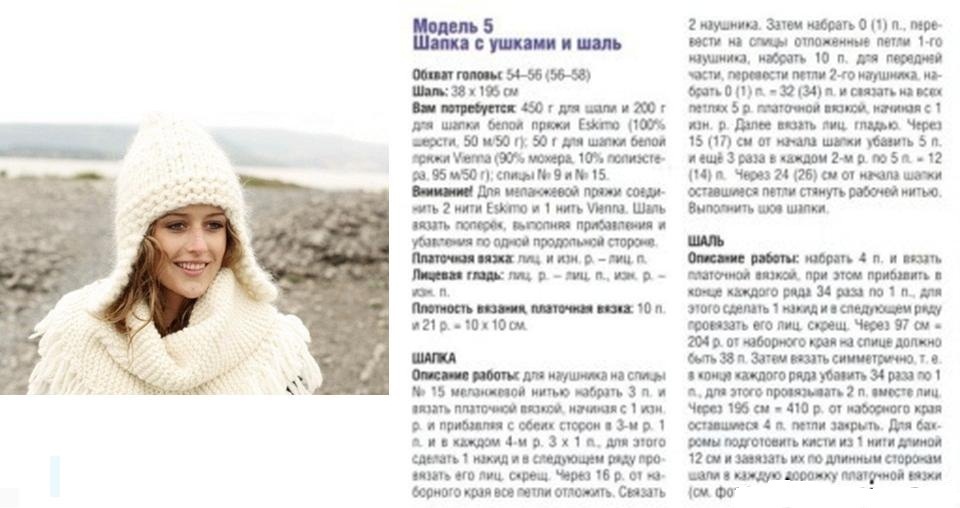 photo and scheme of work on a hat with ears with a handkerchief pattern
 So, we learned how to knit a handkerchief pattern taking into account a number of secrets. And also create simple and fashionable women's hats with it.
Take your knitting needles and start your journey in needlework. Suddenly you will like and become a favorite hobby, bringing pleasure and a penny?