

Many women have haircuts with ribbons associated exclusively with braids. In reality, there are a lot of styling options, and fantasy will help create a stylish and elegant image. Hairstyles with ribbons belong to the category of universal, they can be performed on hair of any length.
- Routine stacking
- Option 1
- Option 2
- Option 3
- Embodiment 4
- Embodiment 5
- Embodiment 6
- Embodiment 7
- Embodiment 8
- Embodiment 9
- Embodiment 10
- Embodiment 11
- Embodiment 12
- Embodiment 13
- Embodiment 14
- Variant15
- Evening and wedding hairstyles
- Ordinary braid
- Greek
- Basket
- Babette
- Scythe from 4 strands
- Scythe's braid
- Scythe from 5 strands
- Hollywood wave
Casual laying of
Similar toTide hairstyles with ribbons help to diversify your image.
Option 1
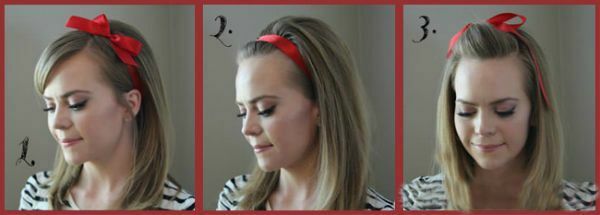
- Separate bangs.
- Make oblique parting.
- Draw the ribbon under the hair around the head and tie it to the side of the bow.
Option 2
- Run at the crown of the head.
- Comb hair back with a soft comb.
- Tape the tape on the back of the head so that it passes through the hairline.
- The ends of the tape hide under the hair.
Option 3
- Separate a lock of hair on the forehead.
- Tie a ribbon around it as a bow.
- Pull this strand slightly forward to give it volume.
- The tips of the tape remain free to droop.
Variant 4
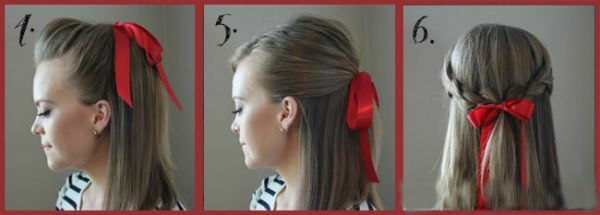
- Run from the top of the head to the forehead.
- Locks on forehead and temples gather in a small ponytail on the back of the head.
- Tape the tape.
Option 5
- Separate bangs and comb it sideways.
- All hair is divided into two equal parts by a horizontal parting.
- Lower hair to comb.
- The top of the hair is combed back and gathered with tape.
Option 6
- Select two strands on the temples.
- Divide them into three parts and braid them into braids.
- Scythe at the back of the head and secure with tape.
Option 7
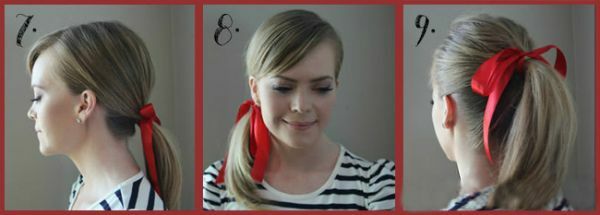
- To comb the hair back and gather a low tail at the back of the head.
- Tie the tail with an elastic band.
- Gum bandaged with tape.
Option 8
- Separate bangs.
- All the rest of the hair is combed back and gathered in a tail on one side.
- Tape the neck with a ribbon and toss it over the shoulder in advance.
Variant 9
- All hair is combed back and gathered in a high tail on the crown.
- Secure the tail with an elastic band and bandage with a ribbon.
Option 10
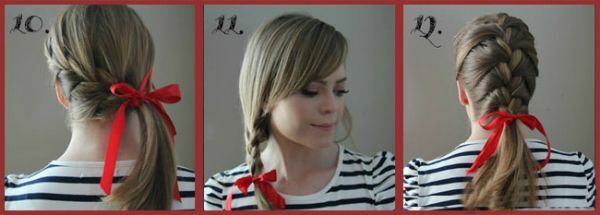
- To comb the hair back.
- Above the left ear, highlight 3 strands and braid the French braid around the head, picking up all loose hair in the braid.
- The edge of the braid should be bandaged.
Option 11
- Collect all the hair on one side.
- Weave into a pigtail.
- Tape the hair ends.
Option 12
- Comb your hair back.
- Twist the French braid from the crown to the back of the head.
- Lock the braid with a ribbon, and leave the rest of the hair free.

Variant 13
- All hair is combed back.
- Locks on the back of the head twist into a bundle and gather in a low careless bunch, fixing with studs and varnish.
- Tape the middle of the head. The ends of the tape are hidden under a bundle.
Option 14
- Collect the hair in high tail.
- Tail the tail into a bundle and fasten with the studs.
- Ribbon tied through the middle of the head.
Variant 15
- Ribbon tied in the form of two symmetrical bows.
- Make a side part and comb the bangs on one side.
- Use the invisibility to fix the bows on the bangs.
Evening and wedding hairstyles
Graceful hairstyles with ribbons can be an excellent option as an evening styling. And if you supplement them with a diadem or veil, then as a wedding.
to contents ^Ordinary braid
- It is good to comb your hair.
- To choose a tape - its length should be 3 times more than strands.
- Hair comb in the tail and tie an elastic band.
- Cover the rubber band with tape. The ends of the tape should be the same length.
- The tail is divided into three strands, two of which are connected with ribbons.
- Weave the usual braid.
Greek
For this laying, instead of tape, you can use a chain, string or elastic.

- Comb hair.
- Ribbon tie through the middle of the head over all the hair, so that it is fixed on the back of the head with a strong knot.
- Starting from the face to the back of the head, the hair is divided into strands.
- Roll each strand into a non-woven bundle and tuck it under the ribbon, fixing the studs.
- Hairstyle to varnish.
Basket
- In the center of the vertex, select one thin strand and attach a long thin ribbon to it.
- Select on the vertex 3 more thin strands.
- The extreme lock is held under the next one, above the tape and under the next one.
- Ribbon to transfer through the next lock and to tighten.
- Again take an extreme lock, add a free hair stuck to it, hold it over the next one, under the ribbon and over the next strand.
- In a similar technique continue to weave the basket in a spiral, constantly picking loose hair from the outside.
- When loose hair ends, you should continue braiding the braid of 4 strands, as described in paragraphs 3-5.
- The end of the braid is tied with an elastic band and decorated with a bow from the remaining ribbon.
- Loosely wrap the braid around the head and secure the edge with invisible fingers.
- Hairstyle to be sprinkled with varnish.
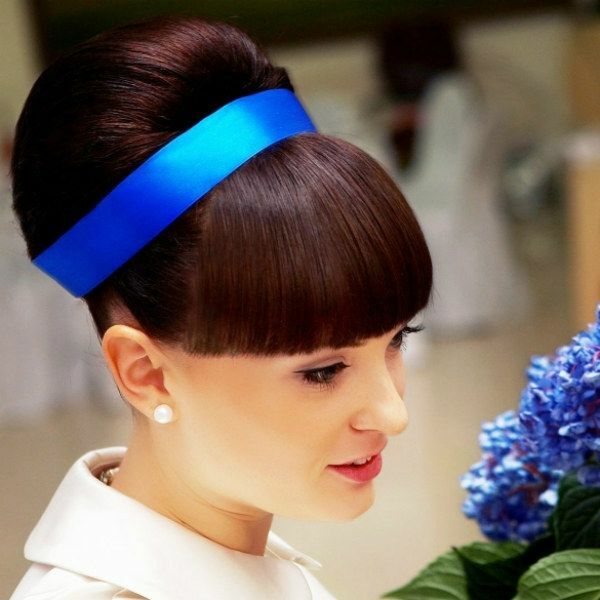
Babette
- Wash and dry hair.
- To trim the bangs and comb it on one side.
- Hair on the vertex divided by a horizontal parting.
- Bend the lower part of the hair with a bundle and wrap it in a bundle. It is good to fix the studs. If the hair is small you can use a foam pad.
- On the upper part of the curls make a bunch and cover them with a bunch.
- Naches should be smoothly smooth with a soft comb so that the styling becomes smooth.
- On the back of the head under the bundle, fix the ends of the hair with invisible objects.
- Ribbon wrap around laying and tie at the back of the head.
- Prepare the hair to be finished with hairspray.
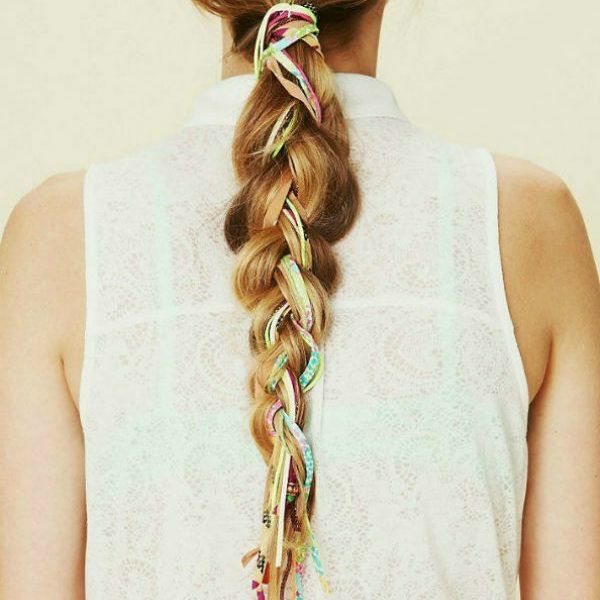
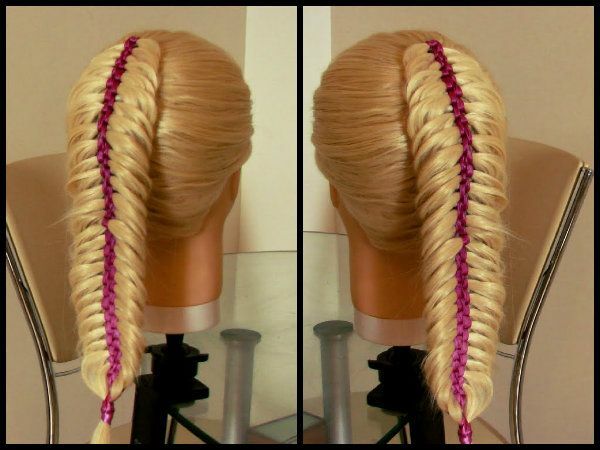
Spit of 4 strands of
It is better to take a thin tape for this hairstyle.
- Comb your hair and collect it in the tail.
- On top of the rubber band, tie the ribbon so that one edge of it is equal to the length of the hair.
- The tail is divided into 3 strands. The ribbon will be the fourth strand.
- Ribbon to place between the first and second strands from the face.
- The long strand from the face is laid from the top between two other locks of hair.
- Ribbon to hold over the central strand and leave between the second and third strands.
- The closest to the face of the strand lay from below between the second and third strands.
- Simultaneously, the same strand should be wrapped from below with a ribbon, so that the tape returns to its original position - between the first and second strands.
- Then the weaving repeats the same way: the far from the person from above to the center, over the ribbon, under the bottom between them the nearest strand, under it to tuck the ribbon.
- The edge of the braid should be tied with an elastic band.
- Place the elastic under a thin strand of hair.
- If desired, you can roll the braid into a spiral and fasten it to the head with the help of studs.
- A ready hairstyle to be sprinkled with hairspray.
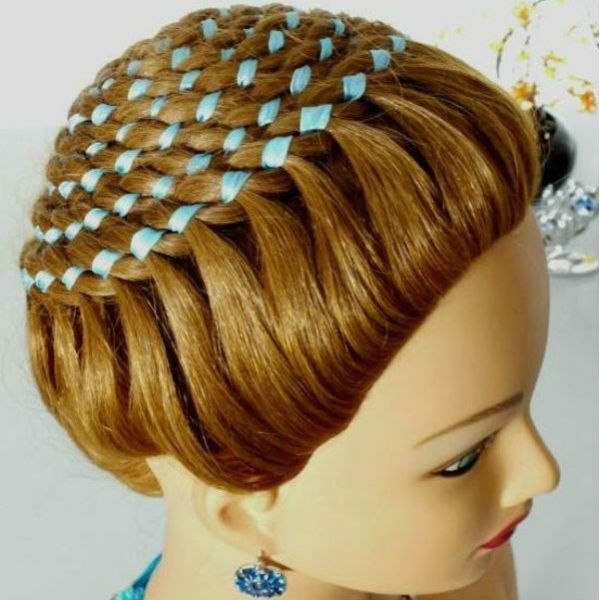
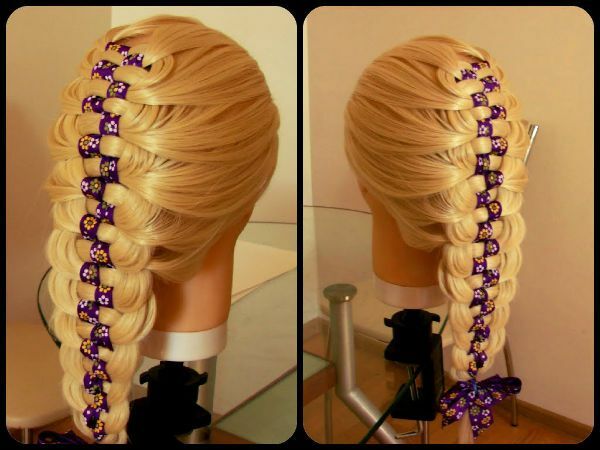
Braid "Shahmatka"
You will need a comb, an invisible clasp, a hairpin, a satin ribbon and a hair spray.
- Comb your hair.
- At the top of the head with the help of an invisible clamp the tape stretching it for the entire length of the hair.
- To the left of the tape to separate the thin strand.
- Place the tape on the strand and tie the knot so that the end of the tape is again in the center of the head. End the strand to the opposite side of the head.
- To the right of the tape, separate the new strand. It must pass strictly under the first strand.
- Place the tape on a new strand and tie the knot so that the end of the ribbon is again in the center of the head. End the strand to the left.
- Separate the strand from the left side again. It must pass under the second strand. And tie a knot in it from the ribbon.
- It is very good to tighten the tape. For convenience, at the time of separation of strands, it is better to pinch the band with a clamp so that it does not slip.
- In this technique you need to alternate the weave until the right side of the head does not get 4 ready strands, and on the left - 3.
- On the right side of the head on loose hair, it is necessary to separate the new thin strand and, connecting it with the very first strand from the crown on the sameside, again to connect it with a knot with a ribbon.
- Too repeat the action on the opposite side: take the very first strand, stretch it under the other strands, add to it a pickup of new hair and tape it with a ribbon.
- Similarly, alternate strands to the end of the braid. When the pods from the new hair run out, continue the weaving without them, each time braiding the uppermost loose strand of hair with a ribbon.
- Periodically during the weaving you need to stretch the ready-made links to give the hair volume.
- The ends of the hair need to be assembled with an elastic band in one bundle.
- Place the elastic under the ribbon or wrap the hair.
- The ends of the tape at the beginning and end of the weave should be tightened under the braid with a hairpin.
- Hairstyle to fix with a varnish.
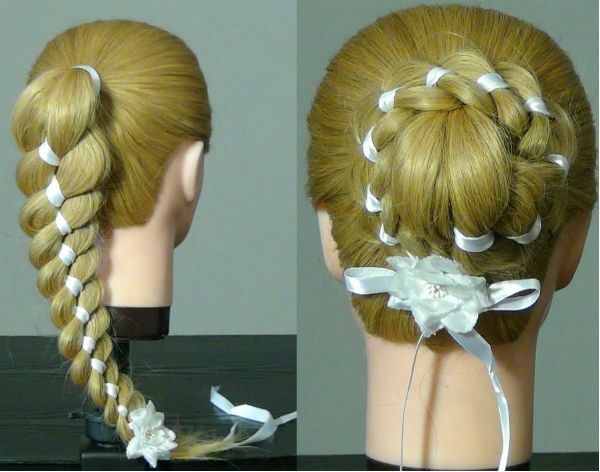
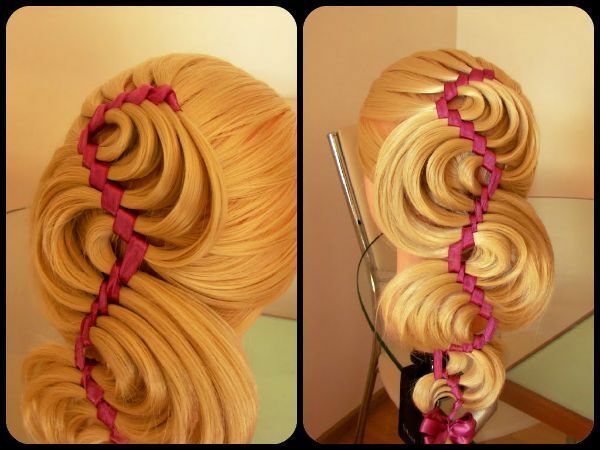
Scythe from 5 strands of
- Hair is good to comb.
- On the vertex, separate a wide strand of hair and spread it over your face.
- Place a center of folded tape in two strands under this strand.
- The wide strand is returned to its place and divided into 3 small strands. In one hand should be 2 strands of hair, in the other - 1, and between them two bands.
- Start the weave better from the side, where 2 strands of hair. The edge of the strand is placed under the next, then on the ribbon, under the ribbon and again upward.
- Similarly, in staggered manner, draw an extreme lock from the opposite side of the head. This is a loose weaving, so do not pull your hair too tight. The main thing is to straighten the tape so that it does not crumple or twist.
- Then weave the same scheme, only from the sides weave free hair into the braid.
- Periodically ready strands need to be straightened to give volume.
- Tip the hair ends with a rubber band and decorate the ribbon with a bow.
Hollywood wave
Evening or wedding arrangement in the form of elegant waves.
- It is good to comb your hair and apply mousse on it.
- Attach tape to the top of the head with an invisible tool.
- To the left of the tape to separate the wide strand. Put the tape over the strand. From the strand and tape to form a loop. Ribbon to stretch through the loop and tighten well. The tail of the strand is left for now.
- On the same side of the head, separate the next strand and tighten a similar loop on it.
- On the one hand, you need to make 5 waves, that is, 5 times to repeat step # 3.The tape should fit in the stepped pattern, and all the tails of the strands should be directed in one direction.
- To direct waves in the opposite direction, it is necessary to take the tail of the strand closest to the ribbon and add to it a pick-up from the total mass of the hair on the other side of the head. Re-form the loop from the tape and tighten it well. The resulting small link needs to be pulled out a little and straightened.
- Take the next tail in order, add hair to it and pull it over with a ribbon.
- Perform similar actions until the last tail.
- In the next step, the weave again reverses its direction, so repeat steps 6, 7, 8 again.
- The links must be stretched to the required size during the weaving process.
- Weave is done to the ends of the hair and is fixed with an elastic band and a bow.