
Mittens come back to fashion again. This warm element of the Russian style can be bought, and you can also link it yourself in the old way. Especially that hand-made mittens, unquestionably, will win by quality, and by design. After all, you can choose for them a unique pattern, yarn, shape and color.
- Technique
- Right mitt
- Left mitt
- Extra décor
Technique for performing
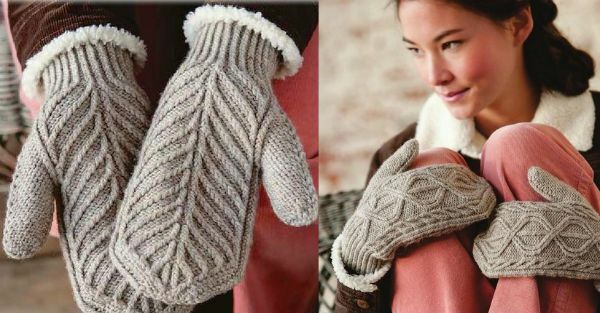
This master class presents an example of knitting beautiful mittens with a herringbone pattern. This version of knitting will be performed on 4 knitting needles.
For work you will need:
- 2 kinds of spokes - thin( stocking) and large;
- yarn( yarn thickness and color at your discretion).
In the work we will use abbreviations:
- persons - face loop;
- of persons / з.с - front for the rear wall of the hinge;
- is out - the reverse loop;
- * - Repeat the scheme from asterisk to asterisk( you have to repeat all the elements placed in the diagram between the asterisks).
Note: in 4th and 6th rows, all the increments should be knit before the initial loops of the row.
to the table of contents ^Right mitt
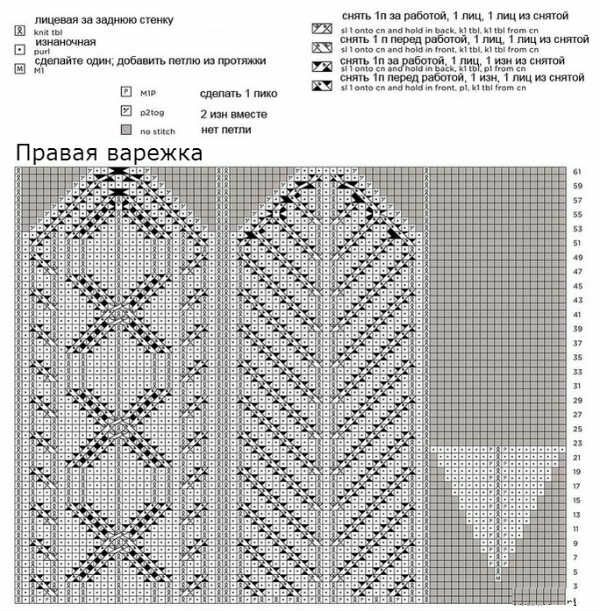
On the thin knitting needles, type 48 loops and divide them into three or four spokes if desired, mark them and collect them in a circle.
Start knitting with a cuff.
First row: 1 persons / hp and 1 dep. Repeat this combination 11 times. Then knit 2 persons / з.с.And again, the combination of 1 out of 1 persons, repeat 12 times. Continue to knit an elastic band with a height of 5 cm.
Now we turn to the creation of the glove itself.
Increment. Line up row 1 according to the scheme - 58 loops. Then go to the big knitting needles. Under the right mitt's pattern, knit rows from 2 to 61, adding in the 4th row the thumb loops and moving 19 finger loops onto the extra spoke in the 23rd row. After passing through 61 rows, you should have only 22 loops left. After this, you can cut the yarn, leaving a thread 45 cm long.
First 11 loops are transferred to one auxiliary spoke, and the remaining 11 to the other. Turn the mitten inside out and transfer 2 more sets of 11 loops to a separate spoke.
Using 45 cm of left thread, join the loops together as follows - place the loops on separate spokes and keep them parallel to each other on the right side. Insert the third spoke into the initial loops of the two spokes and tie them together as one loop. The next loop on each spoke is also knitted together, and then pass the first loop through the second. Repeat from * until the last spoke has the last loop left. After that, the yarn can be cut and stretched, its remaining edge, into the last loop.
Eluding a thumb. On the front side, transfer 19 loops from the auxiliary to the stocking spokes. Attach the thread, leaving a long "tail".Pick hinges and knit in the space between the palm and the thumb: 1 person / s.s., 9 persons, 1 persons / h.s., 9 out. You will get 20 loops.
Then 1st row: 1 persons / з.с, together 2 изн, 7 изн, 1 пико.This sequence must be repeated twice.
2nd row: 1 persons / з.с, 9 изн.Also tie it twice.
Now these two double rows need to be repeated 4 more times.
Go to the top of the finger, start making the adjustments in this way:
- 1st row: 1 persons / z.s, together 2 out, together 2 out, 1 out, together 2 out, together 2 out. Repeat two times. It should get 12 loops.
- 2nd row: 1 persons / з.с, together 2 изн, 1 изн, вместе 2 изн.Repeat two times. The result is 8 loops.
- 3rd row: 2 persons / з.с, together 2 изн.The result is 4 loops.
Leave the "tail" 21 cm and cut the yarn. Pass the "tail" through the remaining loops, tighten and lock from the wrong side.
to contents ^Left mitt
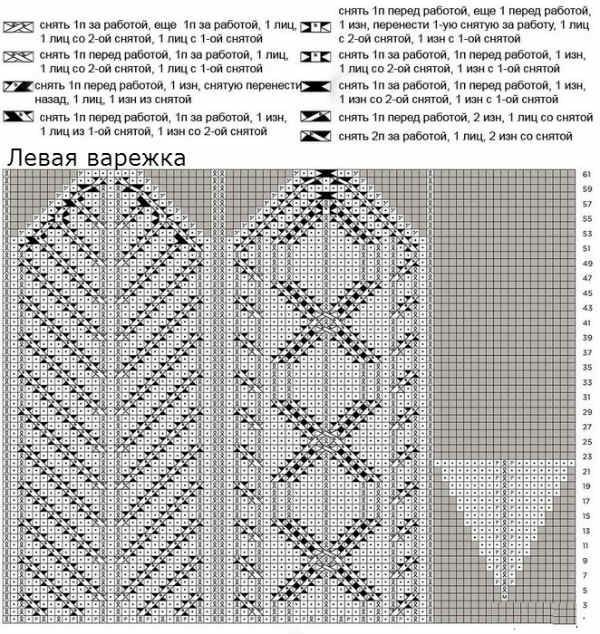
On the thin knitting needles again, type 48 loops and, just like in the previous version, divide them into three or four stocking knitting needles, mark with markers and join in a row.
Cuff. Start knitting with 1 faces / z.s. and 1 kn. Repeat this combination 12 times. Then 2 persons / з.с.And again the combination of 1 out, 1 person repeat 11 times. Next, knit the elastic band to a height of 5 cm.
A palm and a thumb knit similarly to the right mitten, always referring to the diagram.
to contents ^Additional decor
When mittens are ready, you can do their decoration.
There are a lot of ways. First, you can use embroidery with threads, ribbons, beads, beads. It is also possible to separately tie the details( flowers, patterns) with a crochet and sew to mittens.
And thirdly, do not forget about the fashionable fur decoration this season. From it you can make fur pom-poms or do the edge on the cuff.