
With the arrival of cold weather, everyone without exception wants to wrap themselves in something warm, whether it's a coat or a wool sweater. But it is especially pleasant when this warm clothing is made by oneself. Especially nowadays handmade equipment products are gaining popularity, and modern women of fashion who like nobody want to keep pace with the times and with pleasure experiment and try any novelties.
- Fashion coat from
- yarn How to knit a product with knitting needles
- Models of knitted coats
Fashionable coats from yarn
Knitted coats have not been out of fashion for several decades. Changed the styles, color options, conducted bold experiments with accessories. But the idea of a knitted coat is relevant today, as well as 20-30 years ago. Many leading designers of famous fashion houses have long included in their collections knitted coats. This thing will be just an ideal addition to the wardrobe of the modern fashionista. Moreover, now there are many specialized shops where any girl can choose for herself yarn of any color, thickness and quality, as well as sets of all kinds of spokes and accessories( embroidery frame, buttons, various ornaments and much more).
The crocheted coat in English and French styles, which are very strict and glamorous, is invariably popular.
to the table of contents ^How to bind the product with knitting needles

You need to start with the choice of yarn. It is very important to first determine the thickness and thread and composition of yarn. For a knitted coat, take a thread with a higher density, so that the product reliably stores heat in the cold. It is better, if the composition of the chosen thread for a coat includes natural wool, which has high heat-insulating properties. Knitting with the knitting needles of a thick yarn is the best choice for a cold season.
If we talk about the texture of the product, then basically it is determined by the chosen pattern. For a product such as a coat, the variants with large pattern elements, such as braids or diamonds, are the best choice. Ethnic( folk) motives are also relevant today. However, first of all rely on your taste and sense of style - no matter what pattern you choose, it will look great and impressive thanks to exclusivity. It all depends on your imagination.
Knitting needles for crocheting a coat are better to choose straight, with a wider diameter. This will create a beautiful unique relief. Note that knitting needles are divided into 2 main types:
- straight( used for knitting individual garments, which will be assembled into a single product upon completion);
- circular( allow to knit in a circle, modeling a knitted cloth in a ready-made thing).
Materials for spokes are used the most diverse. Steel spokes are stronger than those made of aluminum or plastic. Aluminum too easily can bend - this can create inconvenience when knitting, and plastic are fragile. Needles should be primarily comfortable for the wizard. The advantage of using spokes is that the workpiece can be easily corrected by dissolving the unplayed or failed element. Schemes for knitting coats and creating patterns are contained in magazines devoted to hand-made technology, as well as on the Internet.
The coat consists of several separately connected elements:
- backrest;
- right shelf;
- left shelf;
- sleeves;
- pockets( optional).
Upon completion of work, the elements must be sprayed with water and allowed to dry on a flat surface. Such a method will allow the strands to form the desired shape. After the parts are completely dry, they need to be assembled into one. It is advisable to use the same thread that you knit for stitching - this is how the skilled craftsmen do.
For the selected coat for the Russian female 44 size you need about 1300-1400 grams of yarn of wool in color by your choice.
The elastic is worked out in a standard way: 2 face loops, two purlins( alternate)
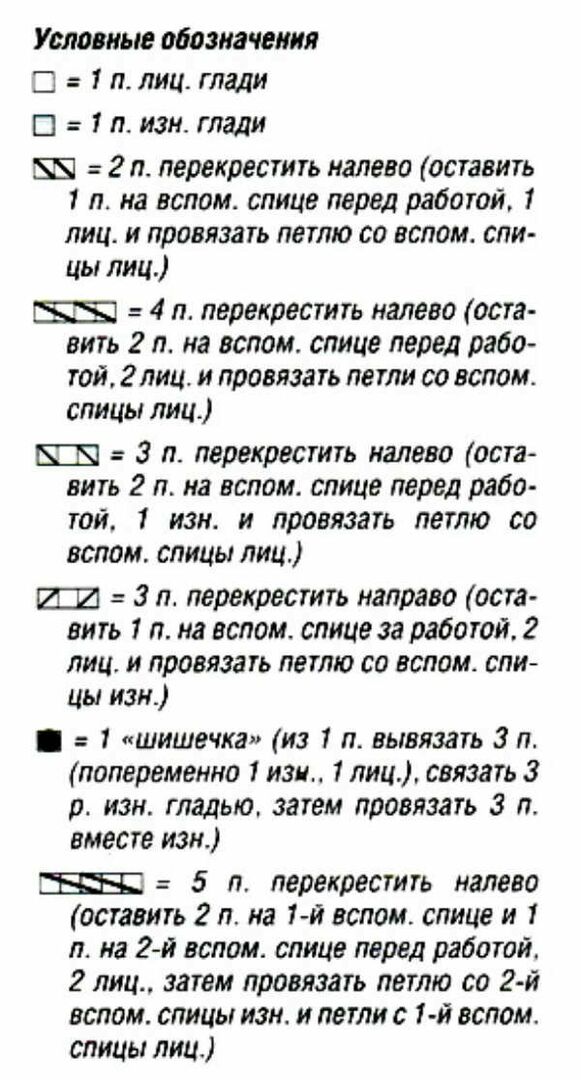
Note the scheme where the braids are indicated by the letters A, B, C, D, E.
Features of work on braids:
- A-braid. The width is 2 loops. Is matched according to the scheme. Make one time from the first to the second row, repeat from the third to the fourth;
- B-braid. The width is 12 loops. Is matched according to the scheme. Make one time from the first to the eighteenth row, repeat from the third to the eighteenth;
- St-Scythe. The width is 12 loops. Is matched according to the scheme. Make one time from the first to the eighteenth row, repeat from the third to the eighteenth;
- E-Scythe. The work is carried out as well as over the oblique C, except for the extreme loops;
- D-braid. The work is carried out as well as over the oblique B, except for the extreme loops.
For a pattern with rhombuses, needles No. 5.5( width 19 loops) are required. Is matched according to the scheme. Make one time from the first to the twenty-sixth row, repeat from the fifth to the twenty-sixth.
We pass to the main knitting needles No. 5.5 and work as follows:
- 4 purl loops, 2 braid curls A;
- 12 stitches of braid B, 2 braids of braid A;
- 12 stitches of the braid S. 2 braids of the braid A;
- 12 loops of braid B. 2 braids of braid A;
- 19 pattern loops with rhombuses.2 loop braids A, tie from * to * 1 times.
- 12 stitches of braid B. 2 braids of braid A. 4 loops of the inner surface / 3 loops of the inner surface, 2 loops of the braid A, 3 loops of the inner surface.* 2 braid loop A;
- 12 stitches of braid B, 2 braids of braid A;
- 12 loop braids C, 2 loops.braids A;
- 12 braid loops B, 2 braid loop A;
- 19 pattern loops with rhombuses, tie * to * 1 times.2 braids of braid A,
- 12 loops of braid B. 2 braids of braid A, 3 loops of purl hair.2 loop braids A, 3 loops of the inner surface of the hair / * 12 loops of the braid B. 2 loops of the braid A;
- 12 loops of the braid C. 2 braids of the braid A *, tied * to * 2 times;
- 19 pattern loops with rhombuses.2 braid loop A;
- 12 stitches of the braid C, 2 braids of the braid A, tie * to * 1 times;
- 12 stitches of braid B. 2 loops of the inner surface.* 2 braid loop A;
- 12 loops of braid B. 2 braids of braid A, 12 loops of braid C *.bind from * to * 2 times, 2 braid loops A,
- 19 pattern loops with rhombuses.2 braid loops A.
- 12 braid loops A. 12 twisters of braid B, 2 braids of braid A, 2 loops of the inner surface.
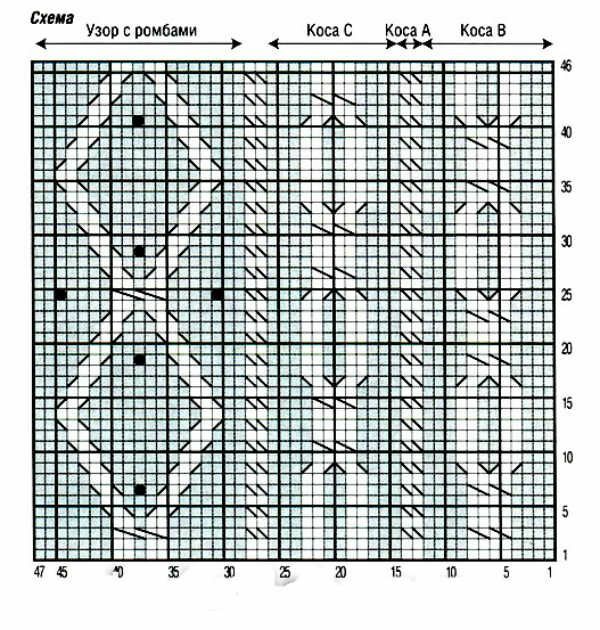
After the blank from the starting edge reaches 21 cm, it is necessary to reduce 16 loops from both edges, making 2 loops together, but not reducing in diamond patterns. There should be 107 loops.
After the blank from the starting edge reaches 37 cm, it is necessary to reduce 16 loops from both edges again, so that 91 loops remain.
When starting edge is 53 cm, start 16 even loops on both sides in order to increase their number 107.
When from the armhole there will be 20 cm it is necessary to close for the shoulder bevels on each side in each second row of 3 x 8 loops. The remaining 33 loops must be closed.
Working the right shelf begins with a set of 56 loops on the spokes number 4, 4 and tying 4 cm gum. Go to the main spokes number 5.5 and work as follows:
- 12 loops of braid B, 2 braids of braid A, 19 loops of pattern with rhombuses.2 braid loop A;
- 12 braid loops B. 2 braids of braid A, 4 loops of the inferior smoothness / 12 loops of braid B, 2 loops of braid A;
- 19 pattern loops with rhombuses, 2 braid curls A;
- 12 stitches of the braid B, 2 braids of the braid A. 3 loops of the inner surface, 2 loops of the braid A, 3 loops of the inner surface / 12 stitches of the spit C. 2 braids of the braid A;
- 19 loops of lozenges, 2 loops of braid A;
- 12 stitches of the spit C, 2 braids of the braid A, 12 stitches of the braid V / 12 stitches of the spit C. 2 braids of the spit A;
- 19 pattern loops with rhombuses, 2 braid curls A;
- 12 spit stitches C. 2 braids of braid A, 12 stitches of braid B, 2 braids of braid A, 2 loops of purlinae.
After the workpiece from the starting edge reaches 21 cm, it is necessary to remove 6 loops from both edges, making 2 loops together, but not reducing in diamond patterns. There should be 51 loops left.
When the starting edge is 37 cm, you need to do it again to make the number of loops 45.
After 53 cm, start adding 6 loops on both sides.
Shoulder bevel must be made 16 cm from the start of work on the armhole, closing the hinges on the right side in each second row.
The left shelf is worked by the same principle as the right one, only symmetrical to it.
For a sleeve to type on spokes № 4,5 54 loops. Work on this principle:
- 8 braid D loops, starting with 2 purl instead of 3 purl, * 2 loops.braids A;
- 10 loops of the braid E, 2 braids of the braid A, 10 loops of the spit D *.bind from * to * 2 times, while finishing one of the wrong ones instead of 3 purl;
- After 4 cm from the starting row, change the spokes No. 5.5;
- After 8 cm from the starting row, begin adding hinges on each side to form hose bevels in each 10 row of 4 x 1 loops and in each 8 row 3 x 1 loops, in each 8 row 6 x 1 loop and in each 6 row.3 x 1 loop, in every 6 row 11 x 1 loop and in each 6 row 9 x 1 loop, in each 4 row 3 x 1 loop;
When it's 12 cm from the starting edge, you need to make two rows in the garter stitch technique from the set row, then go back to the braids.
When the starting edge is 42 cm, you need to gradually close the rounds.
To work out two shelf-slats you need to type in knitting needles 4,5 4,5 loops, make 4 cm of elastic. Note that on some of the slats there should be places for buttons, and on the second - places for holes.
Among the latter, a collar is made. Need for him needles number 5.5.type 106 loops:
- 10 stitches of the spit D, 2 loops of the braid A, 10 loops of the spit E, 2 loops of the spit A *, make from * to * 4 times;
- 10 loops of braid D / * 10 loops of braid D, 2 loops of braid A. 10 loops of braid E. 2 loops of braid A *, make from * to * 4 times;
- 10 stitches of the D / 3 braid of the purl stitch.* 2 braids of braid A. 10 loops of braid D. 2 braids of braid A, 10 loops of braid E *.make from * to * 4 times;
- 2 braids of braid A, 10 loops of braid D, 2 loops of braid A, 3 loops of the inner surface / 3 loops of the inner surface, * 2 braids of braid A, 10 loops of braid D, 2 braids of braid A. 10 loops of braid E ', made from* up to * 4 times;
- 2 braids of braid A. 10 loops of braid D, 2 braids of braid A, 3 loops of purl hair.
When starting from the starting line 15 cm begin to close. The final detail of the collar - make the bar with knitting needles 4,5, creating 38 loops for rubber bands of 3 cm.
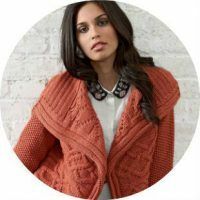
And here you have a new original outfit, a coat that no one else is guaranteed to have! Exclusive and trendy, cozy and warm - what you need a beautiful young lady!
to table of contents ^Models of knitted coats
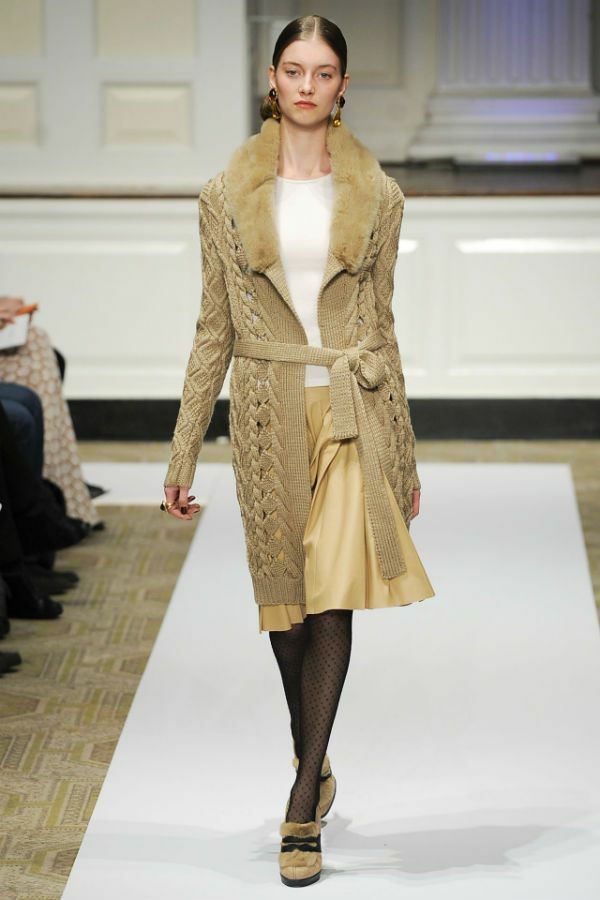


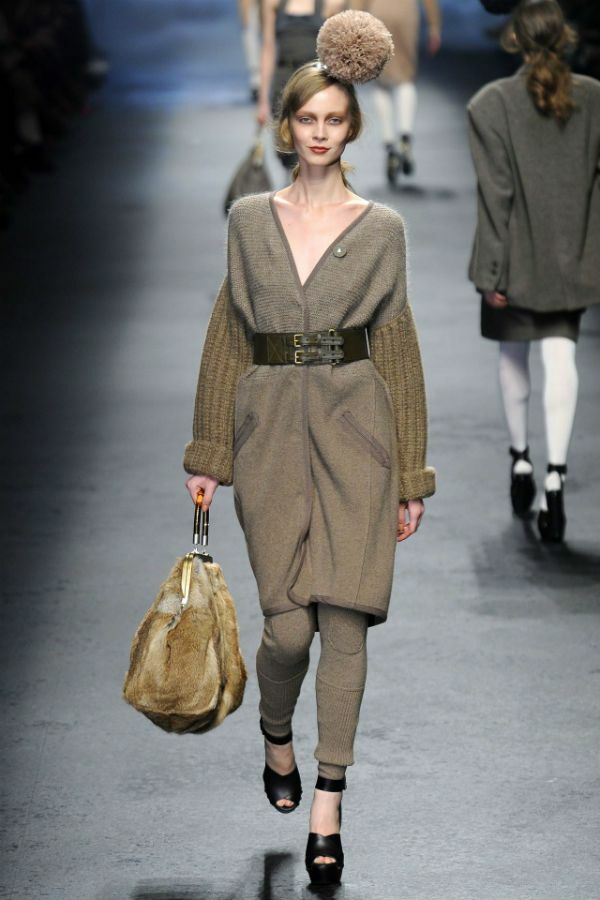
Having decided to tie a coat, many face such a problem as choosing an interesting style. Indeed, in fact, there are a great many models of coats: long( below the knee), shortened( to the middle of the thigh), with a traditional turn-down collar or unusual in the form of a clamp, with or without pockets - you can enumerate endlessly. Again, the issue of color choice is important. More extravagant ladies like bright colors - lilac, terracotta, bright blue and, of course, all shades of red! Practical girls will like beige, chocolate, steel and classic black colors. And by itself, that you can combine different threads, creating exclusive patterns and ornaments.
In addition, when working on a coat, it is not necessary to make it knitted completely. It can contain knitted items, be used as a basis or as a decoration.